
Installation Guide


Additional Items Needed:
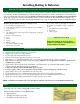
• 53 lbs Ready Mix Concrete or
Portland cement and sand
mix (described at right)
• 29” steel rebar (if creating bal-
usters for railing
• Mixing tool, (small shovel
or garden hoe)
• Lubricant or a mold release
Casting Baluster
General preparations
Using the Baluster
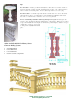
• Especially designed to be used with the History Stones Concrete Railing
System which includes rails and newel posts.
• You may use the baluster as a bird bath pedestal or as a pedestal for
concrete balls, finials or other art.
• The baluster is a good choice for a table base.
• Use your imagination and be sure you use thin set mortar to attach other
concrete pieces to your baluster for a stable and safe project (concrete is
heavy) Have Fun!
Included In Each History Baluster Kit:
Two half baluster molds, 16 bolts 16 nuts, Instruction Sheet
• Prepare the molds using a lubricant or a mold release.
This will help in removing the casting from the mold later and will ex-
tend the life of the mold itself. We recommend the use of any con-
crete release agent, cooking oil spray or WD40 lubricant (use spar-
ingly).
• The Mix is two parts sand and one part cement or pre mixed concrete
• Mix a small amount of water at a time until you achieve a consistency
that is well mixed, and is thick, not runny.
• Weight— baluster only 53 lbs.
Removing Casting
Important—Please Read
Artistic Home & Garden Co. will
not be held responsible for any
installation. All installations are
the responsibility of the installer.
• Once concrete is set, remove the bolts , carefully tilt the baluster flat to the ground taking care not
to rest heavy casting on edges of mold (best to remove on grass area, carpet, cardboard for softer
surface).
• Now unmold the castings by pulling and lifting on the ends of the mold.
• The concrete will continue to set up for 5 more days so be gentle with handling until it is fully cured.
• Clean the molds immediately after use and store them out of the sun.
• It is normal to have some air bubbles in the surface of your baluster which you can patch easily by
mixing a small batch of one part cement and one part sand and enough water to moisten. Apply
with a damp sponge to smooth over the area.
• If you are casting balusters for railing you must pre drill the baluster mold
in the bottom to accommodate the rebar to protrude from the bottom
and 1” above the rim.
• Place the mold assembly upright and begin filling the molds 4” at a time.
• Shake, bounce and tap the sides of your mold in between pouring to
spread the concrete and to help drive out air bubbles. You may use a 2”
x 2” piece of lumber to pack the mix in (do not use a sharp tool that can
scratch your mold — which will show on finished castings)
• Do not use pencil vibrator inside the mold. It will destroy the mold.
• Let molds set up in a dry place out of direct sun for 24 to 48 hours