
Parts List/Tune Up Info


REV A — 25 April, 2019
2
Technical Service Bulletin 190425
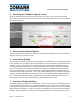
4. Checking the Feedback Signals Levels
Once the feedback signals are connected, the user can check, in the Exact Precorrections
Menu, that they are properly wired, synchronized, and that their power levels are in accordance
with the specications.
Fig. 2 Exact Precorrections screen
5. Connecting Feedback Signals
The only parameters that need to be set before launching the DAP are Crest Factor, Protection
Clipping, and Timer (Correction Time).
6. Crest Factor Setting
Since the Exact is performing a clever PAPR reduction, less destructive for the signal compared
to the amplier, the Crest Factor has to be reduced as much as possible by Exact instead of the
amplier. As a tool, the Crest Factor value monitored from the amplier feedback signal can
be used as a guide / starting point. Once the transmitter is at full power and before correction
is run for the rst time, the crest factor / PAPR can be read in the FBA Measurements section
of the Corrections page. This is the Crest Factor / PAPR that the Exact is measuring on the
transmitter output without correction. The recommended starting point is to set the Crest Factor
setting only about 1dB higher than the value which is monitored in the FBA Measurements sec-
tion. This should not be set to what you believe the Crest Factor / PAPR should be when you
are nished correcting or as referenced by any other measurement means.
7. Protection Clipping Setting
Protection Clipping is just what the name implies. It is the maximum level of PAPR allowed out
of the exciter when correction is run. Because the DAP corrector simply tries to make the feed-
back signal as close to perfect as possible it essentially knows no limits of how far it can stretch
peaks unless told otherwise. If this is not kept to a “reasonable” level it could result in amplier
damage. A good guideline is to keep this only about 3dB above the crest factor setting. Once