Instructions for use GB 15LD2200
Contents Remote Control Buttons ......................... 2 Teletext .................................................. 18 Control Panel Buttons ............................ 3 To Operate Teletext ............................ 18 To Select A Page Of Teletext ............... 18 To Select Index Page ......................... 19 To Select Teletext With A TV Programme ........................................ 19 To Select Double Height Text ............. 19 To Reveal Concealed Information ...
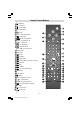
Remote Control Buttons = Stand By = Cursor Up = Cursor Right OK = Okay (Store) = Info 0 - 9 = Direct Programme = Image size =Previous Programme P/CH + = Programme Up + = Volume Up = TV / Quit Menu = External Source (AV-1, RGB1, AV-2, SVHS, PC) Yellow button Blue button = Hold = Update = Index Page = Reveal / PC = Switch from TV to PC = Expand = Mix = Teletext = Time / Subcode page Red button Green button = Mute I-II = Mono/Stereo - Dual I-II - = Volume Down - P/CH = Programme Down = Color temperature sett
Control Panel Buttons 0(18 32:(5 3 &K 0(18 3 &K 92/80( 63($.(5 ,1)5$5(' 5(&(,9(5 /(' )227 723 &29(5 -3(1*/,6+8.
Preparation Install Display on solid horizontal surface such as a table or desk. For ventilation, leave a space of at least 10 cm free all around the set. To prevent any fault and unsafe situations, please do not place any objects on top of the set. Installation of device on the wall (Wall Bracket Optional Extra) Step1: Invert the flat monitor screen and placed it on a flat surface. Remove the back support from the screen.
UV R K F Q D FL WV DO 3 V Z UHF V P P / [ P P ' WH NF DU E O D : V Z HU FV P P ' [ P P V Z HU VF P P / [ P P ' / 52 ,71 20 ' &/ (1*/,6+8.
Features Panel Features Remote controlled colour television. High resolution (1024 x 768), 15-inch TFT LCD display. 100 programmes from VHF, UHF bands or cable channels can be preset. Contrast ratio (400:1 typical) It can tune to cable channels. Brightness (typical) 430 cd/m2. Controlling the TV is very easy by its menu driven system. High-speed response time < 25 msec. It has an SCART socket for an external device (such as video, video games, audio set, etc.
1. Power Source any doubt about the installation of an extension lead, please consult a competent electrician. DONTs DONT continue to operate the equipment if you are in any doubt about it working normally, or if it is damaged in any way switch off, withdraw the mains plug and consult your dealer. DONT place water filled vessels on top of T.V. cabinets. DONT remove any fixed cover as this may expose dangerous voltages.
8. Servicing Please refer all servicing to qualified personnel. Do not remove cover as this may result in electric shock. 9. Naked Flame Sources Do not place naked flame sources on the apparatus. WARNING: When the device is not in use for a long time, disconnect from power. Instructions for waste disposal: Packaging and packaging aids are recyclable and should principally be recycled. Packaging materials, such as foil bag, must be kept away from children.
Inserting Batteries In The Remote Control Handset Before Switching On Your TV Power Connection Remove the battery cover located on the back of the handset by gently pulling upwards from the indicated part. Insert two AAA (R03) or equivalent type of batteries inside. Replace the battery cover. $& DGDSWHU 7R 32:(5 ,1387 '& 9 WHUPLQDO IMPORTANT: The TV set is designed to operate on 12 V DC. For this, an adaptor is used which gives 12V DC voltage.
To switch the TV off: If you want to cancel A.P.S. function, press the M button. Press the button on the remote control, so the TV will switch to stand-by mode and the GREEN LED will become RED, If OK button is pressed, A.P.S. starts and the following warning is displayed. $ 3 6 LV UXQQLQJ 3OHDVH :DLW or, Press the button located on the top of the TV, so the TV will switch off and the GREEN LED will turn off. NOTE: To switch the TV off completely remove the mains plug from the socket.
Volume Setting picture menu Press the + button to increase volume. button to decrease volume. Press the A volume level scale (slider) will be displayed on the screen. By pressing / button, select the first icon. Picture menu appears on the screen. SLFWXUH EULJKWQHVV FRQWUDVW ILOWHU VKDUSQHVV FRORXU VKDUS GRZQ IRU SLFWXUH VHWWLQJV brightness Programme Selecting (Previous or next programme) Press the - P/CH button to select the previous programme.
tint This item is displayed in picture menu when the TV receives an NTSC signal. By pressing / button, select tint. Press button to increase tint. Press button to decrease tint. Tint level can be adjusted between 0 and 100. SLFWXUH EULJKWQHVV FRQWUDVW ILOWHU VKDUSQHVV FRORXU WLQW VKDUS By pressing / button, select frequency. Press button to increase frequency. Press button to decrease frequency. Frequency level can be adjusted between 0 and 100.
extended audio features By pressing / button, select extended audio features. Press button to enter sub-menus. Extended audio features menu has the following sub-menus: feature menu By pressing / button, select the first icon. Feature menu appears on the screen. Press button to select the first frequency band. Press / button to select the other frequency bands. Selected band can be adjusted by pressing / button.
image size Press / button to select image size. By pressing / button, you can change image size to wide, auto and fill all. You can enter image size directly by pressing the button. position can be adjusted between 0 and 100. options menu By pressing / button, select the fourth icon. Options menu appears on the screen. colour temperature You can enter colour temperature directly by pressing "PP" button. This feature is used to change the colour temperature.
When off is selected, there will be no difference in the operation of your TV. When on is selected, the TV can only be controlled by the remote control handset. In this case the control panel buttons except " the top of the TV will not work.
store Press / button to select store. By pressing button, you can store the program settings. You can also store a setting by pressing OK button on the selected setting. STORED is displayed on screen when a program is stored. frequency By pressing / button, select frequency. Press button to select the first digit and digit buttons on remote control to enter the frequency you want. After the frequency is adjusted, press button to exit.
If you want to cancel A.P.S. function, press the M button. If OK button is pressed, A.P.S. starts and the following warning is displayed. $ 3 6 LV UXQQLQJ 3OHDVH :DLW Other Features TV Status Programme Number, Programme Name and Sound Indicator are displayed on screen after programme change for 3 seconds. 3 35 0! WR H[LW If you press the M button, A.P.S. function stops and Program table appears on the screen. If you wait till A.P.S.
Sound Indicator Teletext I-II button is used to select Mono, Stereo, Dual I or Dual II. 0RQR Teletext is an information system that displays text on your TV screen. Using the Teletext information system you can view a page of information on a subject that is available in the list of contents (index). 6WHUHR On screen display is not available in text mode. In Mono broadcast or in forced-mono (for stereo broadcast). In Stereo broadcast. 'XDO , If dual broadcast detected.
Press the P/CH + button to move the Teletext screen forward one page at a time. Press the - P/CH button to move the Teletext screen backward one page at a time. To Select Index Page To Select A Subcode Page Subcode pages are subsections of long Teletext pages that can only be displayed on the screen one section at a time. Select the required Teletext page. To select the page number of the index (generally page 100), press the button.
To Display The Time Via Aerial Input While watching a TV programme with Tele button. text transmission press the The current time information, captured from Teletext will be displayed on the screen. If you want to connect to your TV, peripherals like video recorders or decoders, but the device you want to connect does not have Scart, you should connect it to the Aerial input of the TV. If the programme being watched does not have Teletext transmission, no information will be displayed.
Peripheral Equipment Connections $ % & ' ( )*+ , $ $(5,$/ % '& 9 & 6 9,'(2 ,1387 ' 9,'(2 ,1387 ( $8',2 ,1387 5 ) $8',2 ,1387 / $9 - 21 (1*/,6+8.LQFK3L[HO:RUNV0%6$0:0S * + , . - . /,1( 287 5 /,1( 287 / +($'3+21( 6&$57 62&.
Aerial Connections 2XWGRRU $HULDO &RQQHFWLRQV 9+) $HULDO 5RXQG RKP FRD[LDO FDEOH : 9+) 8+) 5HDU RI 79 Connect Peripheral Equipment HEADPHONE AUDIO $8',2 ,1 / 9,'(2 ,1 5 VIDEO ,1 ,1 $17 ,1 '%1'36()6 FOR SATELLITE RECEIVER DECODER $HULDO - 22 (1*/,6+8.
Search For And Store The Test Signal Of The Video Recorder Connect The Decoder To The Video Recorder Unplug the aerial cable from the aerial socket Aerial of your video recorder. Some video recorders have a special SCART socket for decoder. Switch on your TV and put the video recorder on the test signal. (See the booklet for your video recorder.) Connect a SCART lead to the SCART socket of your decoder and to the special SCART socket of your video recorder.
PC INPUT TYPICAL DISPLAY MODES The display has a maximum resolution of 1024 x 768, vertical sync. frequency range of 50-72 Hz and a horizontal sync. frequency range of 30-57 KHz. The following table is an illustration of some of the typical video display modes.
Sound Tips You can not hear any sound. Did you per- Care Of The Screen Clean the screen with a slightly damp, soft cloth. Do not use abrasive solvents as they may damage the TV screen coating layer. Poor Picture Have you selected the correct TV system? Is your TV set or house aerial located too close to the loudspeakers, non-earthed audio equipment or neon lights, etc.? Mountains or high buildings can cause double pictures or ghost images.
Specifications TV BROADCASTING PAL SECAM B/G D/K K I/I L/L RECEIVING CHANNELS VHF (BAND I/III) UHF (BAND U) HYPERBAND CABLE TV (S1-S20/ S21-S41) NUMBER OF PRESET CHANNELS 100 CHANNEL INDICATOR On Screen Display RF AERIAL INPUT 75 Ohm (unbalanced) OPERATING VOLTAGE 220-240 V AC, 50 Hz. AUDIO Nicam Stereo AUDIO OUTPUT POWER (WRMS.) (%10 THD) 2x3 POWER CONSUMPTION (W) (max.) 38 W < 3 W (Stand-by) PANEL 4:3 display, 15 Screen Size Dimensions (WxHxD) W 462 mm. H 355 mm. with stand D 170 mm.
UK Guarantee Your Guarantee of Excellence Thank you for purchasing this Hitachi Television.
Important Instruction For your own safety read following instruction carefully before attempting to connect this unit to the mains supply.
Hitachi Ltd. Consumer Business Group Shin-Otemachi Bldg 5f, 2-1, Otemachi 2-Chome, Chiyoda-Ku, Tokyo 100-0004 Japan HITACHI EUROPE GmbH Munich Office Dornacher Strasse 3 D-85622 Feldkirchen bei München GERMANY Tel: 089-991 80-0 Fax: 089 - 991 80 -224 Hotline: 0180 - 551 25 51 (12ct/min.) Email: HSE-DUS.Service@Hitachi-eu.com HITACHI EUROPE S.r.l. Via T. Gulli n.39 20147 MILAN ITALY Tel: 02 487861 Fax: 02 48786381 Servizio Clienti Tel. 02 38073415 Email: customerservice.italy@hitachi-eu.