OWNER’S GUIDE Model: 22C31 22” Class (21.53” Diag.) Serial No. CONGRATULATIONS Thank you for purchasing this Hitachi product. Please read these instructions carefully. For additional assistance please call Toll Free 800.HITACHI (800.448.2244) or visit our website at www.hitachi.us/tv. Keep this Owner’s Guide for future reference. Record the model name and serial number of your LCD Television for future reference. This information is located on the back of the television.
CAUTION: TO REDUCE THE RISK OF ELEC- TRIC SHOCK, DO NOT REMOVE COVER (OR BACK). NO USER SERVICEABLE PARTS INSIDE. REFER SERVICING TO QUALIFIED SERVICE PERSONNEL. WARNING: The lightning flash with arrowhead symbol, within an equilateral triangle is intended to alert the user to the presence of uninsulated dangerous voltage within the product's enclosure that may be of sufficient magnitude to constitute a risk of electric shock.
Location of the required Marking The rating sheet and the safety caution are on the rear of the unit. ELECTRONIC RECYCLING Dispose of this product in accordance with applicable environmental laws. For electronic waste recycling and collection information visit our website at www.hitachi.us/tv and click on the Service & Solutions tab or call 800-HITACHI. This equipment is a Class II or double insulated electrical appliance.
IMPORTANT SAFETY INSTRUCTIONS (continued) 17) Do not overload wall outlets and extension cords, as this can result in a risk of fire or electric shock. 18) Do not push objects through any openings in this unit, as they may touch dangerous voltage points or short out parts that could result in fire or electric shock. Never spill or spray any type of liquid into the unit.
IMPORTANT SAFETY INSTRUCTIONS (continued) Possible Adverse Effects on LCD Panel: If a fixed (non-moving) pattern remains on the LCD Panel for long periods of time, the image can become permanently engrained in the LCD Panel and cause subtle but permanent ghost images. This type of damage is NOT COVERED BY YOUR WARRANTY.
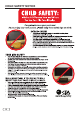
Child Safety Notice 6
SAFETY PRECAUTIONS The unit emits heat when in operation. Do not place any covers or blankets on the unit, this may cause overheating. Do not block ventilation holes, or set up near radiators. Do not place in direct sunlight. When placing on a shelf leave 4 inches (10 cm) free space around the entire unit. 4 inches 4 inches Y(VIDEO) Securing to a Wall 1 Use metallic wire, screw and clamp (not provided) on the rear of the TV as shown below.
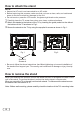
How to attach the stand NOTE: • Assure the AC cord is not connected to an AC outlet. • Before beginning this process, make sure that you have a clean, safe, and cushioned space to work at to avoid any damage to the unit. • Do not touch or press the LCD screen, the glass might break under pressure. 1 Carefully place the TV screen face-down on a clean, cushioned surface. 2 Attach the stands to the bottom of the TV by inserting the guide posts into the slits at the bottom of the TV as shown in Fig.1.
Contents Before using your unit IMPORTANT SAFETY INSTRUCTIONS ����������������������������������������������������������������� 3 CHILD SAFETY NOTICE......................................................................................... 6 SAFETY PRECAUTIONS........................................................................................ 7 How to attach the stand........................................................................................... 8 How to remove the stand......................
Features HDTV Unique space saving design in a 22” class TV. Picture Performance • Long Life LED Backlight • Super Clear Anti-Glare Screen Convenience • USB Input (JPEG Photo Viewer, Software Updates) • Sleep Timer (10-240 min) Audio Performance • Dolby® Digital • MTS Stereo/SAP This Television receiver will display television closed captioning, ( provides text-to-speech, in accordance with FCC rules.
Location of controls A Front Control Key CENTER button: - Short Press Power ON the TV / Input - Long Press to Power Off A Control Keys Remote sensor Power Indicator Red : Standby B Rear HEADPHONE USB INPUT AIR/CABLE IN HEADPHONE out R L VIDEO VGA HDMI B COAXIAL IR/ RF USB Right side AUDIO IN VIDEO IN PC IN HDMI DIGITAL AUDIO OUT (COAXIAL) 11
Remote control INPUT TV GUIDE HDMI AV PC CC AUDIO SLEEP INFO S.MODE P.MODE CH LIST MENU SELECT FAV LAST CH MUTE ENTER 12 POWER Button - Press to turn the TV’s power on/off. INPUT Button - Press to change the TV’s input. COLOR Buttons - Available for use in the Channel List and Program Guide. The OSD will display guidance for these buttons when they are available. TV Button - Press to directly access the TV input. HDMI Button - Press to directly access the HDMI input.
Remote control HOW TO INSTALL BATTERIES (continued) 1. Open the battery compartment cover. 2. Install two “AAA” batteries (supplied). 3. Replace the battery compartment cover BATTERY PRECAUTIONS These precautions should be followed when using batteries in this device: • The batteries may last approximately one year depending on how much the remote control is used. Replace batteries when the remote operation becomes erratic. • Use only the size and type of batteries specified.
Antenna connections If you are using an indoor or outdoor antenna, follow the instructions below that correspond to your antenna system. If you are using a Cable TV service, see Cable TV connections. Combination VHF/UHF Antenna (Single 75 ohm cable) Connect the 75 ohm cable from the combination VHF/UHF antenna to the Antenna Jack. 75 ohm Coaxial Cable Antenna Jack Cable TV connections This TV has an extended tuning range and can tune most cable channels without using a Cable TV Converter box.
Starting setup The Setup Wizard appears the first time you turn on the TV, and assists you to specify the Air/Cable setting, and program your channels automatically. IMPORTANT: Make sure that the antenna or cable TV system connection is made. turn on the TV, press POWER. (It may take approx. 10 seconds for a picture to appear on 1 To screen.) The Initial Setup Wizard begins. Press ◀ or ▶ to select your menu language, then press ▼ or SELECT. 2 Press ▶ or SELECT to go to the next step.
TV operation turn on the TV, press POWER. (POWER indicator on the front of the unit changes blue. It 1 To may take approx.10 seconds for a picture to appear on screen.) the volume level by pressing VOL (VOLUME) + or – . The volume level will be 2 Adjust indicated on the screen by a volume bar. If the volume increases, the number of bars also increases. If the volume decreases, the number of bars also decreases. 3 Set the Source option to the appropriate selection (see “Air/Cable selection” on page 23).
TV operation To select the Audio/Video input source (continued) To view a signal from another device connected to your TV, such as a Blu-ray player, press INPUT, then press ▲ or ▼ to select the desired input, then press SELECT. CH / Press and release CH / . The TV automatically stops at the next channel. For proper operation, before selecting channels, they should be set into the memory. See “Channels setup” on page 23. INFO Press INFO to display the current information on the screen.
Quick guide for menu operation Example: Select Menu Language. 1 2 3 4 5 Press INPUT to select TV mode. Press MENU. The TV menu screen will appear. Press ◀ or ▶ to select “Setup”, then press ▼. Press ▲ or ▼ to select “Menu Language”, then press SELECT and select the desired language. Press EXIT to return to the normal screen. NOTE: • On the following pages, the menu can be called in the same way described above, by pressing the MENU button.
Convenience functions You can change the default settings by pressing the MENU button on your remote, then select one of the icons at the top of the menu - follow the On-Screen prompts to set your preferences. Icon Video Selected Items Picture Mode Standard Dynamic Movie Eco Custom Contrast Brightness Color Sharpness Tint Color Temperature Setup Hint Standard picture quality. Bright and dynamic picture. Soft edge picture setting. Reduced brigtness, saves energy. Your personal preferences.
Convenience functions Icon Audio Selected Items Sound Mode Standard / Music / Movie/ Sports Custom Treble / Bass / Balance Perfect Volume Off / On Surround Sound Off / On Digital Output RAW / PCM MTS Stereo / SAP / Mono Audio Language English / French / Español 20 (continued) Setup hint You can choose a basic equalizer mode. Depending on this setting, the EQ settings are set to the pre-defined values of each mode. The setting of this item adjusts the audio level.
Convenience functions Icon Time Selected Items (continued) Setup hint Sleep Timer Sleep Timer switches the TV to standby after a Off / 10 / 20 / 30 / 60 / 90 / defined period of time. To cancel the Sleep Timer, set to “Off”. 120 / 180 / 240 min Daylight Savings Off / On Time Format 12-hour / 24-hour Time Zone Time Mode Manual / Auto Time If you want to activate Daylight Saving Time, select “On”. Select the time format.. Select your local time zone for auto clock feature.
Convenience functions Icon Setup Selected Items Menu Language English / French / Español Closed Captions Setup Wizard HDMI - CEC CEC Enable ARC Device List Voice Guidance Voice Guidance Volume Speed Pitch Reset No / Yes Software Update (USB) Lock Channels 22 (continued) Setup hint You can choose from three different languages (English, Français (French) and Español (Spanish)) for the on-screen displays. Select the language you prefer first, then proceed with the other menu options. See page 28.
Channels setup This TV is equipped with a Channel List feature which allows channels to skip up or down to the next channel set into the Channel List, skipping over unwanted channels. Before selecting channels, they must be scanned into the TV’s Channel List. Auto Channel Scan “Channels” ⇒ “Auto Channel Scan”, 1 Select then press SELECT. Air/Cable selection 1 Select “Channels” ⇒ “Source”. 2 Press ◀ or ▶ to select “Air” or “Cable”.
Channel Manager You can select the channel that you want to add to favorite. 1 Select “Channels” ⇒ “Favorite Channels”, then press SELECT. 2 Press ▲ or ▼ to select the channel that you want to add. SELECT to assign 3 mark for 3 Press wanted channel. 4 Repeat steps 2 - 3 for other channels you want for Favorite. You can also select the channel that you want to skip. Labeling channels Channel labels appear with the channel number display each time you turn on the TV, select a channel, or press DISPLAY.
Setting the Parental Control An age limitation can be set to restrict children from viewing or hearing violent scenes or pictures that you may choose to exclude. The restriction applies to “US” TV/ Movie Ratings and “Canada” English/French Ratings if this data is transmitted. You may set this restriction separately. To use the Parental Control function, you must register a password. To enter a password 1 Select “Lock”, then press SELECT to enter password.
Movie: Off G PG PG-13 R NC-17 X : None : All ages : parental guidance : parental guidance less than 13 years old : under 17 years old parental guidance suggested : 17 years old and above : adult only Canadian rating systems 1 In the Locks menu, press ▲ or ▼ to select “Parental Control” then press SELECT to set to “On”. 2 Press ▲ or ▼ to select “Canada Rating”, then press SELECT. 3 Press ▲ or ▼ to select “English” or “French”, then press ▲ or ▼ to select desired rating.
NOTE: 16ans+ : Over 16 years: Could contain • The TV can download an additional rating frequent violent scenes and intense system only when receiving a digital signal violence. that carries the Region 5 rating information. 18ans+ : Over 18 years. Only for adult • When you download the additional rating viewing. Could contain frequent system, it may take some time for the violent scenes and extreme violence. download to occur.
Closed Caption WHAT IS CLOSED CAPTIONING? This television has the capability to decode and display Closed Captioned television programs. Closed Captioning will display text on the screen for hearing impaired viewers. Captions: This Closed Caption mode will display text on the screen in English or another language. Generally, Closed Captions in English are transmitted on CC1 and Closed Captions in other languages are transmitted on CC2.
CC options When you have selected “Custom” as the display method, you can adjust the various setting listed below. This feature is designed to customize Digital Caption only. 1 2 3 4 5 Select “Setup” ⇒ “Closed Captions”, then press SELECT. Press ◀ or ▶ to set “Caption Display” to “Off” or “On”. Select “Digital CC Options”, then press SELECT. Press ◀ or ▶ to set the “MODE” to “Custom”. Press ▲ or ▼ to select the desired item, then press ◀ or ▶ to change the setting.
Aspect Switching You can change the picture size being displayed — Normal, Wide, Auto mode (TV input), or Just Scan (HDMI inputs). Selecting the picture size 1 2 Press ASPECT on the remote control. Repeatedly press ASPECT to select the desired aspect ratio, as described below. NOTE: • Selectable aspect ratios may vary depending on the input source or broadcast signal. Normal In some cases, the image will display the size of standard 4:3 with black side bars.
JPEG Viewer You can enjoy viewing pictures from your USB storage device. 1 2 Connect the USB storage device into the USB Input terminal. Press INPUT and press ▲ or ▼ to select “USB”, then press SELECT. NOTE: • Do not disconnect a USB storage device while it is being accessed. Doing so can damage the device or the files stored on the device. You can safely connect or disconnect the USB storage device when the TV is not in USB mode.
Connections to other equipment To connect the TV to a HDMI device to the TV The HDMI input receives digital audio and video from an HDMI device. To HDMI IN HDMI cable (not supplied) To HDMI output HDMI device Note: • HDMI input audio does not support DTS audio. The exact arrangement you use to interconnect various video and audio components to this TV is dependent on the model and features of each equipment.
Connections to other equipment (continued) Using an AV Amplifier with built-in digital surround If you are using an AV Amplifier with built-in digital surround sound, you can enjoy broadcast or cable programs that provide Dolby Digital sound. Connect an AV amplifier with built-in Dolby Digital decoder, etc. as shown below.
Reception disturbances IGNITION NOISE: Black spots or horizontal streaks may appear, picture may flutter or drift. Usually caused by interference from automobile ignition systems, neon lamps, electrical drills, and other electrical appliances. GHOSTS: Ghosts are caused by the television signal following two paths. One is the direct path and the other is reflected from tall buildings, hills or some other objects. Changing the direction or position of the antenna may improve reception.
Troubleshooting Use the following checklist for troubleshooting if you have problems with your TV. Consult your local dealer or service outlet if problems persist. Be sure all connections are properly made when using with other units. SYMPTOMS POSSIBLE SOLUTIONS TV does not operate. • • • • Make sure the power cord is plugged in. Try another AC outlet. Power is off, check fuse or circuit breaker. Unplug unit for an hour, then plug it back in. Poor sound or no sound.
Troubleshooting SYMPTOMS (continued) POSSIBLE SOLUTIONS No CATV reception. • Check all Cable TV connections. • Set Source menu option to the Cable mode. • Station or Cable TV system problems, try another station. Horizontal or diagonal bars on screen. • Check antenna connections, adjust or re-direct antenna. • Check for sources of possible interference. No reception above channel 13. • Make sure the appropriate Source (Air or Cable) has been selected.
Specifications Model Panel size Display method Number of Pixels Broadcasting system Receiving channels Tuner type Inputs Outputs 22C31 22” class 21.53” diagonal (546.87mm) Transmission TFT color LCD panel 1920(H) × 1080(V) US system M ATSC standard (8VSB), QAM 2-13 • Digital Terrestrial Broadcast(8VSB): 2-69 VHF UHF 14-69 • Digital Cable (QAM): 1-135 CATV 14-36 (A)-(W) 37-59 (AA)-(WW) 60-85 (AAA)-(ZZZ) 86-94 (86)-(94) 95-99 (A-5)-(A-1) 100-135 (100)-(135) 01 (4A) Frequency synthesized 1.
800.HITACHI (800.448.2244) Monday ~ Friday 9:00 am - 6:00 pm EST www.hitachi.us/tv HITACHI AMERICA, LTD., DIGITAL SOLUTIONS DIVISION HITACHI has made every effort to assure you enjoy trouble free operation from your Hitachi product. Should you require service assistance with OPERATIONAL, HOOK UP, TECHNICAL ASSISTANCE OR WARRANTY SERVICE SUPPORT, please contact one of our knowledgeable Customer Service Advocates at 800.HITACHI (800.448.2244).
Congratulations on your purchase of a new Hitachi display product! LIMITED WARRANTY: Hitachi America, Ltd. warrants this Hitachi display product (the “Product”) in accordance with the following terms and conditions: Limited Parts and Labor Warranty: The Product is warranted to be free from defects in materials and workmanship beginning on the date of purchase by the original end user purchaser (the “Purchaser”) and continuing for the duration of the applicable time periods specified below.
Memo ............................................................................................................ ............................................................................................................ ............................................................................................................ ............................................................................................................ ......................................................................