36" PC READY COLOR TV 36SDX88B OPERATING GUIDE IMPORTANT SAFEGUARDS FIRST TIME USE SET UP Set Up CUSTOM VIDEO Custom AUDIO THEATER 2-5 6-20 THE REMOTE CONTROL 21-31 ULTRATEC ON-SCREEN DISPLAY 32-59 USING THE PC READY COLOR TV AS A PC MONITOR 60-70 PLUG AND PLAY TRADEMARK ACKNOWLEDGMENT REGULATORY INFORMATION USEFUL INFORMATION SERVICE HOTLINE FEATURE INFORMATION 71-79 INFO Set Up
IMPORTANT Follow all warnings and instructions marked on this PC ready color television receiver. The lightning flash with arrowhead symbol, within an equilateral triangle, is intended to alert the user to the presence of uninsulated dangerous voltage within the product s enclosure that may be of a sufficient magnitude to constitute a risk of electric shock to persons. CAUTION RISK OF ELECTRIC SHOCK DO NOT OPEN CAUTION: TO REDUCE THE RISK OF ELECTRIC SHOCK, DO NOT REMOVE COVER (OR BACK).
IMPORTANT IMPORTANT SAFEGUARDS CAUTION: ¥ Read all of these instructions. ¥ Save these instructions for later use. ¥ Follow all warnings and instructions marked on the PC ready color television receiver. SAFETY POINTS YOU SHOULD KNOW ABOUT YOUR HITACHI PC READY COLOR TELEVISION RECEIVER Our reputation has been built on the quality, performance, and ease of service of HITACHI PC ready color television receivers. Safety is also foremost in our minds in the design of these units.
IMPORTANT PROTECTION AND LOCATION OF YOUR SET 16-1. If an outside antenna is connected to the PC ready color television set, be sure the antenna system is grounded so as to provide some protection against voltage surges and built up static charges, Section 810 of the National Electrical Code, NFPA No.
PICTURE CAUTIONS WARNING Continuous On-Screen Displays such as video games, stock market quotations, computer generated graphics, and other fixed (non-moving) patterns can cause permanent damage to PC Ready Color Television Receivers. Such PATTERN BURNS constitute misuse and are NOT COVERED by your HITACHI Factory Warranty. This PC ready color television receiver was intended mainly for the private viewing of programs broadcast by TV stations, cable companies, and programs from other video sources.
ACCESSORIES Check that you have the following accessories before disposing of the packing material. 1. Remote Control Unit. 2. Two AA size, 1.5V batteries (For Remote Control Unit). For information regarding how to obtain these accessories, please call TOLL FREE 1-800-448-2244 for your nearest HITACHI Authorized Parts Distributor in the continental United States. For Alaska please contact your nearest HITACHI regional office. PART NAME PART NO.
REMOTE CONTROL BATTERY INSTALLATION AND REPLACEMENT 1. Open the battery cover of the remote control by pushing the notched part of the cover with your fingers. 2. Insert two new AA size batteries in the remote. When replacing old batteries, push them towards the springs and lift them out. 3. Match the batteries to the (+) and (-) marks in the battery compartment. 4. Replace the cover. BOTTOM VIEW SUM-3.AA IECR6.1.5V SUM-3.AA IECR6.1.5V Lift up on tab to remove back cover. CAUTIONS 1.
HOW TO SET UP YOUR NEW HITACHI PC READY COLOR TV ANTENNA Unless your PC ready color TV is connected to a cable TV system or to a centralized antenna system, a good outdoor color TV antenna is recommended for best performance. However, if you are located in an exceptionally good signal area that is free from interference and multiple image ghosts, an indoor antenna may be sufficient. LOCATION Select an area where sunlight or bright indoor illumination will not fall directly on the picture screen.
HOOKUP CABLES Most video/audio connections between components can be made with shielded video and audio cables that have phono connectors. For best performance, video cables should use 75-Ohm coaxial shielded wire. Cables can be purchased from most stores that sell audio/video products. Below are illustrations and names of common connectors. Before purchasing any cables, be sure of the output and input connector types required by the various components and the length of each cable.
HOOKUP CABLES AND CONNECTORS ANTENNA CONNECTIONS These sets are equipped with one VHF/UHF antenna terminal. The VHF/UHF terminal can be used for normal TV, cable TV (CATV), a TV game, etc. 1. VHF (75-Ohm) antenna/CATV 3. are connected connected 3.
FRONT PANEL CONTROLS FRONT VIEW DIGITITAL Input Menu - Vol + - CH + Power Exit PiPC SVGA Input Button Volume Buttons Channel Buttons Power Button INPUT MENU MENU - VOL + - CH + OPEN DOOR OPEN DOOR POWER EXIT EXIT PiPC SVGA CURSOR LED PC MOUSE INFRARED SENSOR INPUT INPUT 3 3 PC RGB INPUT 2 S-VIDEO VIDEO L/MONO R AUDIO PC RGB Input 2 S-Video A detailed explanation of the circled numbers is on page 12.
FRONT PANEL CONTROLS INPUT Button Press this button to select the antenna, VIDEO, or PC: RGB Input. Your selection is shown at the top right corner of the screen. NOTE: S-Video input takes priority over Video input. VOLUME Buttons Press these buttons for your desired sound level. The volume level will be displayed on the PC ready color TV screen. CHANNEL Buttons Press these buttons until the desired channel appears at the top right corner of the PC ready color TV screen.
REAR PANEL JACKS REAR VIEW PC RGB INPUT 1 VHF/UHF R-AUDIO - (MONO) / L R-AUDIO - (MONO) / L VIDEO P B /C B PC CONTROL S-VIDEO VIDEO S-VIDEO COMPONENT VIDEO P R /C R INPUT 2 AUDIO TO HI FI L Y MONITOR OUT R-AUDIO - (MONO) / L PC AUDIO INPUT INPUT 1 R VIDEO Antenna Inputs The VHF/UHF terminal can be used for normal TV, cable TV (CATV), a video game, etc. Audio/Video Inputs 1,2 The INPUT button will step through each signal source input each time it is pressed.
REAR PANEL JACKS TIPS ON REAR PANEL CONNECTIONS IMPORTANT: TURN OFF THE TV/PC MONITOR AND THE PC BEFORE CONNECTING OR DISCONNECTING ANY CABLES. The S-Video connection is provided for high performance laserdisc players, VCRs etc., that have this feature. Use this connection in place of the standard video connection if your device has this feature. If your device has only one audio output (mono sound), connect it to the left audio jack on the PC ready color TV.
REAR PANEL CONNECTIONS Outside antenna or cable TV coaxial cable 2-Way signal splitter PC RGB INPUT 1 VHF/UHF 2-Way signal splitter R - AUDIO - (MONO) / L VIDEO R - AUDIO - (MONO) / L VIDEO P B /CB AUDIO TO HI FI COMPONENT VIDEO Y PC CONTROL S-VIDEO S-VIDEO P R /C R INPUT 2 MONITOR OUT R - AUDIO - (MONO) / L PC AUDIO INPUT INPUT 1 L R VIDEO INPUT 2 L and R Optional, see tips on page 14 INPUT V L R Optional, see tips on page 14 VCR #2 ANT IN S-VIDEO V L R Y S-VIDEO V L R
CONNECTING EXTERNAL AUDIO AMPLIFIER To control the audio level of an external audio amplifier with the remote control, connect the system as shown below. (REAR OF PC READY COLOR TV SET) NOTE: AUDIO TO To prevent damage to the speaker and distorted sound, set the volume control of the audio amplifier lower and adjust the sound using the remote control of the PC ready color TV set.
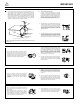
CONNECTING EXTERNAL VIDEO SOURCES The exact arrangement you use to connect the VCR, camcorder, and laserdisc player to your TV set is dependent on the model and features of each component. Check the owner s manual of each component for the location of video and audio inputs and outputs. The following connection diagrams are offered as suggestions. However, you may need to modify them to accommodate your particular assortment of components and features.
CONNECTING EXTERNAL VIDEO SOURCES CONNECTING STEREO VCR OR STEREO LASERDISC PLAYER 1. Connect the cable from the VIDEO OUT of the VCR or the laserdisc player to the INPUT (VIDEO) jack on the PC ready color TV. 2. Connect the cable from the AUDIO OUT R of the VCR or the laserdisc player to the INPUT(AUDIO/R) jack. 3. Connect the cable from the AUDIO OUT L of the VCR or the laserdisc player to the INPUT(AUDIO/L) jack. 4. Press the INPUT button to view the program from the VCR or laserdisc player.
CONNECTING EXTERNAL VIDEO SOURCES CONNECTING A STEREO LASERDISC PLAYER OR DVD PLAYER TO INPUT 2. 1. Connect the cable from the Y OUT of the Laserdisc or the DVD player to the INPUT 2 (Y) jack as shown on the PC color ready TV set below. 2. Connect the cable from the PB/CB OUT or B-Y OUT of the Laserdisc or the DVD player or SET-TOP BOX to the INPUT 2 (PB/CB) jack, as shown on the PC ready color TV set below. 3.
AUDIO SYSTEM SETUP Match the numbers below to the diagrams for speaker placement and refer to the table for the different surround sound requirements.. (See page 54 to 56 for SRS and BBE functions.) The PC ready color television s internal speakers. These speakers are connected to a separate audio amplifier. Use the Audio to HI-FI output on the PC ready color TV.
HOW TO USE THE REMOTE TO CONTROL YOUR TV A detailed explanation of the circled numbers follows on page 22 to 24.
HOW TO USE THE REMOTE TO CONTROL YOUR TV TV POWER Button Press this button to turn the PC ready color TV set on or off. TV/CABLE /VCR Button Press these buttons to control your PC ready color TV, cable/satellite or VCR. See remote control programming section for detailed explanation. HELP Button Press to display On-Screen Display help messages. (TV Mode Only) PiPC Button Press this button to go to PinPC PC mode.
HOW TO USE THE REMOTE TO CONTROL YOUR TV MENU, EXIT and CURSOR Buttons All On-Screen Display features can be set or adjusted by using these buttons. The MENU button will start the On-Screen Display. The EXIT button will quit the On-Screen Display. The CURSOR button will highlight functions or adjust and set different features. Pressing the cursor buttons will also give you access to the FAMILY FAVORITES CHANNELS On-Screen Display.
HOW TO USE THE REMOTE TO CONTROL YOUR TV INPUT Button The INPUT button will select between the antenna signal, the video input jacks and PC input, each time the button is pressed. 10 RUV VIDEO:1 INPUT Y-CBCR INPUT INPUT INPUT PC: RGB1 S IN:3 INPUT SLEEP Button Press this button to display the SLEEP TIMER in the lower left corner of the screen. Every subsequent press of this button will add 15 minutes to the timer, up to a maximum of three hours.
PICTURE-IN-PC Your PC ready color TV incorporates PinPC technology designed for improved viewing enjoyment. The Picture-in-PC feature is convenient when you want to watch a program. You can watch your PC operation while viewing other programs from Antenna, Video and component input sources. PC input sources can only be viewed as a main pictures. Antenna, Video and component inputs can be viewed as the sub-picture.
PICTURE-IN-PC Main Picture PC:RGB1 PC:RGB1 PC:RGB1 PiPC PIP PiPC PIP PiPC PIP Sub Picture (Small) Sub Picture (Large) It is also possible to customize the PiPC position. To do this, wait until the On-Screen Display disappears (about eight seconds) and then use the CURSOR , buttons. Press CURSOR , to select Audio Input source to TV or PC mode.
USING THE REMOTE TO CONTROL YOUR VCR FUNCTIONS A detailed explanation of the circled number follows on page 28.
USING THE REMOTE TO CONTROL VCR FUNCTIONS Operating the precoded function for your VCR This remote is designed to operate different types of VCRs. You must first program the remote to match the remote system of your VCR. (Refer to page 31.) 1. Turn on your VCR. 2. Aim the remote control at the front of your VCR. 3. Press the VCR button to switch to the VCR precoded mode. 4. While holding down the VCR button on the remote, enter the two digit preset code that matches your VCR as shown on page 31.
USING THE REMOTE TO CONTROL CABLE/SATELLITE BOX FUNCTION A detailed explanation of the circled numbers follows on page 30.
USING THE REMOTE TO CONTROL CABLE/SATELLITE BOX FUNCTIONS Operating the precoded function for your cable/satellite box. This remote is designed to operate different types of cable boxes and satellite systems. You must first program the remote to match the remote system in your cable/satellite box. (Refer to page 31.) 1. Turn on your cable/satellite box. 2. Aim the remote control at the front of your cable/satellite box. 3. Press the CABLE button to switch to cable/satellite box mode. 4.
VCR AND CABLE/SATELLITE CODES The remote control is capable of operating many brands of VCRs and cable boxes. You must first program the remote control to match the remote system in your VCR or cable box. NOTE: The remote control memory is limited. Some models of VCRs or cable boxes may not operate. The remote control is not designed to control all features that are available in all models. VCR BRAND CODE Adventura . . . . . . . . . . . . . . . . . .00 Aiko . . . . . . . . . . . . . . . . . . . . . .
SET UP Set Up CUSTOM VIDEO Custom AUDIO THEATER INFO ULTRATEC ON-SCREEN DISPLAY Set Up With HITACHI S ULTRATEC On-Screen Display, each category has it s own color and icon. This semi-transparent system includes SET-UP, CUSTOM, VIDEO, AUDIO, THEATER, and INFO CENTER categories. Using the four cursor buttons, you can easily access and control all of the PC ready color TV s functions. Checked boxes let you know which function you have chosen.
ULTRATEC ON-SCREEN DISPLAY SET UP CUSTOM VIDEO AUDIO CUSTOM Custom VIDEO AUDIO THEATER MENU LANGUAGE SIGNAL SOURCE AUTO CHANNEL SET CHANNEL MEMORY CHANNEL LIST CLOCK SET Choose English, French, or Spanish language. Select Antenna (Indoor or Outdoor) or Cable TV. First time set up for channel buttons. Add or erase channel manually. Check channel name, scan, and child lock. Set before using timer features. CHANNEL ID. VIDEO ID.
SETUP SET UP Select SETUP when setting your PC ready color TV up for the first time. Use the CURSOR or buttons on the remote to highlight the function desired.
SETUP SET UP SIGNAL SOURCE Select ANTENNA if you are using an indoor or outdoor antenna. Select CATV if you have cable TV.
SETUP SET UP AUTO CHANNEL SET This feature will automatically store active TV channels in CHANNEL MEMORY. This will allow you to skip over unused channels when using CHANNEL UP ( ) or DOWN ( ) buttons.
SETUP SET UP CHANNEL MEMORY Use this function after AUTO CHANNEL SET to add or erase additional channels to or from the PC ready color TV channel memory.
SETUP SET UP This function allows you to review which channels are labeled in CHANNEL ID (ID.), which have been added to CHANNEL MEMORY (SCAN), and which are protected by CHILD LOCK (LOCK).
SETUP SET UP CLOCK SET Use this feature for all time related functions. The time must be set before you can use the CALENDAR, 4 EVENT PROGRAM, SPECIAL EVENT REMINDER, or TV TIME OUT.
CUSTOM CUSTOM This selection contains advanced features which will make TV viewing easier and more enjoyable. CUSTOM Use this feature to give up to 20 channels a name when ANTENNA signal source is selected and up to 60 channels a name when CATV1 signal source is selected. CHANNEL ID. Set Set Up Up Custom CURS OR MENU FAV FAV CH CH Video Audio Theater CH 03 **** E RA S E CHANNEL I D. VI DEO I D.
CUSTOM CUSTOM FAMILY FAVORITES (MENU) This function allows you to group your favorite channels into six personalized categories that you can rename. A total of 24 channels can be stored in the FAMILY FAVORITES function. With Family Favorites, you can easily access your favorite movie, sports, news, sitcom, music and custom stations by registering any of your favorite stations into one of six categories.
CUSTOM CUSTOM FAMILY FAVORITES (OPERATION) Use this function to display FAMILY FAVORITES selections to tune the main picture to a desired favorite channel.
CUSTOM CUSTOM CHILD LOCK This feature allows you to block out the picture and sound of the selected channel or video input of any channel that you feel may be inappropriate for your children. There is no limit to the number of channels that can be locked. Your secret code allows you to reinstate these channels any time you wish. It can also be used to schedule an amount of time that the PC ready color TV cannot be viewed. The code to enter CHILD LOCK is a four digit secret code number.
CUSTOM CUSTOM CHILD LOCK Set Set Up Up Custom Video Audio Theater CURSOR C H I L D L OCK * * * * C HANGE SECRET CODE? FAV CHANNEL 0 3 VIDEO L OCK QUICK L OCK T V T IM E OUT MENU TO MENU BAR Press Press Press Press Press Press Press Set Set Up Up Custom IInfo CH TO QUIT Video Audio Theater IInfo C H ILD LOC K TV TIME OU T .......A M B E GIN .......A M E N D ON C E D AILY WEE K LY OFF EXIT CURSOR or to select the time to begin. CURSOR to select hour, minutes and AM/PM.
CUSTOM CUSTOM 4 EVENT PROG. This function will automatically turn the TV on and off, one time only, every day or once a week. Set Set Up Up Custom Video Audio Theater IInfo C HANNEL I D. V I DEO ID.
CUSTOM CUSTOM AUTO LINK Use this function to automatically turn the PC ready color TV on and tune to VIDEO: 1, 2, or 3, when it detects a VIDEO input. Set Set Up Up Custom Video C H A N NEL ID. V I D E O ID. FA M I LY FAVORIT ES C H I L D L OCK 4 E V E N T PROGRAM A U TO LINK C L O S E D CAPT ION M E N U BACKGROUND MENU TO MENU BAR Audio Theater Set Set Up Up Custom IInfo FAV V1 V2 V3 AUTO REM OT E OF F TO QUIT CH Video C H AN N E L ID . VID EO ID .
CUSTOM CUSTOM Closed captions are the dialogue, narration, and/or sound effects of a television program or home video which are displayed on the PC ready color TV screen. Your local TV program guide denotes these programs as CC or . CLOSED CAPTION Set Set Up Up Custom Video Audio Theater Set Set Up Up Custom IInfo C H ANNEL ID. V I D EO ID. FA MILY FAVORIT ES C H IL D L OCK 4 E VENT PROGRAM A U TO L INK C L OSED CAPT ION M E NU BACKGROUND MENU TO MENU BAR D ISP LAY OFF MOD E C .C .
VIDEO VIDEO Select VIDEO to adjust picture settings and improve picture quality.
VIDEO VIDEO ADVANCED SETTINGS Your PC ready color TV has the following functions which will adjust picture settings to produce the highest quality picture possible.
VIDEO VIDEO ADVANCED SETTINGS COMPONENT SET The COMPONENT SET function is very useful when setting up High Definition, Standard Definition and NTSC signal while changing the aspect ratio and moving the Horizontal Position.
AUDIO AUDIO Select AUDIO SETTINGS to adjust the PC ready color TV to your preference and to improve the sound quality.
AUDIO AUDIO ADVANCED SETTINGS Use ADVANCED SETTINGS to improve the sound performance of your PC ready color TV, depending on listening conditions.
AUDIO AUDIO Use this function to reduce the volume level of up to four channels that sound loud compared to other channels. VOLUME CORRECTION Set Set Up Up Custom CURSOR Video Press Press Press Press Ch L e ve l 100% 100% 100% 100% TO QUIT TO QUIT CH EXIT Audio Ne xt Ch a n Use Ch MENU TO MENU BAR FAV C h Level 100% 100% 100% 100% Ne xt Ch a n Use CH CH Ad j.
THEATER THEATER Use this function to choose audio settings for a true home THEATER experience. THEATER SRS ( G ) Based on the principles of the human hearing system, SRS technology delivers an exciting and realistic 3D Sound experience from just two speakers (or) the two internal speakers of your HITACHI PC ready color television.
THEATER THEATER SRS ( G ) VIDEO MODE Set Set Up SETUp UP CUSTOM VIDEO SRS BBE AUDIO THEATER Theater INFO OFF 3D -STE R E O 3D -MON O CURSOR FAV CH MENU TO MENU BAR SETUp UP Set Set Up CUSTOM VIDEO SRS BBE AUDIO THEATER Theater TO QUIT EXIT Set Set Up SETUp UP INFO OF F 3 D- ST EREO 3 D- M ONO CUSTOM VIDEO SR S BB E FAV AUDIO THEATER Theater INFO OF F 3D -S TE R E O 3D -MON O CH MENU TO MENU BAR TO QUIT MENU TO MENU BAR EXIT USE CURSOR or , then CURSOR to set SRS O
THEATER THEATER Sound reproduction quality enhancement system. The BBE technology produces sound that is natural and crisp from just two speakers (or) the two internal speakers of you HITACHI PC ready color television. If your HITACHI PC ready color television is connected to an external audio system, BBE will also create an incredible crisp sound experience from two speakers and even enhance a complete multi-speaker surround sound system.
INFO INFO This function allows your PC ready color TV to assist you with your busy day-to-day schedule. INFO Use this function to set up to six special events into memory. These events can then be viewed in CALENDAR mode.
INFO INFO Use this function to check the day, month, and year. Dates programmed in SPECIAL EVENT REMINDER will appear blinking and special event message will be displayed.
INFO INFO Use this function to display a description of the current menu. AUTO HELP Set Set Up SETUp UP CUSTOM VIDEO SPECIAL EVENT REMINDER CALENDAR AUTO HELP MENU TO MENU BAR AUDIO THEATER INFO IInfo INFO CURSOR FAV ON OFF TO QUIT CURSOR CH EXIT INSTANT HELP DESCRIPTION OF THE DISPLAYED MENU SPECIAL EVENT REMINDER CALENDAR AUTO HELP MENU TO MENU BAR ON OFF TO QUIT Press CURSOR , to select ON or OFF. Press EXIT to quit menu or CURSOR to return to previous menu.
PC MODE CONNECTION AND OPERATION IMPORTANT: TURN OFF THE TV/PC MONITOR AND THE PC BEFORE CONNECTING OR DISCONNECTING ANY CABLES. REAR PANEL CONNECTION TO PC PC RGB INPUT 1 VHF/UHF R - AUDIO - (MONO) / L VIDEO R - AUDIO - (MONO) / L VIDEO PB /CB Y PC CONTROL S-VIDEO S-VIDEO PR/CR INPUT 2 COMPONENT VIDEO AUDIO TO HI FI L MONITOR OUT R - AUDIO - (MONO) / L PC AUDIO INPUT INPUT 1 R VIDEO AUDIO OUT MOUSE PORT NOTE: (MONITOR OUT) (PC MONITOR OUT) 1.
PC MODE CONTROLS 1. FRONT PANEL Input Menu - Vol + - CH + Power Exit PiPC SVGA FRONT PANEL CONTROLS INPUT MENU MENU - VOL + - CH + POWER EXIT CURSOR EXIT 2. REMOTE CONTROL A detailed explanation of the circled numbers follows on page 62. POWER H VCR CABLE TV HELP TV/VCR PIPC H V POSITION V SIZE REC PAUSE STOP VOL LST-CH CH MUTE L I G H T EXIT FAV CH CH C.S.
PC MODE CONTROLS MENU Button Press MENU to display PC mode On-Screen Display. PC MAIN MENU There are ten features that allow you to set up your multimedia vision (while in PC Mode) to your preference. Features are H Position, V Position, H Size, V Size, Pincushion, Set Up, Contrast, Brightness, Audio and Tilt. MENU TO STORE EXIT TO QUIT After completing adjustment, press MENU to store. EXIT Button Press EXIT button to exit the on-screen display.
PC MODE CONNECTION AND OPERATION IMPORTANT: TURN POWER OFF ON THE TV/PC MONITOR AND THE PC BEFORE CONNECTING OR DISCONNECTING ANY CABLES. PC MOUSE CONTROL OPERATION 1. Connect the 6 pin-din cable (provided) to the PC and monitor as shown on page 60. 2. Turn the TV/PC monitor power on. 3. Press the input button on the front panel or on the remote control until you select PC mode. 4. Turn the PC power on. 5.
PC ON-SCREEN DISPLAY PICTURE ADJUSTMENTS The following adjustments are independent of the TV mode: ¥Press MENU in PC mode for on-screen display. ¥Press CURSORS right ( ) or ( ) left to highlight the item to be adjusted. ¥Press CURSORS up ( ) or down ( ) to select the highlighted item. ¥Use CURSORS right ( ) or ( ) left to adjust. This feature allows you to adjust the horizontal position of the display. H POSITION Use Left/Right cursors to adjust the horizontal position.
PC ON-SCREEN DISPLAY This feature allows you to adjust the horizontal size in PC Mode. H SIZE Use Left/Right cursors to adjust the horizontal size. Press MENU button to store and EXIT to quit. H SIZE 32 TO MENU STORE EXIT TO QUIT This feature allows you to adjust the vertical size in PC mode. V SIZE Use Left/Right cursors to adjust the vertical size. Press MENU button to store and EXIT to quit.
PC ON SCREEN DISPLAYS SET UP ADJUSTMENTS RGB INPUT The following adjustments are independent of the TV mode: ¥Press MENU in PC mode for on-screen display. ¥Press CURSORS right or left to highlight the item to be adjusted. ¥Press CURSORS up or down to select the highlighted item. ¥Use CURSORS right or left to adjust. This feature allows you to select PC INPUT between RGB1 or RGB2. ¥ Use right CURSOR to select between RGB1 or RGB2. ¥ Press MENU button to store and EXIT to quit.
PC ON SCREEN DISPLAYS SET UP ADJUSTMENTS Press CURSOR for more set up adjustments. COLOR TEMPERATURE This feature allows you to select your color temperature. ¥ Use CURSOR or then CURSOR to set Color Temperature to 9300¡k, 8000¡k or 6500¡k depending on your preference. ¥ Press MENU button to store and EXIT to quit. ASPECT RATIO This feature allows you to select your aspect ratio. ¥ Use CURSOR or then CURSOR to select Aspect Ratio from 16:9 or 4:3.
PC ON-SCREEN DISPLAYS CONTRAST This feature allows you to adjust the contrast in PC mode. Use Left/Right cursors to adjust contrast. Press MENU button to store and EXIT to quit. NOTE: See TV contrast feature for additional information regarding contrast. BRIGHTNESS This feature allows you to adjust brightness in PC Mode. Use Left/Right cursors to adjust brightness. Press MENU button to store and EXIT to quit.
PC ON-SCREEN DISPLAYS PC AUDIO OPERATION Use the CURSOR or to highlight the function to be adjusted. Press CURSOR or to adjust the function. Press MENU button to store and EXIT to quit. BASS This function controls the low frequency audio to all speakers. TREBLE This function controls the high frequency audio to all speakers. BALANCE This function will control the left to right balance of the TV internal speakers and the AUDIO TO HI FI output. NOTE: TV mode and PC mode AUDIO have the same effect.
PC ON-SCREEN DISPLAYS This feature allows you to turn on or off the BBE function. Use CURSOR or , the CURSOR to select BBE and turn in on or off. Press MENU button to store and EXIT to quit. TILT This feature allows you to adjust the tilt position of the display. Use or CURSORS to adjust the horizontal position. Press MENU button to store and EXIT to quit. NOTE: Tilt control works only on PC mode, it does not work on TV mode.
PLUG and PLAY PLUG & PLAY This monitor complies with VESA DDC2B specifications, Plug & Play is a system with computer, peripherals (including monitors), and operating system. It works when the monitor is connected to a DDC ready computer that is running an operating system software that is capable for the plug & play. When a Plug and Play PC is powered on, it sends a command to the Monitor requesting identification. The Monitor sends back a string of data including its characteristics.
ASK DEMAN ME! MOI! USEFUL INFO AGENCY REGULATORY INFORMATION Federal Communications Commission Notice This equipment has been tested and found to comply with the limits for a Class B digital device, pursuant to Part 15 of the FCC Rules. These limits are designed to provide reasonable protection against harmful interference in a residential installation.
ASK DEMAN ME! MOI! USEFUL INFO DO Make sure the PC ready color TV is turned off when cleaning the screen. Dust the screen and cabinet with a soft cloth. Clean the screen with a soft cloth moistened in warm water and dry with a soft cloth. A mild soap may be used if the screen is extremely dirty. Place your PC ready color TV and remote control away from extreme heat, humidity and extremely dusty places.
ASK DEMAN ME! MOI! USEFUL INFO ¥ IGNITION NOISE: Black spots or horizontal streaks may appear, picture may flutter or drift. Usually caused by interference from automobile ignition systems, neon lamps, electrical drills, and other electrical appliances. ¥ GHOSTS: Ghosts are caused by the PC ready color television signal following two paths. One is the direct path and the other is reflected from tall buildings, hills or some other objects.
AUDIO ASK DEMAN ME! MOI! No picture, no sound Sound OK, picture poor Try ure PC CH TR ECK Y T TH HE ES Be SE E I sur AD TEM ee xte JU Be rna ST S AN sur l co ME D ep nn ect ow NT ion er Be S co is s SYMPTOMS rd cor is p rec lug t rea ge dy d an in col oth o rT er Vi cha Ch ss eck nn wit el ( ant che sta enn dO t ion Ch ac N tr o eck onn u ect ble an ion ten ) s (b na Ch for ack eck bro of P ou ken tsid Cc Ch lea olo e a eck r re d-i nte n ady nn for w a ire loc TV ) al i Ad nte jus tC r fe
ASK DEMAN ME! MOI! USEFUL INFO TV Features: ¥ 600 Line Horizontal Resolution Superfine Picture Quality. ¥ All Time Progressive Scanning (480P) ¥ Full 1080 I HDTV Capable with Set-Top Box ¥ ULTRABLACK Digital Pitch INVAR MASK Picture Tube ¥ Dynamic Focus ¥ Remote Control (controls many brands of VCR s, Cable Boxes, and Satellites. Genius MMV Universal Remote. ¥ ULTRATEC On-Screen Display. (Tri-Lingual Bit Map OSD). ¥ Full Set of Input Jacks, including S-Video. ¥ Variable Audio Output Jacks.
ASK DEMAN ME! MOI! USEFUL INFO e c i v r se To locate an authorized HITACHI service facility in the continental U.S.A. and Canada, DIAL TOLL FREE 7 days a week, 24 hours a day 800 HITACHI (1-800-448-2244) Hitachi Home Electronics (America), Inc. Hitachi has made every effort to assure you hours of trouble free operation from your unit. However, should you require service, a network of Hitachi Authorized Service Facilities has been established in all 50 states and Puerto Rico.
ASK DEMAND ME! MOI! FEATURE INFORMATION As the digital era dawns, Hitachi has models that provide the best possible images today....and tomorrow. Our HDTVReady SDX model incorporates new Flex Converter technology to display a high quality 480 P (progressive scanning) image; this same circuitry enables it to accept a full 1080 I HDTV signal from a digital set-top box now or in the future. The SDX model also has a S-VGA input for 800x600 resolution from a computer.
ASK DEMAND ME! MOI! NOTES: 79
QR27362