PLASMA TELEVISION Operating Guide for 42HDT52, 42HDT52A and 55HDT52 IMPORTANT SAFETY INSTRUCTIONS....................................................................................... 2-3 FIRST TIME USE ....................................................................................................................... 4-22 THE REMOTE CONTROL ........................................................................................................ 23-41 ON-SCREEN DISPLAY ...................................
Important Safety Instructions SAFETY POINTS YOU SHOULD KNOW ABOUT YOUR HITACHI PLASMA TELEVISION Our reputation has been built on the quality, performance, and ease of service of HITACHI plasma televisions. Safety is also foremost in our minds in the design of these units. To help you operate these products properly, this section illustrates safety tips which will be of benefit to you.
Important Safety Instructions Power source This plasma television is designed to operate on 120 volts 60 Hz, AC current. Insert the power cord into a 120 volt 60 Hz outlet. To prevent electric shock, do not use the plasma television’s (polarized) plug with an extension cord, receptacle, or other outlet unless the blades and ground terminal can be fully inserted to prevent blade exposure. Never connect the plasma television to 50 Hz, direct current, or anything other than the specified voltage.
Accessories Check to make sure you have the following accessories before disposing of the packing material. First time use Remote Control Table Top Stand (42” models only) Two “AA” size, 1.5V batteries Cleaning Cloth Power Cord / Power Swivel Cable (42” models only) 2 IR Mouse Cables or G-LINK Cables CAUTION: 2 Ferrite Core (see page 13) Note: Please visit our website for optional accessories for the 55” models. For U.S.
How To Set Up Your New Hitachi Plasma Television To take measures to prevent the Plasma Television from tipping over and prevent possible injury it is important to mount the unit in a stable and flat surface. ANTENNA Unless your Plasma Television is connected to a cable TV system or to a centralized antenna system, a good outdoor color TV antenna is recommended for best performance.
How to set up your new HITACHI Plasma Television VIEWING First time use The best picture is seen by sitting directly in front of the TV and about 10 to 18 feet from the screen. During daylight hours, reflections from outside light may appear on the screen. If so, drapes or screens can be used to reduce the reflection or the TV can be located in a different section of the room.
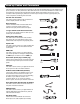
Hook-up Cables and Connectors First time use Most video/audio connections between components can be made with shielded video and audio cables that have phono connectors. For best performance, video cables should use 75-Ohm coaxial shielded wire. Cables can be purchased from most stores that sell audio/video products. Below are illustrations and names of common connectors.
Quick Reference Remote Control Buttons and Functions First time use In addition to controlling all of the functions on your HITACHI Plasma TV, the new remote control is designed to operate different types of devices, such as, DVD Players, CBL (Cable Boxes), set-top-boxes, satellite receivers, and VCRs. The remote control must be programmed to control the chosen device. Please see pages 23-41 for a complete description of all features and programming of the Remote Control.
Front/Rear/Side Panel Controls FRONT VIEW First time use POWER PHOTO INPUT REAR/SIDE VIEW CH + CH - L/MONO MENU/SELECT R INPUT/EXIT INPUT 5 VIDEO S-VIDEO VOL - AUDIO CURSOR VOL + SIDE POWER button Press this button to turn the Plasma Television ON/OFF. It can also be turned ON/OFF by remote control. The “MAIN POWER” button must be at stand-by mode.
Front/Rear/Side Panel Controls First time use POWER light indicator To turn the monitor ON, press the main power switch located on the lower right side of the monitor. A red stand-by indicator lamp located on the lower right corner of the front bezel will illuminate. The Plasma TV is now ready for remote ON/OFF operation. Indicating Lamp Off Power Status Off Operating When the main power switch is set to OFF. When the main power switch on the display monitor is ON.
Rear Panel Connections Antenna Input The remote control allows you to switch between two separate 75-Ohm RF antenna inputs, CABLE and AIR. 햴 MONITOR OUT & HI-FI AUDIO OUT These jacks provide fixed and variable audio and video signals (CABLE/AIR, INPUT 1, 2 and 5) which are used for recording. Use the S-VIDEO Output for high quality video output. Component signal to INPUT 3 and 4, and HDMI inputs will not have monitor output.
Rear Panel Connections First time use Subwoofer Out Connect this SUB WOOFER OUT output to the external audio component input using the sub woofer cable (not provided). If the CableCARD is properly installed or not installed, the TV will display the following respective screens. Upgrade Card This card slot is for future software upgrades. HITACHI will notify you if a software upgrade is required for your TV. In order to receive written notification, please complete and return your warranty card.
Connecting External Video Sources The front panel jacks are provided as a convenience to allow you to easily connect your video camcorder, digital camera or Digital Video Camcorder as shown in the following examples: Left Side Panel Left Side Panel INPUT 5 L/MONO AUDIO IEEE1394 DV INPUT PHOTO INPUT VIDEO S-VIDEO R IEEE1394 DV INPUT L/MONO AUDIO First time use R INPUT 5 PHOTO INPUT VIDEO S-VIDEO Ferrite Core Instructions: 1.
Rear Panel Connections Cable TV coaxial cable First time use 2-Way signal splitter Outside Antenna VCR #1 DIGITAL OUTPUT CAPABILITY OUTPUT ANT IN S-VIDEO V L R DIGITAL OUTPUT AUDIO OUT Optional The Remote Control DVI to HDMI IEEE1394 DV INPUT / On-Screen Display G-LINK Optional Y OUTPUT PB/CB PR/CR L R S-VIDEO V L INPUT DVD Player VCR #2 R S-VIDEO V L OUTPUT R Laserdisc player, VCR, camcorder, etc.
Tips on Rear Panel Connections • S-VIDEO, YPBPR, or HDMI connections are provided for high performance laserdisc players, VCRs etc. that have this feature. Use these connections in place of the standard video connection if your device has this feature. First time use • If your device has only one audio output (mono sound), connect it to the left audio jack on (L/(MONO)) the Rear Panel.
Connecting External Video Sources CONNECTING A VIDEO AND STEREO AUDIO SOURCE TO INPUT1 – INPUT5 First time use 1. Connect the cable from the VIDEO OUT of the VCR or the laserdisc player to the INPUT (VIDEO) jack, as shown on the Rear Panel on the right. / G-LINK 2. Connect the cable from the AUDIO OUT R of the VCR or the laserdisc player to the INPUT (AUDIO/R) jack. The Remote Control 3. Connect the cable from the AUDIO OUT L of the VCR or the laserdisc player to the INPUT (AUDIO/L) jack. 4.
Connecting External Video Sources CONNECTING A COMPONENT SOURCE WITH HDMI OR DVI CAPABILITY TO INPUT 1 OR 2 2. With DVI output, connect the cable from the AUDIO OUT R of the HDTV set top box or DVD player to the INPUT (AUDIO/R) jack as shown on the Rear Panel below. 3. With DVI output, connect the cable from the AUDIO OUT L of the HDTV set top box or DVD player to the INPUT (AUDIO/L) jack as shown on the Rear Panel below. 4.
Connecting External Video Sources First time use CONNECTING A COMPONENT AND STEREO AUDIO SOURCE TO INPUT 3 OR 4: Y-PBPR. 1. Connect the cable from the Y OUT of the Laserdisc/DVD player or HDTV set top box to the INPUT (Y) jack, as shown on the Rear panel below. 2. Connect the cable from the PB/CB OUT or BY OUT of the Laserdisc/DVD player or HDTV set top box to the INPUT (PB) jack. 3.
Connecting External Video Sources CONNECTING A COMPONENT SOURCE WITH DIGITAL INTERFACE CAPABILITY TO IEEE1394 TERMINALS. Connect the IEEE1394 cable from the output of the component with IEEE1394 capability, such as a Digital VCR or AVHD (External Hard Drive) Digital Recorder, to the IEEE1394 input terminals shown below. IEEE 1394 allows the plasma television and the external device to communicate with one another.
Connecting External Audio/Video Devices CONNECTING A VIDEO AND MONAURAL AUDIO SOURCE TO INPUT 1, INPUT 2 OR INPUT 5 First time use 1. Connect the cable from the VIDEO OUT of the VCR or the laserdisc player to the INPUT (VIDEO) jack, as shown on the Rear Panel on the right. Connect the Cable and/or Air cables / G-LINK 2. Connect the cable from the AUDIO OUT of the VCR or the laserdisc player to the INPUT (MONO)/L(AUDIO) jack. 3.
Connecting External Video Sources First time use Your Hitachi Plasma Television is equipped with an AV Network feature. This feature helps to control your external Audio/Video equipment (VCR, Set Top Box, DVD, etc.). Once this is setup, it allows your IR Mouse connector to control your equipment using your Hitachi Plasma TV Remote Control. You can use your HITACHI remote control to control the Audio/Video equipment command without the equipment’s remote control.
Connecting External Video Sources First time use Your Hitachi Plasma Television is equipped with a G-LINK feature. This connection is necessary for the TV Guide On ScreenTM system to work with your cable box to receive program listings and to enable VCR recording features. Once you setup the G-LINK (IR Mouse) connector, then you can use your HITACHI Plasma TV Remote Control and the TV Guide On Screen system to control your cable box and VCR recording features.
The Remote Control In addition to controlling all the functions on your HITACHI Plasma TV, the new remote control is designed to operate different types of VCRs, CATV (Cable TV) converters, set-top-box, satellite receiver, DVD players, and other audio/video equipment with one touch. Basic operation keys are grouped together in one area.
How to Use the Remote to Control Your TV POWER button Press this button to turn the TV set on or off when the remote is in TV mode. (See page 23 for instructions on how to set the remote control to TV mode.) 햴 MODE Indicator Turns on or blinks to show remote control mode. 햴 SOURCE ACCESS ( or ) buttons Press these buttons to select remote control mode.
How to Use the Remote to Control Your TV ASPECT button Press this button to quickly change the picture format ASPECT ratio. Depending on the input signal format received, the picture format ratio allows you to adjust the images through the following options. 4:3 STANDARD Use this aspect mode to display conventional (4:3) images. Side panels (gray areas) are placed to the left and right of the image to preserve the original aspect ratio of the source.
How to Use the Remote to Control Your TV DAY/NIGHT button Press this button to toggle between Day and Night picture mode settings. Select Day for day time viewing with more brightness and contrast to compete with room light. Select Night for night time viewing with less brightness and contrast for a more detailed picture (see page 44 for settings changes). NOTE: For automatic DAY/NIGHT picture mode settings, see page 44.
How to Use the Remote to Control Your TV PHOTO INPUT This feature is useful for viewing digital still pictures from your digital camera, USB Drive or memory cards USB drive using the Photo Input in the left side panel of the TV. 1. Press the INPUTS button to cycle through the INPUTS selections until the PHOTO INPUT is selected. Press the SELECT button or CURSOR PAD . Photo Input IEEE 1394 Cable Air Input 1 Move SEL Sel. Press the CURSOR PAD or to access the next or previous photo. Next 3. 4. 5.
How to Use the Remote to Control Your TV ROTATE Select this menu item to rotate selected photos either clockwise (CURSOR PAD ) and counterclockwise (CURSOR PAD ). The Remote Control SLIDESHOW Select this menu item to start a slideshow of the digital photos. While the Interval sub menu is highlighted, press the SELECT button to cycle through the interval time from 5, 10 and 30 seconds. Press the SELECT button to stop on a chosen picture of the slideshow.
How to Use the Remote to Control Your TV IEEE1394 Use this function to control your devices with digital interface capabilities. When an IEEE1394 device is not connected INPUTS Photo Input IEEE 1394 Cable Air Input 1 Move SEL Sel. The Remote Control Device not detected When an IEEE1394 device is connected 1. Press INPUT button, CURSOR PAD and SELECT button to select IEEE 1394. 2. Use CURSOR PAD to select connected device (example D-VHS1). 3. Use CURSOR PAD cursors to highlight POWER. 4.
How to Use the Remote to Control Your TV LAST CHANNEL (LAST CH) button Press this button to toggle between the current and last channel viewed. VOLUME (VOL) WHEEL, MUTE button Use the VOL WHEEL ( or ) until you obtain the desired sound level. The Remote Control To reduce the sound to one half of normal volume (SOFT MUTE) to answer the telephone, etc., press the VOL wheel down. Press the VOL wheel again to turn the sound off completely (MUTE).
Picture-in-Picture (PIP) Your HITACHI Plasma TV incorporates Two Tuner technology designed for improved viewing enjoyment. This Two Tuner feature allows you to view antenna inputs on both the main picture and sub picture simultaneously, with separate tuning control for each. When a Digital channel is viewed in the main picture, the Digital channel can not be viewed in the sub picture.
Picture-In-Picture (PIP) PIP MODE PICTURE-IN-PICTURE Select AIR from the INPUTS menu. Select a channel that has a 1080i signal. To prevent a pattern burn, occasionally move the sub-picture using the CURSOR PAD. SURF MODE PICTURE-IN-PICTURE Surf Mode PIP automatically scans all active channels (those set in Memory) and displays them as PIP subpictures or Thumbnails. Press the SELECT button to stop on a chosen channel. Use the remote CURSOR PAD , , or to navigate the Thumbnails.
Picture-In-Picture (PIP) PAUSE button If you wish to freeze the sub-picture, press the PAUSE button. This is convenient when trying to write down the address for a mail order company, recording statistics for a sporting event, etc. To return the picture to motion, press the EXIT button. Press the PAUSE button repeatedly to toggle between FREEZE modes (Main Freeze, SPLIT and STROBE).
The Remote Control for Cable Box Functions Operating the precoded function for your cable box. This remote is designed to operate different types of cable boxes. You must first program the remote to match the remote system of your cable box (refer to pages 40-41 for pre-codes). 1. Turn ON your cable box. 2. Aim the remote control at the front of your cable box. The Remote Control 3. 4. 5. 6.
The Remote Control for Set-Top-Box/Satellite Receiver Functions Operating the precoded function for your set-topbox/satellite receiver. This remote is designed to operate different types of set-top-box/satellite systems. You must first program the remote to match the remote system of your settop-box/satellite systems (refer to pages 40-41 for precodes). Turn ON your set-top-box/satellite systems. 2. Aim the remote control at the front of your set-topbox/satellite systems. 3.
The Remote Control for DVD Functions Operating the precoded function for your DVD player. This remote is designed to operate different types of DVD players. You must first program the remote to match the remote system of your DVD player (refer to pages 40-41 for pre-codes). 1. Turn ON your DVD player. 2. Aim the remote control at the front of your DVD player. The Remote Control 3. 4. 5.
The Remote for VCR/PVR Functions Operating the precoded function for your VCR/PVR (Personal Video Recorder). This remote is designed to operate different types of VCRs/PVRs. You must first program the remote to match the remote system of your VCR/PVR (refer to pages 40-41 for pre-codes). 1. Turn ON your VCR/PVR. 2. Aim the remote control at the front of your VCR/PVR. 3. 5. 6.
The Remote Control for Additional Audio Equipment Operating the precoded function for your Audio component. This remote is designed to operate different types of Audio component. You must first program the remote to match the remote system of your Audio component (refer to pages 40-41 for pre-codes). 1. Turn ON your Audio component you wish to control with the Remote. 2. Aim the remote control at the front of your Audio component. The Remote Control 3. 4.
How to Use the ENT Button INPUT ACCESS This optional feature allows the user of the remote control to setup it’s ENTER (ENT) button to access the specified input of the TV. Setup for this feature is applicable to the remote control’s normal mode only and only applies to the DVD, CBL, STB, PVR and AMP modes. Select the desired device mode (DVD, CBL, STB, PVR, or AMP) by using your SOURCE ACCESS buttons ( or ) to position the LED indicator to the corresponding selection. 2.
Remote Control Codes The Remote Control VCR BRAND ..................CODE ABS ..................................1972 Admiral ....................0048, 0209 Adventura .........................0000 Aiko....................................0278 Aiwa ..............0000, 0037, 0307 Akai ..............0041, 0061, 0106 Alienware ..........................1972 America Action ..................0278 American High ..................0035 Asha ..................................0240 Audiovox..................
Remote Control Codes ............1639, 1142, 0247, 0749, ..........1749, 0724, 0819, 1856, ............1076, 1109, 0099, 1052, ..1053, 1054, 1442, 1443, 1444 Dish Network System ......1005, 0775, 1170 DishPro....................1005, 0775 Drake ............0018, 0064, 0245 Echostar ......1005, 0775, 0148, ......................0269, 0280, 1170 Expressvu..........................0775 GE ....................................0566 GOI ....................................0775 General Instrument ..........0869, ..
On-Screen Display 1. Press MENU on the remote control to display the different features on your HITACHI Plasma TV. 2. Use the CURSOR PAD (buttons , , and ) or CHANNEL WHEEL to navigate to a different menu item. 3. Press EXIT on the remote control to quickly exit from a menu. This part of the screen shows which selections are available.
On-Screen Display Channel Manager Video Picture Mode Contrast Brightness Color Tint Sharpness Color Temperature Black Enhancement Contrast Mode Noise Reduction Auto Movie Mode Aspect Black Side Panel BBE TruBass Audio Source Internal Speakers Auto Noise Cancel Perfect Volume Loudness Language Digital Output DRC Adjust the treble. Adjust the bass. Adjust the balance. Select SRS settings (Off, Wide, Normal) Select BBE settings (Off, Soft, Hard) Select TruBass settings. Select between three Audio Sources.
Video Video Video Audio TV Guide On Screen Channel Manager Select VIDEO to adjust picture settings and improve picture quality. You can independently customize each of the Video Inputs to your preference to increase viewing performance and pleasure depending upon the video program being viewed. If RESET is selected, only the selected input will reset to initial conditions. Locks Picture Mode Use this function to choose from automatic picture settings to optimize your TV’s performance. 1.
Video Color Temperature Set this to High for cooler color with more blue, set to Medium for more natural color, set to Standard for accurate color or set to Black/White for more reddish color. Black Enhancement Use this function to enhance the shadow detail in dark scenes using the settings off, low, middle and high. NOTE: 1. If CONTRAST is selected, you are adjusting CONTRAST. The additional menu items BRIGHTNESS, COLOR, TINT, and SHARPNESS can be selected and adjusted in the same manner. 2.
Video Set Black Side Panel The BLACK SIDE PANEL function turns the gray side bars on/off when watching 4:3 signals in Standard mode or use of the PIP modes. 1. 2. Press the CURSOR PAD or to set to ON or OFF. Press EXIT to quit menu or select SET BLACK SIDE PANEL to return to the previous menu. Set Black Side Panel Next On/Off Set Black Side Panel Next On/Off Off SEL Return On SEL Return NOTE: To prevent uneven aging when watching 4:3 signal, turn off the BLACK SIDE PANEL.
Audio Audio Video Audio TV Guide On Screen Channel Manager Locks Select AUDIO to adjust the TV to your preference and to improve the sound quality. Timers or Setup Power Swivel 1. 2. 3. Move Press CURSOR PAD or to select menu item. Press CURSOR PAD or to adjust the function. Press EXIT to quit the MENU, or select AUDIO to return to the main menu. NOTE: If TREBLE is selected you are adjusting treble. The additional menu items Bass and Balance can be selected and adjusted in the same manner.
Audio Audio Source Multi-Channel Television Sound will allow you to select STEREO (a stereo broadcast), MONO (monaural sound) used when receiving a weak stereo broadcast or SECOND AUDIO PROG (SAP) which may be a secondary language, weather report, etc. Internal Speakers This function is useful when setting up the external speakers. ON TV as Center OFF Select this feature if using the internal speakers only. Select this feature when setting up external speakers from a separate stereo system.
TV Guide On Screen TV Guide On Screen The TV Guide On-Screen system is a built-in feature that provides a channel lineup and program listings in your area. Once the setup process is complete, the program listings are automatically updated several times a day. This interactive guide can also be programmed to receive listings from a cable box or record your favorite shows using a VCR.
TV Guide On Screen Screen 4: Do you have a Cable box connected? Use the CURSOR PAD and to highlight your choice, then press the SELECT button to continue. If YES: Please see Screen 5. If NO: Please see Screen 12. On-Screen Display Screen 5: Which TV input is the Cable box plugged into? AIR/CABLE: Please see Screen 6. INPUT 1/2: Please see Screen 7. Screen 6: Select the channel your TV is tuned to when using a Cable box.
TV Guide On Screen Screen 10: The TV Guide On Screen system will test the code of your Cable box. No TV, Cable or remote buttons should be pressed while performing the automatic test. After the testing process is complete, the setup procedure will continue, see screen 11. Screen 11: Did your Cable box tune to channel 28? Use the CURSOR PAD and to highlight your choice, then press the SELECT button to continue. If YES: Please see screen 12.
TV Guide On Screen Screen 16: This screen shows the correct way to setup the VCR with the G-LINK. Please confirm connection (see Page 22). Press the SELECT button to continue. Screen 20: Did your VCR stop playing? Use the CURSOR PAD and to highlight your choice, then press the SELECT button to continue. If YES: Please see screen 21. If NO: Select NO to test a different code or select TEST THIS CODE AGAIN to test the same code.
TV Guide On Screen Screen 22: Congratulations! The TV Guide On Screen system setup is complete. Press the SELECT button to finalize. Screen 23: The last screen gives tips on using the TV Guide On Screen system. Press the SELECT button to exit the Setup. On-Screen Display NOTE: 1. The Plasma TV should be in standby mode in order to continually receive updated program listings from your cable company. 2.
TV Guide On Screen Using the TV Guide On Screen System This free interactive program guide provides up to 8 days of TV programming. The advanced program listings make watching and recording TV shows and programs much easier. The TV Guide On Screen system consists of 5 main services: • Listings: Displays the available program listings and descriptions. • Search: Allows you to find shows by keyword, alphabetically, or by program category.
TV Guide On Screen NAVIGATING THE TV GUIDE ON SCREEN SYSTEM • Press the GUIDE button while watching TV Video to access the TV Guide On Screen system. Window The LISTINGS screen will be presented with the current show displayed in the Video Window. • Use the CURSOR PAD , , , and to highlight any program, and press the SELECT button to tune to that program (if it is currently airing) or channel (if the program airs in the future).
TV Guide On Screen TV Guide On Screen Icons On-Screen Display Icon 56 NAME DESCRIPTION 1. Progress Bar - Elapsed time in current program 2. Info Icon 3. HDTV - Program is presented in High Definition. 4. New - Program is new (not a repeat). 5. CC - Closed Captioning is available. 6. TV Rating 7. Record Once - Program is set to record one time. 8. Record Daily - Program is set to record every weekday that it airs on the same channel and starts at the same time.
TV Guide On Screen Press the MENU button while a program is highlighted to access the Episode Options Panel Menu. Five (5) Services: • LISTINGS • SEARCH • RECORDINGS • SCHEDULE • SETUP NOTE: 1. The RECORDINGS service is only available when an IEEE1394 HDD recording device is connected to the TV (see page 19). 2. Recording to other devices such as a VCR is available in the LISTINGS, SEARCH and SCHEDULE services.
TV Guide On Screen SEARCH: The SEARCH service screen allows you to find programs by the following: • Keyword • Alphabetical • Category • HDTV • Movies • Sports • Children • Educational • News • Variety • Series 2. Press the CURSOR PAD to highlight a subcategory (Example: ALL). Press SELECT for shows matching category, then move / to highlight show and press SELECT to watchi if on now or Menu for episode options. 3. Press the SELECT button to display a list of all movies organized by date and time.
TV Guide On Screen Example: Keyword Search 6. A list of all the shows that matched the keyword is displayed. The Keyword search allows you to enter a word or words to find a program title that matches. 1. From the Search Screen, use the CURSOR PAD or to highlight KEYWORD, and then press the SELECT button. 2. Use the CURSOR PAD or to highlight NEW SEARCH in the Panel Menu, and then press the SELECT button. Move to highlight a show. Press SELECT to hide list. 7.
TV Guide On Screen RECORDINGS: The RECORDINGS Service screen displays a list of previously recorded or currently recording programs on an IEEE1394 recording device connected to the TV. • NOTE: The RECORDINGS Service will only appear in the Service Bar if an IEEE1394 recording device is connected to the TV (see page 19). Press the INFO button while the RECORDINGS Service is highlighted on the Service Bar to display a Help screen.
TV Guide On Screen SCHEDULE: The SCHEDULE Service screen allows you to review, edit and delete Record and Remind events. How to Record: The Record options can be set in the LISTINGS, SEARCH, and SCHEDULE Services. You can also edit record settings for a program in the SCHEDULE Services. There are 3 ways to set a program to record. • Use the RECORD button on the Remote Control. Press the RECORD button to record the program Once with the current default setting.
On-Screen Display TV Guide On Screen • 1. Use Manual Recording: From the SERVICE bar, use the CURSOR PAD or to highlight the SCHEDULE. Press the MENU button to display the Schedule Options Panel Menu. 2. Use the CURSOR PAD or to highlight New Manual Recording, and then press the SELECT button to access the Record Options Panel Menu. 3. Set the information in the Panel Menu fields. 4.
TV Guide On Screen How to set a reminder: • Set Manual reminder • Set from the Panel Menu 1. 1. Use the CURSOR PAD or to highlight a program and press the MENU button to access the Episode Options Panel Menu. Use the CURSOR PAD to highlight SET REMINDER and press the SELECT button to access the Remind Options Panel Menu. From the Service bar, use the CURSOR PAD or to highlight SCHEDULE, and then press the MENU button to access the Schedule Options Panel Menu.
TV Guide On Screen Reminder Notification Banner Depending on your option settings, a notification banner will appear at the scheduled reminder time. SETUP: The SETUP Service screen allows you to modify settings that were entered at initial TV Guide On Screen system setup (see page 49). The 3 settings will be the following: Press the SELECT button to hide the Reminder banner, or, if more than one reminder appears, use the CURSOR PAD or to highlight a program.
TV Guide On Screen CHANGE SYSTEM SETTINGS: Use this option if you want to change something after completing initial TV Guide On Screen system setup. 1. 1. From the SETUP screen, use the CURSOR PAD to highlight Change system settings, and then press the SELECT button to reconfirm your settings. From the SETUP Screen, Use the CURSOR PAD to highlight Change Channel Display, and then press the SELECT button.
TV Guide On Screen CHANGE DEFAULT OPTIONS: Use this option to change default settings: • General Defaults • Record Defaults • Remind Defaults • IR Defaults RECORD DEFAULTS 1. From the SETUP screen, use the CURSOR PAD or to highlight Change Default Options and then press the SELECT button. 2. Use the CURSOR PAD or to highlight Record defaults and then press the MENU button to access the Record Defaults Panel Menu. 3.
TV Guide On Screen IR DEFAULTS IR Defaults lets you modify the channel dialing defaults if your cable box and/or VCR is not changing channels properly. 1. From the SETUP screen, use the CURSOR PAD to highlight Change Default Options and then press the SELECT button. 2. Use the CURSOR PAD or to highlight IR defaults and then press the MENU button to access the IR Defaults Panel Menu. Press Select to access options to -- change default IR dialing options 3.
Channel Manager Channel Manager Video Audio TV Guide On Screen Select CHANNEL MANAGER to set your Antenna options, run Auto Channel Scan, Check Signal Meter and Set Channel List. Channel Manager Locks Timers Setup Power Swivel 1. Press CURSOR PAD , or CHANNEL WHEEL to highlight function 2. Press the SELECT button or CURSOR PAD to select.
Channel Manager Channel List This function allows you to review which channels are labeled (CH ID), which have been added to CHANNEL MEMORY (SCAN), which are protected by LOCK and which are your FAVORITE (FAV) CHANNELS. 1. Use the CURSOR PAD to navigate the Channel List. 2. Press the SELECT button to select ON or OFF on the SCAN and LOCK columns. 3. To select LOCK column, input the access code.
Locks Locks Video Audio Audio This function will block out the picture and sound of the selected channel or video input. It can also be used to keep the TV from being viewed for a scheduled time period that you set. Channel Manager Locks Timers Setup Power Swivel Move SEL Select The code to enter the Locks feature is a four digit access code number. The factory preset code is 0000. Use the NUMBER buttons to enter the access code. 1.
Locks Movie Ratings Use Movie Ratings to prevent viewing of any movie that you feel may be inappropriate due to its content. Locks Change Access Code Engage Lock Movie Ratings 1. 2. Use the CURSOR PAD , or CHANNEL WHEEL to select the MOVIE RATING category that you want to block. TV Ratings Canadian Ratings(Eng) Canadian Ratings(Frn) Move Press SELECT to block the MOVIE RATING that you have selected.
Locks TV Ratings Use TV RATINGS to prevent the viewing of any TV program that you feel may be inappropriate due to its content. Locks Change Access Code Engage Lock Movie Ratings TV Ratings 1. 2. Canadian Ratings(Eng) Use the CURSOR PAD , or CHANNEL WHEEL to select the TV RATING category that you want to block. Canadian Ratings(Frn) Move SEL Select Press SELECT to block the TV RATING that you have selected. Locks TV Ratings 3.
Locks Canadian Ratings (Eng) Use CANADIAN RATINGS (ENG) to block any type of movie and television program in Canada that you feel might be inappropriate in its content. Locks Change Access Code Engage Lock Movie Ratings TV Ratings 1. 2. 3. Canadian Ratings(Eng) Use the CURSOR PAD , or CHANNEL WHEEL to select the CANADIAN RATINGS (ENG) category that you want to block. Press SELECT to block the CANADIAN RATINGS (ENG) that you have selected.
Locks Canadian Ratings (Frn) Use CANADIAN RATINGS (FRN) to block Canadian French programs according to various program ratings that you feel might be inappropriate in its content. Locks Change Access Code Engage Lock Movie Ratings TV Ratings 1. 2. 3. Use the CURSOR PAD , or CHANNEL WHEEL to select the CANADIAN RATINGS (FRN) category that you want to block. Press SELECT to block the CANADIAN RATINGS (FRN) that you have selected.
Timers Timers Video Audio TV Guide On Screen Select TIMERS to set your Clock, Sleep Timer and Day/Night Timer. Channel Manager Locks Timers 1. 2. Setup Use the CURSOR buttons or to highlight the function to be adjusted. Power Swivel Move SEL Select Press the SELECT button to select. Timers or Set The Clock -- : -- AM PST Set Sleep Timer 0:00 Set Day/Night Timer Not Set Move Set The Clock The Clock must be adjusted before you can use the DAY/NIGHT TIMER feature.
Timers Set Sleep Timer Select this feature to set your SLEEP TIMER from 30 minutes to 3 hours (30 minute increments). 1. Timers Set The Clock -- : -- AM PST Set Sleep Timer 0:00 Set Day/Night Timer Press the CURSOR PAD repeatedly to set your Timer from 0:00, 0:30, 1:00, 1:30, 2:00, 2:30 and 3:00.
Setup Setup Video Audio TV Guide Channel Select SETUP when setting your TV up for the first time. Channel Manager Locks Timers 1. 2. Use the CURSOR PAD , , and to select the sub-menu of your choice. or Setup Power Swivel Move SEL Select Press the SELECT button to select. Setup Menu Preference or Screen Saver Set The Inputs Set AV NET Set Closed Captions Set Monitor Out Upgrades Set Stand-By Mode Move SEL Select Video Menu Preference Setup the Language and background of the Menu OSD.
Setup Set the Menu Background This function allows you to choose from two menu backgrounds. Setup 1. Use the CURSOR PAD or to highlight SET THE MENU BACKGROUND (SHADED OR SOLID) of your choice. Use the CURSOR PAD or to select shaded or solid. Menu Preference Set The Language : Set The Menu Background : Move English Shaded SEL Return 2. Select SOLID for a black background (no picture can be seen behind menu screen), select SHADED and a light background is visible. 3.
Setup Set The Inputs Use this feature to give a name to any of the live video inputs. Setup Menu Preference Screen Saver 1. 2. Press the CURSOR PAD , to highlight the video inputs. Set The Inputs Set AV NET Set Closed Captions Set Monitor Out Press the CURSOR PAD , to select your choices. Upgrades Set Stand-by Mode Move INPUT 4 Auto Link Use this function to automatically turn the TV on and tune to INPUT 4 when it detects a video signal to INPUT 4. 1.
Setup AV NET SETUP WIZARD ( Example: A/V RECEIVER Setup) 1. Press the SELECT button to start the SETUP WIZARD. 10. Use the CURSOR PAD , , and to highlight NEXT, then press the SELECT button to move on to the next SETUP screen. AV Net Setup Wizard : A/V Receiver Setup Please choose the IR Code Set number. If the matched Code does not exist, please choose “Other” and proceed to the Learning mode. AV Net Setup Wizard Welcome to the AV Net Setup Wizard.
Setup 15. If you would like to label your A/V Receiver Source, use the CURSOR PAD or to highlight “ Yes “ then press the SELECT button to continue. Selecting “ No “ will bypass the Source labeling. AV NET SETUP WIZARD ( Example: DVD Setup ) 1. AV Net Setup Wizard : A/V Receiver Setup Press the SELECT button to start the SETUP WIZARD. Brand Name Hitachi IR Code Set 3 TV Input Not Connected (44/54) Monitor Out Not Connected Welcome to the AV Net Setup Wizard.
Setup Use the CURSOR PAD or to choose the brand name of your DVD. 9. Press the CURSOR PAD to highlight the IR CODE Set, then use the CURSOR PAD or to choose the preset IR Code. 10. Use the CURSOR PAD to highlight the “ POWER ” Test button. These On-screen buttons are called “ Soft Keys ”. 11. Press the SELECT button to pass the Power command through the IR Mouse and onto the DVD. ( Repeat steps 9 to 11 until finding the IR code that will power up the A/V Receiver.
Setup 5. 6. Use the CURSOR PAD or to select “Other” from brand name choices. Use the CURSOR PAD or to highlight “Learning Mode” then press the SELECT button. 10. If the IR code transfer was successful, the screen below appears, then select “OK” to continue setup. AV Net Setup Wizard : A/V Receiver Setup AV Net Setup Wizard : A/V Receiver Setup Please choose the Brand Name of your A/V Receiver.
Setup 16. Use the CURSOR PAD or to select the A/V Receiver Source if you have connected the Monitor Out and Optical Out to the A/V Receiver. Select “Not Connected” if not used. 17. Use the CURSOR PAD , , and to highlight NEXT, then press the SELECT button to move on to the next step. 23. Select “YES” to setup another device or select “No, thanks, I’m done” to exit the AV Net setup. AV Net Setup Wizard : A/V Receiver Setup Congratulations! Your A/V Receiver is now connected to your AV network.
Setup 7. 8. Use the CURSOR PAD or to choose the device you wish to learn. (Example: DVD 3) Select NEXT to continue. 13. Select another softkey to learn or select “DONE” to move on to the next screen. AV Net Setup Wizard : Custom Settings AV Net Setup Wizard : Custom Settings Select the DVD3 softkey to learn? TV Softkeys Custom settings POWER Please choose the device you wish to learn.
Setup 19. Continue with the normal procedures to setup TV Input, Monitor Out, Optical Out and the labeling of the source buttons. 20. Select “YES” to setup another device or select “No thanks, I’m done” to exit the AV NET setup. AV Net Setup Wizard : Device Settings Congratulations! Your DVD3 is now connected to your AV network. Would you like to setup another device? No thanks, I’m done. Move SEL Yes Select On-Screen Display NOTE: 1.
Setup Set Closed Caption Closed Captions are the dialogue, narration, and/or sound effects of a television program or home video which are displayed on the TV screen. Your local TV program guide denotes these programs as or . Setup Menu Preference Screen Saver Set The Inputs Set AV NET 1. Set Closed Captions Use the CURSOR PAD , , and to highlight and select the function to change. Set Monitor Out Upgrades Set Stand-by Mode 2.
Setup Set Monitor Out This feature will select the source of the Monitor Output. Setup Menu Preference Screen Saver Set The Inputs Set AV NET Monitor: Select MONITOR to output the audio and video signals of the chosen input source (CABLE, AIR, INPUT 1-5) to a VCR or other A/V device. Set Closed Captions Set Monitor Out Upgrades Set Stand-by Mode Move TV Tuner Out: Select TV TUNER OUT to output the audio and video signals of the last watched Antenna Source (CABLE, AIR).
Setup TV TUNER OUT: Available Monitor Out Signals Input Mode ANT (Air or Cable) Input 1 Input 2 Input 3 Input4 Input5 Digital No Macrovision S-Video Channel Macrovision S-Video Analog Channel Video HDMI_1 S-Video_1 Video_1 HDMI_2 S-Video_2 Video_2 Y-PbPr_3 Video_3 Y-PbPr_4 Video_4 S-Video_5 Video_5 Y-PbPr Y-PbPr Monitor Out (TV Tuner Out) S-Video Video L/R HiFi YES YES YES YES ANT ANT ANT ANT YES ANT YES YES YES ANT ANT ANT YES YES YES YES ANT ANT ANT ANT digital only Upgrades This feature shows s
Setup Set Stand-By Mode This function sets the IEEE1394 in Stand-By Mode to ON or OFF. Certain digital devices have a power save feature, in which the device automatically powers OFF when not in use (sleep mode). Only by setting the IEEE1394 function in Stand-By mode to ON, will the TV be able to control a device that is in sleep mode.
Equipment Care and Troubleshooting DO DO NOT Dust the screen and cabinet with a soft cloth. Do not clean your screen with strong cleaners, polishes or a chemically treated cloth. Clean the screen with a soft cloth moistened in warm water and dry with a soft cloth. A mild soap may be used if the screen is extremely dirty. Do not place rubber or vinyl products or cellophane tape on your Plasma Television. Place your Plasma Television away from extreme heat, humidity, and extremely dusty places.
Reception Problems IGNITION NOISE: Black spots or horizontal streaks may appear, picture may flutter or drift. Usually caused by interference from automobile ignition systems, neon lamps, electrical drills, and other electrical appliances. GHOSTS: Ghosts are caused by the television signal following two paths. One is the direct path and the other is reflected from tall buildings, hills or some other objects. Changing the direction or position of the antenna may improve reception.
Troubleshooting 1. Plasma Television Troubleshooting No. 1 2 3 4 5 6 7 8 9 10 11 12 Items Notes A buzzing sound may be heard when the plasma television is turned on in a very quiet Buzzing sound from Plasma room. This is due to the plasma panel drive circuit when it is functioning. The buzzing display panel. sound is normal and is not a malfunction. Some infrared rays are emitted from the plasma television panel that might affect the Infrared interference operation of other infrared controlling equipment.
Troubleshooting TV Guide On-ScreenTM Frequently asked quiestions continued If I add a recorder or change my cable service, how do I change my Setup information? 1) Highlight the Setup Service in the Guide. 2) Use the down arrow to select Change System Settings. 3) Follow the on-screen instructions. A show entry in the Guide reads “No Listing.” What does that mean? Show information for that entry was not available during the last Guide information update (download).
Useful Info PLUG AND PLAY This Class B digital apparatus meets all requirements of the Canadian Interference-Causing Equipment Regulations. This Class B digital apparatus complies with Canadian ICES-003. Cet appareil numérique de la classe B est conforme à la norme NMB-003 du Canada. Cable Compatible Television Apparatus- Tèlèvision câblocompatible, Canada. This Plasma Television receiver will display television closed captioning, ( paragraph 15.119 of the FCC rules.
Features and Specifications Features: Audio: • • • • • • • • • • • • • • • New Easy-to-Use On-Screen Menu Control (3 Language) New AV Network System Control Control up to 4 components with one remote control 2 IR Mouse cables included Illuminated and Preprogrammed Remote Control Power Management: ON/OFF via signal detection Picture Enhancement Input Signal Identification CableCARD compatible - Contact your local cable operator for more information HDMI (High Definition Multimedia Interface)(High Band
Set Dimensions 42 Inch Models (Includes Table Top Stand) Weight (lbs./kg): 98/44.5 55 Inch Models (Plasma Television Only) Weight (lbs./kg): 135.6/61.
Hitachi Service Hotline To locate an authorized HITACHI service facility in the continental U.S.A. and Canada, DIAL TOLL FREE 7 days a week, 24 hours a day 1-800-HITACHI Useful Information (1-800-448-2244) HITACHI AMERICA, LTD. HOME ELECTRONICS DIVISION HITACHI CANADA, LTD. DIGITAL MEDIA DIVISION HITACHI has made every effort to assure you hours of trouble free operation from your unit.
End User License Agreement for HITACHI DTV Software END USER LICENSE AGREEMENT FOR HITACHI DTV SOFTWARE IMPORTANT – READ CAREFULLY: This End User License Agreement for HITACHI DTV Software (this “Agreement”) is a legal agreement between you (“you” or “your”), in your capacity as the owner of a HITACHI brand digital television (the “DTV”), and HITACHI America, Ltd., Home Electronics Division ("HITACHI").
Appendixes Appendix A: INPUT Air or Cable (Analog Channels) INPUT 1 & 2 TYPE -- IMAGE INPUT FORMAT ASPECT NTSC 4:3 HDMI 480i/480p INPUT 1-5 S-Video1 Video NTSC INPUT 3 & 4 Y-PbPr 480i/480p 16:9 Letter 4:3 -16:9 Letter 4:3 -16:9 Letter 4:3 -- VIDEO ID -- AUTO ASPECT On/Off 16:9 Letter 4:3 No Info. 16:9 Letter 4:3 No Info. 16:9 Letter 4:3 No Info.
Appendixes Appendix E After the CableCARD has been successfully installed, a CableCARD Information menu appears in the SETUP menu of the On-Screen Display. Follow the instructions below to access the CableCARD Information menu. 1. Press the MENU button on the Remote Control to access the Main Menu screen. THINGS TO CHECK WHEN USING THE CableCARD / CableCARD Services 1. Check that the CableCARD is properly inserted in the CableCARD slot. 2.
Index A Accessories, . . . . . . . . . . . . . . . . . . . . . . . . . .4 Antennas (Connecting), . . . . . . . . . . . . . . . . .6 Aspect Ratio, . . . . . . . . . . . . . . . . . . . . .25, 45 Audio TruBass . . . . . . . . . . . . . . . . . . . . . . . . . . .47 Audio Settings . . . . . . . . . . . . . . . . . . . . .47-48 Audio Source . . . . . . . . . . . . . . . . . . . . . . . .48 Auto Noise Cancel . . . . . . . . . . . . . . . . . . . . .48 A/V Network . . . . . . . . . . . . . . . . . . . .
Notes 103
QR64865