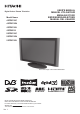
USER'S MANUAL MANUEL UTILISATEUR MANUALE D'USO BEDIENUNGSANLEITUNG MANUAL DEL USUARIO Digital Colour Plasma Television Model Name 42PD9700C 42PD9700N 42PD9700U 42PD9R10 55PD9700C 55PD9700N 55PD9700U This is the image of the model 42PD9700U. READ THE INSTRUCTIONS INSIDE CAREFULLY. KEEP THIS USER MANUAL FOR FUTURE REFERENCE For future reference, record the serial number of your monitor. SERIAL NO. This serial number is located on the rear of the monitor. Ver.
ENGLISH USER'S MANUAL Thank you for purchasing the HITACHI Plasma Television. Please read this user manual carefully before operating this product. To ensure proper operation, please read and follow ALL the instructions, especially the "IMPORTANT SAFETY INSTRUCTIONS" and "SAFETY PRECAUTIONS". Please keep this user manual for future reference. Ver.
CONTENTS IMPORTANT SAFETY INSTRUCTIONS ......... 2 INTRODUCTION ........................................... 3 About This Manual ................................................ 3 Trademark Credits ................................................. 3 About Software ...................................................... 3 Infomation for Users Applicable in European Union Countries ............. 3 SAFETY PRECAUTIONS ............................... 4 Important for United Kingdom ...............................
Thank you for purchasing the HITACHI Plasma Television. We hope that you will enjoy the great performance with this product. This Plasma Television has been designed to meet the international standards. However, it could cause personal injuries and property damage if improperly handled. In order to prevent potential danger and obtain maximum benefit from your set, please observe the following instructions when installing, operating, and cleaning the product.
SAFETY PRECAUTIONS For your safety, please read the following precautions carefully before using this product. Improper use would cause serious personal injuries and/or damage to your property or this product. Important For United Kingdom IMPORTANT FOR UNITED KINGDOM WORDING FOR CLASS I EQUIPMENT INSTRUCTION BOOKS AND LABELS The mains lead on this equipment is supplied with a molded plug incorporating a fuse, the value of which is indicated on the pin face of the plug.
SAFETY PRECAUTIONS (continued) ENGLISH WARNING There is a risk of fire, electric shock, or serious injury. ■ Do not insert liquids or any foreign objects (such as metals or flammable items) inside the unit. In case it happens, turn off the main power, unplug the Power Cord, and contact your dealer immediately. Use special caution when younger children are around the unit. ■ Do not remove cover, or modify the product. High-voltage components are installed inside of the unit.
SAFETY PRECAUTIONS (continued) CAUTION ■ Do not place the unit at a dusty place. It could cause malfunction. ■ Do not cover or block any ventilation holes on the product. The monitor would overheat, and it could cause fire or damage the product which may shorten its service life. Install the product in accordance with the instructions in this manual. Do not place the unit with ventilation side down. Do not install the unit on the carpet or bedclothes. Do not cover the unit with table cloth etc.
SAFETY PRECAUTIONS (continued) ENGLISH PRECAUTIONS ■ Do not install areas where it will be subjected to high temperatures. It could damage the cabinet or parts of the product. Do not install near any heat sources such as radiators, heat registers, stoves, or other apparatus that produce heat. Keep the unit out of direct sunlight. It could increase the temperature of the unit and cause malfunction. ■ Viewing Advice The lighting of the environment in which the product is used should be appropriate.
ABOUT PLASMA DISPLAY PANEL Image Retention of Plasma Display Panel The plasma display panel has one of characteristics that can result in panel image retention depending on how the plasma display is used. The following are the common reasons for and effective preventive measures against the image retention. Characteristics of Image Retention Image retention is caused by partial degrading the phosphors due to the partial display of character and figure. For example, when the characters as shown in Fig.
FEATURES ENGLISH Enjoy not only beautiful and high-quality pictures on the display, but also various kinds of useful and convenient functions in your daily life! Large-screen and high-definition plasma panel. Improved Digital signal processor. High quality sound with deeper, richer and dynamic bass tones. Various functions as Digital Terrestrial Television (More TV channels, EPG, etc). 3 Scart terminals installed. Accept more digital input devices with 2 HDMI terminals.
COMPONENT NAMES Main Unit Front Panel 1 2 6 1 2 3 4 5 6 Speaker Panel Main Power Switch (on the bottom surface) Remote Control Receiver Indicating Lamp Desktop Stand 1 2 3 4 5 Handgrips (only for 42PD9700U/C) Side Input Terminal Board (External Device Connection) Power Cord Socket Control Panel (see below for details) 5 4 3 Rear Panel 1 2 5 Please refer to 14 ~ 19 for the detailed information for the connections.
Remote Control Sub Power Function Select (TV/DVD/SAT) Press this button to select function mode indicating LED lamp. Normally, select “TV”. Input Select/DVD Control/Photo Input Control Press this button to change input mode. In addition, you can use these buttons while operating the selected brand of DVD player or Photo Input function. Menu Cursor OK Sound Mode Sound mode can be changed each time pressed in the following sequence.
PREPARATION Remote Control Batteries Installation This remote control operates on 2 “AA” batteries. Handling the Remote Control Use the remote control within about 5m from front of the unit’s remote-control sensor and within 30 degrees on both sides. 1. Open the battery compartment cover Slide open the battery compartment cover on the backside of the remote control in the direction of an arrow. 2.
PREPARATION (continued) Read SAFETY PRECAUTIONS ( 4 to 7 ENGLISH Safety Precaution on Main Unit Installation ) carefully besides this page. *The Desktop Stand has been used for the illustration in this manual. When installing the main unit, be sure to use the specified mount units in order to obtain maximum performance and maintain the safety. We assume no responsibility or liability for personal injuries or property damages caused by use of other mount units or improper installation.
CONNECTION Terminal Positions Rear Power Cord Socket Aerial Socket AV1 AV2 AV3 AV4 Monitor Out and Sub Woofer Service use only Power Swivel Terminal (See 51 ) PC Connection terminals (D-sub 15 pin and mini stereo for Audio) HDMI1, 2 and mini stereo for Audio Common Interface slot PH35826 SD MEMORY CARD PUSH-EJECT P AUDIO OK PC INPUT (AV1) INPUT(HDMI) AUDIO INPUT (AV2) INPUT (AV3) Y/VIDEO PB AUDIO PR L C SUB WOOFER VIDEO MONO R INPUT (AV4) WOW, SRS and symbol are trademarks of SRS Labs, In
CONNECTION (continued) ENGLISH Connecting Procedure (continued) 3. Connecting to External Equipment Terminals on Rear AV1 can be connected to the equipment with Composite/S-Video/Audio input, and Composite/Audio output. The output signal can support not only Analogue but also Digital Terrestrial TV signals.
CONNECTION (continued) Connecting Procedure (continued) AV4 can be connected to the equipment with either Component or Composite output. Depending on whether the Y/VIDEO input of your selected equipment is Y signal or Video signal, it automatically regards as Component or Composite. When using as Composite, do not insert the jacks into PB or PR.
CONNECTION (continued) ENGLISH Connecting Procedure (continued) PC terminals (D-sub 15 pin + audio) is connected to PC, which allows Analogue RGB signal. IN OUT [Example] (Mini Stereo plug) or HDMI 1 2 terminals can be connected to the devices with HDMI output, or if the external device has DVI output, this can be available with HDMI-DVI conversion cable. In case of using the HDMI-DVI, connect to audio terminal besides HDMI.
CONNECTION (continued) Connecting Procedure (continued) Terminals on Side Since the following terminals are located on the side, it is very convenient to connect an extra device on a temporary basis after completing the connections on the rear panel. AV5 can be connected to the equipment with S-Video output and composite output.
CONNECTION (continued) ENGLISH Connecting Procedure (continued) 4. Connecting the plug into the wall socket Connect the Power Cord after completing all other connections. (The type of plug is different from this drawing for some countries.) UK only Except UK CAUTION Use only the Power Cord provided. Do not use a power supply voltage other than that indicated(AC100-240V, 50/60Hz). It may cause fire or electric shock.
BASIC OPERATION Power On/Off Main Power switch (on the bottom surface) Now, turn On the main power to the unit. Make sure that the Power Cord is plugged into the wall socket. To turn On the power of the unit: 1. Press the Main Power switch on the unit. The Indicating Lamp will illuminates in Red (Standby mode). 2. Press Sub Power button either on the control panel or on the remote control. Sub Power button The colour of the Indicating Lamp turns into Green, and the image will display on the screen.
BASIC OPERATION (continued) When you turn ON the TV for the first time, your TV automatically leads to the settings of “Language,” “Country” and “Auto Tuning.” (Also, refer to the attached Quick Guide.) Language 1. The first screen appeared will ask you to choose the language of your Analogue TV’s display. button, select language you preferred from the list and press OK button. 2. Using button, select your residing country and press OK button. 3. Then, using 4.
BASIC OPERATION (continued) Volume UP/DOWN 1. To increase the sound volume, press button on the remote control, or Volume Up button on the control panel. The Volume Indicator value on the screen will shift right. button on the 2. To decrease the sound volume, press remote control or Volume Down button on the control panel. The Volume Indicator value on the screen will shift left. Mute button Mute 1. To mute the sound, press Volume Up/Down button button on the remote control.
BASIC OPERATION (continued) ENGLISH Input Switching to TV/AV1~5, HDMI, and RGB Input Select buttons By pressing Input Select button, you can switch the input. To watch actual broadcast, press Input Select button on the control panel, the numeric buttons or Channel Up/Down button on the remote control. To display the image outputting from the external equipments connected to each terminal (DTT / TV, AV1~5, HDMI 1 / 2, and RGB), select corresponding mode. 1. Press Input Select buttons on the remote control.
TV SETUP OPERATION How to use the On-Screen Display (OSD) system With the On-Screen Display system, you can access the various kinds of the features and functions in this product. Picture Audio Timer Function Setup Language Select OK Set Basic Operation MENU 1. Press button on the remote control or Menu button on the control panel of the unit. The Main Menu is displayed on the screen as shown on the right. 2. To select the item, press buttons. The selected item will be highlighted in Yellow.
TV SETUP OPERATION (continued) ENGLISH Setup Menu (TV mode) With this menu, you can access various kinds of features relating to TV channel settings. Setup Auto Tuning Manual Tuning Fine Tuning Sort Teletext Language Auto Off Scart Output Select OK Set Selected Items Off TV Return Setup hint ( Page 1 ) ( Page 2 ) Country ( Page 3 ) Auto Tuning Select the country where you watch TV so that it starts auto-tuning for appropriate channels.
TV SETUP OPERATION (continued) Setup Menu (TV mode) (continued) Selected Items Setup hint Auto Colour System PAL SECAM Select colour system from 5 different modes. NTSC4.43 NTSC3.58 Manual Tuning On It allows you to skip unregistered channels automatically when you use channel up (+) down (-) buttons to select channels. This function will automatically skip unavailable channels when set to on.
TV SETUP OPERATION (continued) ENGLISH Setup Menu (AV mode) With this menu, you can select or adjust the condition of the input signals from each terminal. Setup System Colour System Video Input Scart Output Select Set Selected Items System 1 TV Return Setup hint Do not change the original setting. (System1: Europe/Asia, System2:North America) Composite and S-video input only. System 1 System System 2 Auto PAL System 1 SECAM NTSC4.43 Colour system AV1~AV5 NTSC3.
TV SETUP OPERATION (continued) Setup Menu (RGB mode) With this menu, you can adjust the display condition of the image which is inputting from the RGB terminals. By pressing ▼button at the bottom of the 1st Setup menu page, the 2nd Setup menu page will appear on the screen. Setup Auto Adjust Adjust Horizontal Position 0 Vertical Position +31 Horizontal Clock –20 Clock Phase 10 Reset Reset Select Return Exit Selected Items 0.
TV SETUP OPERATION (continued) Selected Items ENGLISH Setup Menu (RGB mode) (continued) Setup hint 0.7V Input Level 1.0V Normally, select [0.7V]. Select [1.0V] only when the whole display becomes too white. Off Select whether indicating the PC signal frequency information on Input Signal Screen Display or not. Frequency Display On Off WVGA Type On Off 1280x768 1366x768 Off On PC Movie WXGA Mode Vertical Filter Frequency Mode It allows you to switch display size to [Full] and [Real].
TV SETUP OPERATION (continued) Function Menu This menu provides various ways to protect your panel, reduce power consumption, and set up utilizing the useful functions, such as Freeze Mode and Photo Input. Function Screen Saver Off Screen Wipe On 60Min. Black Side Panel Off Video Power Save Off Freeze Mode Split Default Zoom Panoramic Eco Mode On Luminance Manager Off Reset Reset Select Set Screen Wipe Setup hint Off 5Min. 10Min. 20Min. 40Min. 60Min. On 60Min.
TV SETUP OPERATION (continued) Selected Items Background Setup hint 1 2 Off Slide Effect 1 2 5Sec. Slide Interval 10Sec. 30Sec. Slide Music Slide Mode Reset ENGLISH Function Menu (continued) Off 1 2 1 2 This is available only for Photo Input function. Switch the pattern of background. See details on 65 . This is available only for Photo Input function. You can select the method of switching slides during slide show. See details on 63 . This is available only for Photo Input function.
TV SETUP OPERATION (continued) Picture Menu (TV/AV mode) In this menu, you can make specific adjustments for the picture based on your preference. By pressing ▼button at the bottom of each menu page, the next Picture menu page will appear on the screen.
TV SETUP OPERATION (continued) Selected Items Setup hint Dynamic Contrast Mode* ENGLISH Picture Menu (TV/AV mode) (continued) Normal Auto It allows you to choose from 3 modes. Dynamic: Sharpen the gradation to improve the contrast feeling. Normal: Reproduce as faithful gradation as possible. Auto: Adjust to natural brightness without blurred white by detecting the bright parts on images. Each item on this menu screen can be restored to the original factory settings by pressing OK button.
TV SETUP OPERATION (continued) Picture Menu (TV/AV mode) (continued) Selected Items Setup hint Amplitude Red Green Colour Temp. Adjust** On Blue Cut off Red Green Blue On: When you want to set specific adjustments in each of the 4 Colour Temperature modes. You can adjust on the amplitude and cut off. The settings reflect on the Colour Temperature. Amplitude: subdue the following colours on the brighter parts. Cut off : subdue the following colours on the darker parts. Off: Remains as default setting.
TV SETUP OPERATION (continued) ENGLISH Picture Menu (RGB mode) In this menu, you can make specific adjustments for the RGB picture based on your preference. Picture Contrast Brightness Colour Hue Picture Enhancement Colour Temperature Colour Temp. Adjust Reset Select OK Set Selected Items : +31 : –31 : 0 : +31 : Off : Normal Reset Return Setup hint This adjusts the contrast to meet the lighting environment Contrast -31~+31 (+32~+40) .
TV SETUP OPERATION (continued) Picture menu (RGB mode) (continued) Selected Items Setup hint Amplitude Red Green Blue Colour Temp. Adjust.** On Cut off Red Green Blue On: When you want to set specific adjustments in each of the 4 Colour Temperature modes. You can adjust on the amplitude and cut off. The settings reflect on the Colour Temperature. Amplitude: subdue the following colours on the brighter parts. Cut off : subdue the following colours on the darker parts. Off: Remains as default setting.
TV SETUP OPERATION (continued) ENGLISH Audio Menu With this menu, you can adjust and customize the audio condition as you like. You can move on to the next menu screen by pressing ▼button at the bottom.
TV SETUP OPERATION (continued) Audio Menu (continued) Selected Items Headphone Volume Setup hint 0~63 A/B Headphone Select B It allows you to adjust the volume of the headphone. The sound from the speaker will automatically set to MUTE when the headphone is connected to the terminal. Select either side of the display that you want to hear the sound with headphone during 2-picture mode.
TV SETUP OPERATION (continued) Analogue Teletext ENGLISH 12 : 34 : 56 Page Number How to operate the Teletext You can display the Teletext simply by pressing the remote control buttons. Link pages NOTE Select Teletext language from Setup Menu shown on 26 . Red Operation To activate Teletext mode. To exit from the Teletext mode. To split the screen into two and watch both Teletext information and actual broadcast at the same time. Press again to watch Teletext on a single screen.
DIGITAL TERRESTRIAL TELEVISION (DTT) OPERATION How to use the On-Screen Display (OSD) system With the On-Screen Display system, you can access the various kinds of the features and functions in this product. Basic Operation MENU 1. Press MENU button on the remote control or Main Menu Channel List Installation Configuration Timers Language TV Setup Common Interface button on the control panel of the unit. The DTT Main Menu is displayed on the screen as shown on the right. 2.
DIGITAL TERRESTRIAL TELEVISION (DTT) OPERATION (continued) If you want to change the setting after completing the easy preset, set up individually as follow. Refer to the easy preset. 21 ENGLISH Changing Preset about Re-Installing DTT channels Reset to the factory setting. MENU button on the remote control. 1. Press 2. Select "Installation" on the DTT main menu. 3. Select "First Time Installation". 4.
DIGITAL TERRESTRIAL TELEVISION (DTT) OPERATION (continued) Channel Selections There are 4 ways to select the channels: stepping through the channel, selecting by number, selecting from the onscreen channel list, and using the Electronic Programme Guide (EPG). Stepping through the Channel Press CHANNEL UP/DOWN button to switch the next or previous channel on the list. Information banner is displayed every time channel is switched. Refer to 44 about the information banner.
DIGITAL TERRESTRIAL TELEVISION (DTT) OPERATION (continued) If your TV is 42/55PD9700C in Spain or Germany, you can sort the channels manually as you want. (The channels in UK & France will be automatically sorted when installing.) MENU ENGLISH Channel Sort CHANNEL SORT 1. WDR 2. FAB 3. BBC World 4. Südwest BW/RP button. 1. Press 2. Select “Channels” on the DTT main menu. 3. To sort the channels, select “Channel Sort” by pressing 4. Select the channel you wish to sort with OK button.
DIGITAL TERRESTRIAL TELEVISION (DTT) OPERATION (continued) Utilizing the Infomation Tool Information Banner Whenever the channels are changed using the button or numeric buttons, the TV displays the picture along with an information banner at the bottom of screen for approximately 3 seconds. The information banner also 16:10-16:35 16:35-17:00 Now: 50/50 Next: Ace Lightning Signal Level: 1. 19:28 BBC ONE button whilst watching DTT. Press it again to return appears by pressing to normal viewing screen.
DIGITAL TERRESTRIAL TELEVISION (DTT) OPERATION (continued) ENGLISH Utilizing the Infomation Tool (continued) Electronic Programme Guide (EPG) Like the Channel Lists, the EPG screen displays a list of the stored channels along with information on what programmes are being broadcast. You will have either 7 days EPG or Now and Next EPG if the service is available. 7days EPG 1. Press button to display EPG screen. button. 2. Select channels with 3.
DIGITAL TERRESTRIAL TELEVISION (DTT) OPERATION (continued) Timer Programming Timer Programming is available to not only record multiple programmes but also remind you that the desired programme is about to start whilst you are watching another channel. From “Timers” Menu PROGRAMME TIMERS You can record multiple programmes from “Timers Menu”. MENU button on the remote control. 1. Press 2. Select “Timers” from the DTT main menu. 3. Highlight the item on the row of “Mode” using 4. Press OK button.
DIGITAL TERRESTRIAL TELEVISION (DTT) OPERATION (continued) ENGLISH Configuring the Setting Setting Audio and Subtitle Language The available audio and subtitle languages can be checked from “Language” menu. Then, you can set your preferred language from “Configuration” menu as below. Audio Language CONFIGURATION MENU 1. Press button on the remote control. 2. Select “Configuration” on the DTT main menu. 3. Select “Audio Language” to highlight it. button to select the language. 4.
DIGITAL TERRESTRIAL TELEVISION (DTT) OPERATION (continued) Configuring the Setting (continued) Setting the Protection There are various kinds of protection to avoid certain operations: Channel Lock and Menu Lock (Main Menu Lock and Installation Lock). Set Lock Key To use the locks effectively, do change the PIN code from the factory default setting, which should be known and remembered only by you. The default setting is 0000. MENU button on the remote control. 1. Press 2.
DIGITAL TERRESTRIAL TELEVISION (DTT) OPERATION (continued) ENGLISH Configuring the Setting (continued) Upgrading DTT The DTT can be upgraded via the configuration menu. MENU button on the remote control. 1. Press 2. Select “Configuration” from the DTT main menu. 3. Select “Receiver Upgrade”. button to select “Automatic Download” along 4. Press with “Enabled”. Automatic upgrade method takes place in standby/power save mode. The indicator lamp will blink whilst this is taking place.
DIGITAL TERRESTRIAL TELEVISION (DTT) OPERATION (continued) Common Interface Common Interface enables you to plug in a module which for example receives Pay TV service. Once the common interface module has been successfully inserted, select a service from the DTT main menu as follows. MENU Common Interface Common Interface on the remote control. 1. Press No Common Interface Media Guard 2. Select “Common Interface” to show a new module detected. menu. 3.
FUNCTION ENGLISH Power Swivel SWIVEL With the Desktop stand, you can adjust the angle of the panel side to side by pressing button on the remote control. SWIVEL button on the remote control. 1. Press The Swivel Display (as shown in the figure on the right) will appear on the screen. buttons while Swivel Display is on 2. Adjust the angle of the panel with the screen. The monitor will be able to move ±30 degrees to each side.
FUNCTION (continued) ZOOM button Size Switching Each time button of the remote control is pressed, the screen display size is switched in sequence, and the status will be displayed at the bottom of the screen. DTT/TV/AV1~AV3 signal input Auto Full Current Output Image (Input Signal) Zoom C14:9L 14:9Zoom Panoramic Display Size To display suitable screen as follows. Auto Play a image with the suitable format by automatically selecting depending on the picture format or programme being broadcast.
FUNCTION (continued) ENGLISH Size Switching (continued) AV4 / AV5 / HDMI1 / HDMI2 signal input Panoramic 4:3 Current Output Image (Input Signal) (4:3 Signal) Full Zoom C14:9L 14:9Zoom Display Size To display suitable screen as follows. 4:3 Play a 4:3 image on screen faithfully. Blanking occurs on both sides. Panoramic Play a 4:3 image which enlarges horizontal and vertical size of the middle in equal scales, and displays both sides appearing much wider.
FUNCTION (continued) Size Switching (continued) Position Adjustment Vertical picture position can be adjusted for Panoramic, Zoom, C14:9L, and 14:9 Zoom mode as follows. 1. Press buttons while operating the picture size display. 2. “Position” display will appear. 3. Adjust the position by buttons. Adjustment range of each picture size are as shown below. Panoramic: -12 to+12 (The position cannot be adjusted in Panoramic 2 mode.
FUNCTION (continued) ENGLISH Size Switching (continued) CAUTION Using a wide-screen monitor This monitor has a screen mode selection feature. If an incompatible screen mode is selected to play certain software, such as a TV program, the image would appear different from the original. Take this into consideration when making screen mode choices.
FUNCTION (continued) Multi Picture Mode With this feature, you can watch different channels simultaneously on one screen in several ways. As for the available signals, please refer to "Recommended Signal List" on 75 . This function is NOT available in HDMI input. To activate Multi Picture mode in either DTT, TV, AV, or RGB mode, press button on the remote control. 2-picture mode You can watch two different pictures side by side. This mode is available in DTT, TV and AV mode (AV1~5 Input).
FUNCTION (continued) ENGLISH Multi Picture Mode (continued) 2-picture mode (continued) 4. To switch to 4-picture mode, press 2-4-12 button once. The 4-picture mode is displayed on the screen. NOTE Each time 2-4-12 2-Picture AV1 button is pressed, the picture mode will be switched by following order.
FUNCTION (continued) Multi Picture Mode (continued) 4-picture mode (continued) NOTE You cannot display the picture with Component signal on Side B screens. button. 4. To EXIT from Multi Picture mode, press button to activate the Multi Picture mode, it will start from 4-picture mode. Next time you press button. 5. To switch to 12-picture mode, press The 12-picture mode is displayed on the screen. 2-4-12 12-picture mode You can check 12 different live broadcast channels on one screen.
FUNCTION (continued) ENGLISH Multi Picture Mode (continued) Activate the Multi Picture Mode in RGB Mode When you activate the Multi Picture mode in RGB Input, the picture will be displayed at the mode which the Subscreen is displayed inside of the large screen (Main-screen). To activate Multi Picture mode, press button on the remote control. indicates the following. The speaker icon The audio sounds can be heard on the side with the speaker icon.
FUNCTION (continued) Picture Freezing By pressing button, you can change to freeze mode easily anytime you 2-4-12 like. Press it again to return to normal picture. FREEZE button There are two types of freeze mode. You can select these in the “Freeze Mode” from Function Menu.( 30 ) Split: It displays 2 pictures from the same source. One is active (left), while the other is still picture (right). This is very useful in order to avoid missing something or to make a note of something, such as a recipe.
FUNCTION (continued) ENGLISH Photo Input Function With this Photo Input function, you can enjoy watching Photos from such devices as Digital Still Camera and SD card on monitor along with useful features such as Slide Show with Background Music and Movie picture. Operating the Photo Input 1. Before operating this function, make sure to turn the power OFF /Standby. 2. Prepare the DSC (Digital Still Camera) / USB card reader/ SD card or MMC as follows.
FUNCTION (continued) Photo Input Function (continued) Displaying Still Picture in Photo Mode Thumbnail-Size Image (Index) to Full-Size Image 1 2 3 4 17 18 19 20 17 18 19 20 5 6 7 8 21 22 23 24 21 22 23 24 9 10 11 12 25 26 27 28 25 26 27 28 13 14 15 16 29 30 31 32 29 30 31 P P st nd Photo Index (1 Page). 32 nd Photo Index (2 Page) Move to next page. Photo Index (2 Page) Select the file. OK No. 23 28/05/03 1600x1200 No.
FUNCTION (continued) ENGLISH Photo Input Function (continued) Displaying Still Picture in Photo Mode (continued) Slide Show Function SLIDE SHOW 17 18 19 20 21 22 23 24 25 26 27 28 29 30 31 32 OK No. 23 28/05/03 1600x1200 Slide Show begins.* Photo Index (2nd Page) Select the file. OK Start Slide Show is paused. *You can select where to start Slide Show. See “Slide Mode” in the table 1.
FUNCTION (continued) Photo Input Function (continued) Displaying Movie Picture in Movie Mode Thumbnail-Size Image (Index) to Full-Size Image: 1 2 3 4 1 2 3 4 17 18 19 20 17 18 19 20 5 6 7 8 5 6 7 8 21 22 23 24 21 22 23 24 9 10 11 12 9 10 11 12 25 26 27 28 25 26 27 28 13 14 15 16 13 14 15 16 29 30 31 32 29 30 31 st st Photo Index (1 Page). nd Movie Index (1 Page). or*1 or*5 Movie Index (2 Page). Movie starts.
ENGLISH FUNCTION (continued) Photo Input Function (continued) Other You can select the background pattern on “Background” from “Function Menu.” Function Menu Background Selection Description Select preferred background pattern. 1: Striped texture of gray 2: Green checked pattern 1→2 button whenever you want to return from full size image to index. Press button. The file information is displayed by pressing * The size of the image depends on the resolution for the image.
FUNCTION (continued) Photo Input Function (continued) CAUTION The picture may not be displayed on this monitor in case of copying, viewing or editing by computers, etc. Do not connect any apparatus other than DSC, USB card reader, and SD card/MMC to the Photo Input connector. It causes the malfunction. Do not connect a DSC and USB card reader with USB HUB. Pictures may not be displayed correctly, or it causes a malfunction.
FUNCTION (continued) ENGLISH Audio Switching NICAM / Sound Multiplex(including A2) (TV mode) button of remote control. Audio can be switched only You can make optimum use of available audio by pressing if receiving NICAM and sound multiplex signals; otherwise, pressing this button will have no effect, such as when only mono sound is received. These can be divided into two main categories: Bilingual/Dual Sound broadcast and Stereo broadcast.
FUNCTION (continued) Power Save Mode When AV input is selected You are provided with the function to save power consumption when no signal is detected in AV input. Set to On in “Video Power Save” from Function Menu, which leads to the power save mode in AV4 /HDMI1 /HDMI2 and the Standby mode in other AV input. (Please see the table below for details) Refer to 30 about “Video Power Save”.
FUNCTION (continued) Recall button DVD Player / STB Selection ENGLISH Function Select button You can use this remote control to operate DVD Player and Set Top Box of other button, press (or hold) the required makers as well as this set. After pressing buttons to select the maker and type as shown below. Set up hint Example: HITACHI DVD ② 1. Set up the maker. button to indicate the DVD LED on the remote control. While the DVD Press and ① buttons. LED is blinking (Approx. 30 Seconds), press + 2.
TROUBLESHOOTING Before calling service technician, check the following tables first. If the problem is not be solved with the suggested procedures, contact your local dealer. For your safety, NEVER try to repair the product by yourself. When Following Messages Appear on the Screen Message Condition / Action Page Power Save This indicates it is in Power Save mode. (in AV/RGB mode) The indicating lamp lights in orange. 30 , 68 No Sync. Signal The unit cannot detect any signals from any input terminals.
TROUBLESHOOTING (continued) Symptoms No picture The Indicating lamp → Off No picture The Indicating lamp → Orange It means that the unit is in “Power Save mode”. Check list Page Check if the Power Cord is plugged into the socket firmly. Check if the Main Power is ON. Check if the signal cable is connected correctly and firmly. Adjust the level of Brightness and Contrast lower. The top of the monitor and surface of the panel heat up. It may happen when you use the unit for long hours.
TROUBLESHOOTING (continued) Symptom and Check List (continued) Symptoms Check list Cannot display the image from “Photo Input function”. 61 , 65 , 66 The image on the screen is moving in an oblique direction. (RGB input mode only) Adjust “Horizontal Clock” and “Clock Phase”. 28 The coarse horizontal stripes could be seen in full-display mode. (RGB input mode only) Adjust “Horizontal Clock”. 28 AAAAA The part of the image is lacking.
PRODUCT SPECIFICATIONS Panel Display dimensions Approx. 42 inches (922 (H) x 524 (V) mm, diagonal 1059mm) Approx. 55 inches (1230 (H) x 692 (V) mm, diagonal 1412mm) Resolution 1024(H) x 1080 (V) pixels 1366 (H) x 768 (V) pixels including Stand: 1134(W)x728(H)x350(D) mm including Stand: 1510(W)x933(H)x450(D) mm excluding Stand: 1134(W)x648(H)x108(D) mm excluding Stand: 1510(W)x840(H)x105(D) mm including Stand: 45.0kg excluding Stand: 39.3kg including Stand: 73.5kg excluding Stand: 62.
PRODUCT SPECIFICATIONS (continued) Signal Input RGB terminal (D-sub 15-pin connector) Pin 1 2 3 4 5 6 7 8 9 10 11 12 13 14 15 Input signal R G or sync on green B No connection No connection R.GND G.GND B.GND No connection GND No connection [SDA] H. sync or H/V composite sync V.sync. [V.
PRODUCT SPECIFICATIONS (continued) ENGLISH Recommended Signal List With HDMI input Signal mode No. Signal Name 1 2 3 4 5 6 7 8 9 VGA 576i 480i 576p 480p 1080i/50 1080i/60 720p/50 720p/60 Resolution Vertical frequency (Hz) Horizontal frequency (kHz) Dot clock frequency (MHz) 640 X 480 720(1440) X 576 720(1440) X 480 720 X 576 720 X 480 1920 X 1080 1920 X 1080 1280 X 720 1280 X 720 59.94 50.00 59.94 50.00 59.94 50.00 60.00 50.00 60.00 31.47 15.63 15.73 31.25 31.47 28.13 33.75 37.50 45.00 25.18 27.
PRODUCT SPECIFICATION (continued) Recommended Signal List (continued) With Multi Picture Function 2-Picture / (1080i)* Input terminal Sub AV1 ~AV5 AV2, AV3 AV4 Main DTT TV PAL, SECAM NTSC3.58/4.43 RGB 576i, 576p 480i, 480p 720p/50, 60 1080i/50, 60* DTT TV ○ ○ ○ ○ ○ ○ ○ ○ ○ ○ ○ ○ ○ ○ ○ ○ AV1~AV5 PAL NTSC3.58 SECAM NTSC4.
ENGLISH Thank you for purchasing this Hitachi Television. In the unlikely event that this product should develop a fault, we undertake to repair or replace any part of the product which fails due to a manufacturing defect within 12 months of the date of purchase provided that ... 1. the product has been installed and used only in accordance with the instructions supplied with the product. 2. the product has not been repaired, maintained, or modified by any person other than a Hitachi authorized dealer. 3.
+LWDFKL /WG &RQVXPHU %XVLQHVV *URXS 6KLQ 2WHPDFKL %OGJ I 2WHPDFKL &KRPH &KL\RGD .X 7RN\R -DSDQ +,7$&+, (8523( /7' &RQVXPHU $IIDLUV 'HSDUWPHQW 32 %R[ 0DLGHQKHDG %HUNVKLUH 6/ =( 81,7(' .,1*'20 7H O (PDLO FRQVXPHU PDLO#KLWDFKL HX FRP +,7$&+, (8523( 6 $ .