
User's Manual


English
48
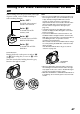
Inserting and Removing Disc
INSERTING DISC
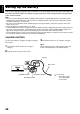
1 Press down the DISC EJECT button once and
release it.
A few moments after the ACCESS/PC
indicator blinks, the cover of disc insertion
block will open.
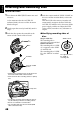
2 Gently open the cover by hand fully until it
stops.
3 Push the disc against the turntable at the
centre to lock it until a click is heard.
• Note that the recording surface of disc must face
the inside of DVD video camera/recorder.
• Never touch the disc recording surface or pickup
lens.
• Use the disc cleaning cloth provided to wipe off
any dirt adhering to the disc recording surface.
• Do not use a dirtied or scratched disc.
• The recording side must face the inside (DVD
video camera/recorder).
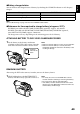
4 Push the section marked “PUSH CLOSE” on
the cover of disc insertion block, to close the
cover.
Then the DVD video camera/recorder will
automatically recognise the disc: While the
ACCESS/PC indicator is lit, do not cut off the
power supply, and do not subject the DVD
video camera/recorder to any vibrations or
impact.
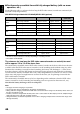
●Identifying recording sides of
disc:
Single sided disc:
The recording side is
opposite to the printed label.
Double-sided disc:
The recording side of “SIDE
A” is opposite to the “SIDE
A” marked side.
The recording side of “SIDE
B” is the “SIDE A” marked
side.
Push the shaded
portion.
Tur nt able
Pickup lens
D
V
D
-
R
A
M
/
S
I
D
E
A
“SIDE A” mark
The opposite side is
the “SIDE A”
recording side.