
Operation Manual


8
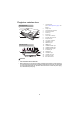
Remote control
1.
Toggles the projector between standby
mode and on.
2. MENU/EXIT
Turns on the On-Screen Display
(OSD) menu. Goes back to previous
OSD menu, exits and saves menu
settings.
3. FREEZE
Freezes the projected image.
4. Left
5. MODE/ENTER
Selects an available picture setup
mode.
6. BLANK
Used to hide the screen picture.
7. Keystone/Arrow keys ( Up,
Down)
Manually corrects distorted images
resulting from an angled projection.
8. VOLUME (+, -)
Adjusts the sound level.
9. AUTO
Automatically determines the best
picture timings for the displayed
image.
10. Right
Activates panel key lock.
When the On-Screen Display (OSD)
menu is activated, the #3, #4, and #9
keys are used as directional arrows to
select the desired menu items and to
make adjustments.
11. SOURCE
Displays the source selection bar.
12. MAGNIFY (+, -)
Magnifies or reduces the projected
picture size.
13. TIMER ON
Activates or displays an on-screen
timer based on your own timer setting.
14. TIMER SET UP
Enters presentation timer setting
directly.
15. Battery cover
1
2
5
4
8
6
7
3
7
9
12
11
13
10
14
15
I
I