Projector CP-DX250/CP-DX300 User Manual Thank you for purchasing this product. Please read this manual before you operate your projector. Save it for future reference.
Table of contents Important safety instructions .......................2 Maintenance ...................41 Care of the projector .......................... 41 Lamp information .............................. 42 Introduction......................4 Troubleshooting .............47 Projector features ................................. 4 Shipping contents................................. 5 Projector exterior view......................... 6 Controls and functions ......................... 7 Specifications ....
Important safety instructions Your projector is designed and tested to meet the latest standards for safety of information technology equipment. However, to ensure safe use of this product, it is important that you follow the instructions mentioned in this manual and marked on the product. Safety Instructions WARNING 1. 2. 3. 4. 5. 6. 7. 8. 9. 10. 11. Please read this manual before you operate your projector. Save it for future reference. Do not look straight at the projector lens during operation.
12. Do not block the ventilation holes. If the ventilation holes are seriously obstructed, overheating inside the projector may result in a fire. - Do not place this projector on a blanket, bedding or any other soft surface. - Do not cover this projector with a cloth or any other item. - Do not place inflammables near the projector. 13. Always place the projector on a level, horizontal surface during operation.
Introduction Projector features The projector integrates high-performance optical engine projection and a user-friendly design to deliver high reliability and ease of use. The projector offers the following features. • • • • • • • • • • • • • • • Presentation timer for better control of time during presentations Supports 3D display Color Management allowing color adjustments to your liking Less than 0.
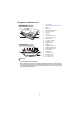
Shipping contents Carefully unpack and verify that you have all of the items shown below. If any of these items are missing, please contact your place of purchase. Standard accessories The supplied accessories will be suitable for your region, and may differ from those illustrated. Projector Power Cord VGA Cable Multi-language user manual CD User manual Remote Control & Battery GOST-R Declaration Optional accessories 1.
Projector exterior view 1. Front/upper side 1 2 5 6 7 3 8 4 9 Rear/lower side 11 17 12 13 15 14 16 1819 20 21 10 22 2. 3. 4. 5. 6. 7. 8. 9. 10. 11. 12. 13. 14. 15. 16. 17. 18. 19. 20. 21. 22. Control panel (See "Control panel" on page 7 for details.
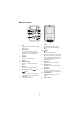
Controls and functions Control panel 1 2 7 3 8 4 9 5 10 6 3 1. 2. 3. 7. TEMPerature indicator light Lights up red if the projector's temperature becomes too high. LAMP indicator light 8. Indicates the status of the lamp. Lights up or flashes when the lamp has developed a problem. 9. Keystone/Arrow keys ( Up, Down) Manually corrects distorted images resulting from an angled projection. 4. 5. 6. Left Used to hide the screen picture. MODE/ENTER Selects an available picture setup mode.
Remote control 1 2 3 7 9 4 5 6 7 10 11 12 13 8 14 15 1. 2. 3. 4. 5. 6. 7. 9. I I Toggles the projector between standby mode and on. MENU/EXIT Turns on the On-Screen Display (OSD) menu. Goes back to previous OSD menu, exits and saves menu settings. FREEZE Freezes the projected image. Left MODE/ENTER Selects an available picture setup mode. BLANK Used to hide the screen picture. Keystone/Arrow keys ( 11. 12. 13. Up, Down) 8. 10. 14.
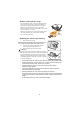
Remote control effective range The Infra-Red (IR) remote control is located on the front of the projector. The remote control must be held at an angle within 30 degrees perpendicular to the projector's IR remote control sensor to function correctly. The distance between the remote control and the sensor should not exceed 4 meters (~ 13 feet). Make sure that there are no obstacles between the remote control and the IR sensor on the projector that might obstruct the infra-red beam. 15º 15º 4m (approx.
Positioning your projector Choosing a location Your room layout or personal preference will dictate which installation location you select. Take into consideration the size and position of your screen, the location of a suitable power outlet, as well as the location and distance between the projector and the rest of your equipment. Your projector is designed to be installed in one of following possible installation locations: 1.
Projection dimensions Refer to "Dimensions" on page 50 for the center of lens dimensions of this projector before calculating the appropriate position.
Connection When connecting a signal source to the projector, be sure to: • • • Turn all equipment off before making any connections. Use the correct signal cables for each source. Ensure the cables are firmly inserted. In the connections shown below, some cables may not be included with the projector (see "Shipping contents" on page 5). They are commercially available from electronics stores. The connection illustrations below are for reference only.
Connecting a computer or monitor Connecting a computer The projector provides two VGA input sockets that allow you to connect them to both IBM® compatibles and Macintosh® computers. A Mac adapter is needed if you are connecting legacy version Macintosh computers. To connect the projector to a notebook or desktop computer: 1. 2. Take the supplied VGA cable and connect one end to the D-Sub output socket of the computer.
Connecting Video source devices You can connect your projector to various Video source devices that provide any one of the following output sockets: • HDMI • Component Video • S-Video • Video (composite) You need only connect the projector to a Video source device using just one of the above connecting methods, however each provides a different level of video quality.
If you have a separate sound system, you will most likely want to connect the audio output of your Video source device to that sound system, instead of to the mono audio projector. • The audio output only works when a signal source is connected to the projector. • When an audio cable is connected to the AUDIO OUT port, the projector’s speaker will be muted. Connecting an HDMI device You should use an HDMI cable when making connection between the projector and HDMI devices.
Connecting an S-Video source device Examine your Video source device to determine if it has an unused S-Video output socket available: • • If so, you can continue with this procedure. If not, you will need to reassess which method you can use to connect to the device. To connect the projector to an S-Video source device: 1. 2. Take an S-Video cable and connect one end to the S-Video output socket of the Video source device.
Operation Starting up the projector 1. Plug the power cord into the projector and into a wall socket. Turn on the wall socket switch (where fitted). 2. Press II on the projector or remote control to start the projector. The POWER indicator light stays blue when the projector is on. (If necessary) Rotate the focus ring to adjust the image clearness. • If the projector is still hot from previous activity, it will run the cooling fan for approximately 60 seconds before energizing the lamp.
Using the menus The projector is equipped with On-Screen Display (OSD) menus for making various adjustments and settings. The OSD screenshots below are for reference only, and may differ from the actual design. Below is the overview of the OSD menu. Main menu icon Highlight Sub-menu Current input signal Wall Color Aspect Ratio Off Auto Keystone Position Phase Status 15 15 H. Size Digital Zoom 3D Sync 3D Sync Invert Disable Analog RGB MENU Exit Go to the previous page or to exit.
Utilizing the password function For security purposes and to help prevent unauthorized use, the projector includes an option for setting up password security. The password can be set through the On-Screen Display (OSD) menu. For details of the OSD menu operation, please refer to "Using the menus" on page 18. You will be inconvenienced if you activate the password functionality and subsequently forget the password.
Entering the password recall procedure 1. 2. 3. 4. 5. Open the OSD menu and go to the SYSTEM SETTING: Advanced > Security Settings > Change Password menu. Press MODE/ENTER on the projector or remote control. The message 'INPUT CURRENT PASSWORD' is displayed. Press and hold AUTO on the remote control RECALL PASSWORD for 3 seconds. The projector will display a Please write down the recall code, and contact the dealer. coded number on the screen. Write down the number and turn off your projector.
Disabling the password function To disable password protection, go back to the SYSTEM SETTING: Advanced > Security Settings > Power on Lock menu after opening the OSD menu system. Select Off by pressing password. / . The message 'INPUT PASSWORD' is displayed. Enter the current • If the password is correct, the OSD menu returns to the Security Settings page with 'Off' shown in the row of Power on Lock. You will not have to enter the password next time you turn on the projector.
Adjusting the projected image Adjusting the projection angle The projector is equipped with two adjuster feet. They change the image height and vertical projection angle. Screw the adjuster feet to fine tune the angle until the image is positioned where you want it. If the projector is not placed on a flat surface or the screen and the projector are not perpendicular to each other, the projected image becomes trapezoidal. To correct this situation, see "Correcting keystone" on page 23 for details.
Correcting keystone Keystoning refers to the situation where the projected image is noticeably wider at either the top or bottom. It occurs when the projector is not perpendicular to the screen. To correct this, besides adjusting the height of the projector, you will need to manually correct it following one of these steps. • Using the remote control Press / on the projector or remote control to display the Keystone correction page. Press to correct keystoning at the top of the image.
Selecting the aspect ratio The 'aspect ratio' is the ratio of the image width to the image height. Most analog TV and computers are in 4:3 ratio, and digital TV and DVDs are usually in 16:9 ratio. With the advent of digital signal processing, digital display devices like this projector can dynamically stretch and scale the image output to a different aspect than that of the image input signal. To change the projected image ratio (no matter what aspect the source is): 1.
About the aspect ratio In the pictures below, the black portions are inactive areas and the white portions are active areas. OSD menus can be displayed on those unused black areas. 1. Auto: Scales an image proportionally to fit the projector's native resolution in its horizontal width. This is suitable for the incoming image which is neither in 4:3 nor 16:9 and you want to make most use of the screen without altering the image's aspect ratio. 16:10 picture 15:9 picture 2.
Optimizing the image Selecting a preset mode The projector is preset with several predefined preset modes so that you can choose one to suit your operating environment and input signal picture type. To select an operation mode that suits your need, you can follow one of the following steps. • Press MODE/ENTER on the projector remote control repeatedly until your desired mode is selected. • Go to the PICTURE > Preset Mode menu and press / to select a desired mode.
Adjusting Contrast Highlight the PICTURE > Contrast menu and press / . The higher the value, the greater the contrast. Use this to set the peak white level after you have previously adjusted the Brightness setting to suit your selected input and viewing environment. -50 0 +50 Adjusting Color Highlight the PICTURE > Color menu and press / . Lower setting produces less saturated colors. If the setting is too high, colors on the image will be overpowering, which makes the image unrealistic.
There are many different shades that are considered to be "white" for various purposes. One of the common methods of representing white color is known as the “color temperature”. A white color with a low color temperature appears to be reddish white. A white color with a high color temperature appears to have more blue in it. Color Management Only in permanent installations with controlled lighting levels such as boardrooms, lecture theaters, or home theaters, should color management be considered.
Setting the presentation timer This function is only available when an input signal is selected and active. Presentation timer can indicate the presentation time on the screen to help you achieve better time management when giving presentations. Follow these steps to utilize this function: 1. Press TIMER SET UP on the remote control to access the Presentation Timer menu or go to the SYSTEM SETTING: Basic > Presentation Timer menu and press MODE/ENTER to display the Presentation Timer page. 2.
1. 2. Go to the SYSTEM SETTING: Basic > Presentation Timer menu and highlight Off. Press MODE/ENTER. A confirmation message displays. Highlight Yes and press MODE/ENTER to confirm. You will see the message “Timer is Off” displaying on the screen. Hiding the image In order to draw the audience's full attention to the presenter, you can use on the projector or BLANK on the remote control to hide the screen image. Press any key on the projector or remote control to restore the image.
Operating in a high altitude environment We recommend you use the High Altitude Mode when your environment is between 1500 m–3000 m above sea level, and temperature is between 0°C–35°C. CAUTION Do not use the High Altitude Mode if your altitude is between 0 m and 1500 m and temperature is between 0°C and 35°C. The projector will be over cooled, if you turn the mode on under such a condition. To activate the High Altitude Mode: 1.
Menu operation Menu system Please note that the on-screen display (OSD) menus vary according to the signal type selected. The menu items are available when the projector detects at least one valid signal. If there is no equipment connected to the projector or no signal detected, limited menu items are accessible. Main menu Sub-menu Options Off/Light Yellow/Pink/Light Green/Blue/Blackboard Auto/Real/4:3/16:9 Wall Color 1. DISPLAY Aspect Ratio Keystone Position Phase H. Size Magnify 3D Sync 2.
Main menu 3. SOURCE Sub-menu Options Quick Auto Search Auto Adjustment Timer Period Timer Display Presentation Timer 4.
Main menu Sub-menu Quick Cooling High Altitude Mode Audio Settings Mute Volume Menu Display Time 5. SYSTEM SETTING: Advanced Menu Settings Menu Position Standby Mode Lamp Mode Lamp Settings Security Settings Closed Caption Reset All Settings 6.
Description of each menu Function Description In the situation where you are projecting onto a colored surface such as a painted wall which may not be white, the Wall Color feature can help correct the projected picture' colors to prevent possible color difference between the source and projected pictures. Wall Color Use the / buttons to select a color which is closest to the color of the projection surface. This function is only available when a computer signal (analog RGB) is selected.
Function Description This projector features 3D function which enables you to enjoy 3D movies, videos, and sporting events in a more realistic way by presenting the depth of the images. You need to wear a pair of 3D glasses to view 3D images. 1. Press the MODE/ENTER button to display the 3D Sync menu. 2. Use the / buttons to select a 3D sync mode. 1. DISPLAY menu - When Auto is selected, the projector detects the input signal and determines a suitable 3D sync mode automatically.
Function Preset Mode Brightness Contrast Color 2. PICTURE menu Tint Sharpness Description Pre-defined preset modes are provided so you can optimize your projector image set-up to suit your program type. See "Selecting a preset mode" on page 26 for details. Adjusts the brightness of the image. See "Adjusting Brightness" on page 26 for details. Adjusts the degree of difference between dark and light in the image. See "Adjusting Contrast" on page 27 for details.
Function Description 4. SYSTEM SETTING: Basic menu Presentation Timer Reminds the presenter to finish the presentation within a certain time frame. See "Setting the presentation timer" on page 29 for details. Language Sets the language for the On-Screen Display (OSD) menus. See "Using the menus" on page 18 for details. Mirror See "Choosing a location" on page 10 for details. Auto Power Off Allows the projector to turn off automatically if no input signal is detected after a set period of time.
Function Description Use / to select a standby mode. Normal The projector is able to provide the following functions when it is in standby mode. • Standby Mode The projector can output a VGA signal when it is in standby mode and the COMPUTER IN 1 port is correctly connected to devices. • The projector can play sound when it is in standby mode and the corresponding ports are correctly connected to devices. See "Connection" on page 12 for how to make the connections. 5.
Function Description Current System Status Shows current system status. 6. INFORMATION menu Source Shows the current signal source. Preset Mode Shows the selected mode in the PICTURE menu. Current Color System System Status Shows input system format, NTSC, PAL, SECAM, or RGB. Resolution Shows the native resolution of the input signal. Equivalent Lamp Hour Displays the number of hours the lamp has been used. Serial Number Shows the serial number of the projector.
Maintenance Care of the projector Your projector needs little maintenance. The only thing you need to do on a regular basis is to keep the lens clean. Never remove any parts of the projector except the lamp. Contact your dealer if other parts need replacing. Cleaning the lens Clean the lens whenever you notice dirt or dust on the surface. • • Use a canister of compressed air to remove dust.
Lamp information Getting to know the lamp hour When the projector is in operation, the duration (in hours) of lamp usage is automatically calculated by the built-in timer. The method of calculating the equivalent lamp hour is as follows: Total lamp hour = (hours used in Normal mode) + (hours used in Economic mode) + (hours used in Intelligent Eco mode) To obtain the lamp hour information: 1.
Replacing the lamp To prepare a new lamp, contact your dealer and tell the lamp type number. Type number: DT01461 WARNING • The projector uses a high-pressure mercury glass lamp. • The lamp can break with a loud bang, or burn out, if jolted or scratched, handled while hot, or worn over time. Note that each lamp has a different lifetime, and some may burst or burn out soon after you start using them. Hg - Lamp contains mercury. Manage in accordance with local disposal laws. See www.lamprecycle.
5. Remove the protection film. Loosen the screw that secures the lamp. Refer to the right figure to identify the screw. 1 6. 7. 2 Disconnect the lamp's wire connector from the projector, and then slowly pick up the lamp by the handle. CAUTION 2 • Pulling it too quickly may cause the lamp to break and scatter broken glass in the projector. • Do not place the lamp in locations where water might splash on it, children can reach it, or near flammable materials.
12. Replace the lamp cover on the projector. 1 2 13. Tighten the screw that secures the lamp cover. CAUTION • Loose screw may cause a bad connection, which could result in malfunction. • Do not over tighten the screws. 14. Restart the projector. CAUTION Do not turn the power on with the lamp cover removed. Resetting the lamp timer 15. 16. 17. 18. After the startup logo, open the On-Screen Display (OSD) menu. Go to the SYSTEM SETTING: ADVANCED > Lamp Settings menu.
Indicators Light POWER TEMP Status & Description LAMP System Messages Purple Off Off Stand-by Blue Flashing Off Off Powering up Blue Off Off Normal operation Purple Flashing Off Off Power-down cooling Blue Off Red CW start fail. Please contact your dealer for assistance. Red Flashing Off Off Scaler shutdown fail. Please contact your dealer for assistance. Lamp Error Messages Off Off Off Off Red Lamp error. Please contact your dealer for assistance. Red Lamp is not lit up.
Troubleshooting The projector does not turn on. Cause Remedy There is no power from the power cord. Plug the power cord into the AC inlet on the projector, and plug the power cord into the power outlet. If the power outlet has a switch, make sure that it is switched on. Attempting to turn the projector on again during the cooling process. Wait until the cooling down process has completed. No picture Cause Remedy The video source is not turned on or connected correctly.
Specifications Projector specifications • All specifications are subject to change without notice. • Not all models can be purchased in your region. General Product name Projector Optical Resolution Display system Lamp 1024 x 768 XGA 1-CHIP DMD 196 W lamp Electrical Power supply Power consumption AC 100-120V: 2.9 A, AC 220-240V: 1.4 A AC 100-120V: 250W, AC 220-240V: 235W Mechanical Weight Approx. 2.
Output terminal MONITOR OUT port AUDIO OUT port Speaker D-Sub 15-pin (female) x 1 Stereo mini x 1 2 watt x 1 Control terminal CONTROL port IR receiver RS-232 serial control 9 pin x 1 x 1 (Front) Service terminal SERVICE port USB mini B x 1 Environmental Requirements Operating temperature Operating relative humidity Operating altitude 0°C–40°C at sea level 10%–90% (without condensation) • • 0–1499 m at 5°C–35°C (with High Altitude Mode 2 (Normal)) 1500–3000 m at 5°C–25°C (with High Altitude Mode 1 (H
Dimensions 265 mm (W) x 81.5 mm (H) x 223 mm (D) 81.
Timing chart Supported timing for PC input Resolution Mode VGA_60*** VGA_72 640 x 480 VGA_75 VGA_85 SVGA_60*** SVGA_72 SVGA_75 800 x 600 SVGA_85 SVGA_120* (Reduce Blanking) XGA_60*** XGA_70 XGA_75 1024 x 768 XGA_85 XGA_120* (Reduce Blanking) 1152 x 864 1152 x 864_75 1280x720 1280 x 720_60*** 1280 x 768 1280 x 768_60*** WXGA_60*** WXGA_75 WXGA_85 1280 x 800 WXGA_120* (Reduce Blanking) SXGA_60** 1280 x 1024 SXGA_75 SXGA_85 1280 x 960_60** 1280 x 960 1280 x 960_85 1360 x 768 1360 x 768_60** 1440 x 900 WXGA+_
• **Supported timing for 3D signal with Top-Bottom and Side-by-Side formats. • ***Supported timing for 3D signal with Frame Sequential, Top-Bottom and Side-by-Side formats.
• *Supported timing for 3D signal with Frame Sequential format. • **Supported timing for 3D signal with Top-Bottom and Side-by-Side formats. • ***Supported timing for 3D signal with Frame Sequential, Top-Bottom and Side-by-Side formats.
Supported timing for Video and S-Video inputs Video mode NTSC PAL SECAM PAL-M PAL-N PAL-60 NTSC4.43 Horizontal Frequency (kHz) 15.73 15.63 15.63 15.73 15.63 15.73 15.73 54 Vertical Frequency (Hz) 60 50 50 60 50 60 60 Color sub-carrier Frequency (MHz) 3.58 4.43 4.25 or 4.41 3.58 3.58 4.43 4.
Regulation Statements FCC statement This device complies with Part 15 of the FCC Rules. Operation is subject to the following two conditions: (1) this device may not cause harmful interference, and (2) this device must accept any interference received, including interference that may cause undesired operation. This equipment has been tested and found to comply with the limits for a Class B digital device, pursuant to part 15 of the FCC Rules.
This symbol is only valid in the European Union. If you wish to discard this product please contact your local authorities or dealer and ask for the correct method of disposal.
Copyright information Copyright Copyright 2012. All rights reserved. No part of this publication may be reproduced, transmitted, transcribed, stored in a retrieval system or translated into any language or computer language, in any form or by any means, electronic, mechanical, magnetic, optical, chemical, manual or otherwise, without the prior written permission of this company.
Warranty and after-service If an abnormal operation (such as smoke, strange odor or excessive sound) should occur, stop using the projector immediately. Otherwise if a problem occurs with the projector, first refer to “Troubleshooting”, and run through the suggested checks. If this does not resolve the problem, please consult your dealer or service company. They will tell you what warranty condition is applied.
Hitachi America, Ltd. Hitachi Europe AB Business Solutions Group 900 Hitachi way, Chula Vista CA 91914-3556 USA CANADA Tel: +1 -800-448-2244 Ź http://www.hitachi-america.us/projectors Frösundaviks Alle 15 169 29 Solna SWEDEN Sweden Tel: +46 36 16 16 90 Finland Tel: +358 9 8494 133 Norway Tel: +47 2290 1930 Denmark Tel: +45 7562 4577 Ź http://www.hitachidigitalmedia.com Hitachi Europe Ltd.