Projector CP-EX250/CP-EX300 User's Manual (detailed) Operating Guide Thank you for purchasing this projector. WARNING ►Before using this product, please read all manuals for this product. Be sure to read Safety Guide first. After reading them, store them in a safe place for future reference. About this manual Various symbols are used in this manual. The meanings of these symbols are described below.
Contents Introduction . . . . . . . . . . . . . . . 3 Features. . . . . . . . . . . . . . . . . . . . . . . 3 Checking the contents of package. . . . 3 Part names. . . . . . . . . . . . . . . . . . . . . 4 Setting up. . . . . . . . . . . . . . . . . 7 Arrangement. . . . . . . . . . . . . . . . . . . . 7 Connecting with your devices. . . . . . 10 Connecting to a power supply. . . . . . 14 Using the security bar and slot. . . . . 15 Remote control. . . . . . . . . . .
Introduction Introduction Features The projector provides you with the broad use by the following features. ü T his projector has a variety of I/O ports that supposedly cover for any scene. ü This lightweight projector requires only a minimal amount of space for installation. ü This projector has a capability to project various picture signals onto a screen. Checking the contents of package Please see the Contents of package section in the User’s Manual (concise) which is a book.
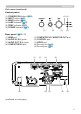
Introduction Part names (1) Lamp cover (&65) The lamp unit is inside. (2) Speaker (&20, 46) (3) Filter cover (&67) The air filter and intake vent are inside.
Introduction Part names (continued) Control panel (1) STANDBY/ON button (&18) (2) INPUT button (&21) (3) MENU button (&29) (4) LAMP indicator (&72) (5) TEMP indicator (&72) (6) POWER indicator (&72) (5) (4) (1) (2) (3) (6) Rear panel (&10 ~ 13) (1) HDMI port (2) AUDIO IN (R,L) ports (3) AUDIO OUT (R,L) ports (4) COMPUTER IN1 port (5) COMPUTER IN2 / MONITOR OUT port (6) CONTROL port (7) VIDEO port (8) Security slot (&15) (9) Security bar (&15) (1) (9) (7) (4) (2) (3) (5) (6) (8) (continued o
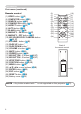
Introduction Part names (continued) Remote control (1) VIDEO button (&21) (2) COMPUTER button (&21) (3) SEARCH button (&22) (4) STANDBY/ON button (&18) (5) ASPECT button (&23) (6) AUTO button (&25) (7) BLANK button (&28) (8) MAGNIFY - ON button (&27) (9) MAGNIFY - OFF button (&27) (10) MY SOURCE/DOC.
Setting up Setting up Install the projector according to the environment and manner the projector will be used in. For the case of installation in a special state such as ceiling mount, the specified mounting accessories (&Specifications in the User’s Manual (concise)) and service may be required. Before installing the projector, consult your dealer about your installation.
Setting up Arrangement (continued) WARNING ►Install the projector where you can access the power outlet easily. If an abnormality should occur, unplug the projector urgently. Otherwise it could cause a fire or electric shock. ►Do not subject the projector to unstable conditions. If the projector falls or topples over, it could result in injury or damage to the projector and the surrounding things. Using a damaged projector could result in a fire and an electric shock.
Setting up Arrangement (continued) CAUTION ►Place the projector in a cool place with sufficient ventilation. The projector may shutdown automatically or may malfunction if its internal temperature is too high. Using a damaged projector could result in a fire and an electric shock. • Do not place the projector in direct sunlight or near hot objects such as heaters. • Do not place the projector where the air from an air conditioner or similar unit will blow on it directly.
Setting up Connecting with your devices Before connecting the projector to a device, consult the manual of the device to confirm that the device is suitable for connecting with this projector and prepare the required accessories, such as a cable in accord with the signal of the device. Consult your dealer when the required accessory did not come with the product or the accessory is damaged.
Setting up Connecting with your devices (continued) About Plug-and-Play capability • Plug-and-Play is a system composed of a computer, its operating system and peripheral equipment (i.e. display devices). This projector is VESA DDC 2B compatible. Plug-and-Play can be used by connecting this projector to a computer that is VESA DDC (display data channel) compatible. - Take advantage of this feature by connecting a computer cable to the COMPUTER IN1 port (DDC 2B compatible).
Setting up Connecting with your devices (continued) External device Computer NOTE • Before connecting the projector to a computer, consult the computer’s manual and check the compatibility of the signal level, the synchronization methods and the display resolution output to the projector. - Some signal may need an adapter to input this projector. - Some computers have multiple screen display modes that may include some signals which are not supported by this projector.
Setting up Connecting with your devices (continued) VCR/DVD/Blu-ray DiscTM player Monitor RGB IN Speakers (with an amplifier) NOTE • The HDMI port of this model is compatible with HDCP (High-bandwidth Digital Content Protection) and therefore capable of displaying a video signal from HDCP compatible DVD players or the like. - The HDMI supports the following signals.
Setting up Connecting to a power supply the connector of the power cord into the 1. Put AC (AC inlet) of the projector. plug the power cord’s plug into the 2. Firmly outlet. In a couple of seconds after the power supply connection, the POWER indicator will light up in steady orange. AC Please remember that when the DIRECT POWER ON function activated (&53), the connection of the power supply make the projector turn on.
Setting up Using the security bar and slot A commercially available anti-theft chain or wire can be attached to the security bar on the projector. Refer to the figure to choose an anti-theft chain or wire. Also this product has the security slot for the Kensington lock. For details, see the manual of the security tool. Security slot 12.2mm Anti-theft chain or wire 18.6mm 18.
Remote control Remote control Installing the batteries Please insert the batteries into the remote control before using it. If the remote control starts to malfunction, try to replace the batteries. If you will not use the remote control for long period, remove the batteries from the remote control and store them in a safe place. Holding the hook part of the battery 1 2 3 cover, remove it. Align and insert the two AA batteries (HITACHI MAXELL ENERGY Part No.
Remote control About the remote control signal The remote control works with the projector’s remote sensor. This projector has a remote sensor on the front. The sensor senses the signal within the following range when the sensor is active: 60 degrees (30 degrees to the left and right of the sensor) within 3 meters about. (approx.) NOTE • The remote control signal reflected in the screen or the like may be available.
Power on/off Power on/off Turning on the power STANDBY/ON button POWER indicator sure that the power cord is firmly and 1. Make correctly connected to the projector and the outlet. sure that the POWER indicator is 2. Make steady orange (72). STANDBY/ON button on the 3. Press projector or the remote control. CE/ SOUR RA MY CAME UTER DOC.
Power on/off Turning off the power the STANDBY/ON button on the projector or the remote control. 1. Press The message “Power off?” will appear on the screen for about 5 seconds. the STANDBY/ON button again while the message appears. 2. Press The projector lamp will go off, and the POWER indicator will begin blinking in orange. Then POWER indicator will stop blinking and light in steady orange when the lamp cooling is complete (72).
Operating Operating Adjusting the volume VOLUME +/- button the VOLUME +/VOLUME - buttons to adjust the volume. 1. Use A dialog will appear on the screen to aid you in adjusting the volume. If you do not do anything, the dialog will automatically disappear after ten seconds. VIDEO ASPECT MAGNIFY ON COMPUTER MY SOURCE/ DOC.CAMERA AUTO FREEZE SEARCH PAGE UP BLANK VOLUME + DOWN OFF MY BUTTON ー ● When is selected for current picture input port, the volume adjustment is disabled.
Operating Selecting an input signal INPUT button on the projector. 1. Press Each time you press the button, the projector switches its INPUT button input port from the current port as below. COMPUTER IN1 COMPUTER IN2 VIDEO HDMI ● While ON is selected for AUTO SEARCH item in OPTION menu (53), the projector will keep checking the ports in above order repeatedly till an input signal is detected. 1. Press COMPUTER button on the remote control.
Operating Selecting an input signal(continued) the MY SOURCE / DOC. CAMERA button on 1. Press the remote control. The input signal will be changed MY SOURCE / DOC. CAMERA button into the signal you set as MY SOURCE (57). VIDEO ● This function also can use for document camera. Select the input port that connected the document camera. ASPECT MAGNIFY ON COMPUTER MY SOURCE/ DOC.CAMERA AUTO SEARCH FREEZE PAGE UP SEARCH button on the remote control. 1.
Operating Selecting an aspect ratio ASPECT button on the remote control. 1. Press Each time you press the button, the projector switches the mode for aspect ratio in turn. For a computer signal NORMAL 4:3 16:9 16:10 ASPECT button VIDEO ASPECT MAGNIFY ON COMPUTER MY SOURCE/ DOC.
Operating Adjusting the projector’s elevator Using the Front elevator foot can tilt the projector in order to project at a suitable angle to the screen, elevating the front side of the projector within 12 degrees. The elevator foot is adjustable while pushing the elevator button. Holding the projector, push the elevator button to loose the elevator foot. Release the elevator button in order to lock the elevator foot.
Operating Using the automatic adjustment feature AUTO button on the remote control. 1. Press Pressing this button performs the following. AUTO button COMPUTER MY SOURCE/ DOC.CAMERA VIDEO For a computer signal The vertical position, the horizontal position and the horizontal phase will be automatically adjusted. Make sure that the application window is set to its maximum size prior to attempting to use this feature. A dark picture may still be incorrectly adjusted. Use a bright picture when adjusting.
Operating Correcting the keystone distortions KEYSTONE button on the remote 1. Press control. A dialog will appear on the screen to aid you in correcting the distortion. 2. Use the ◄/► buttons for adjustment. To close the dialog and complete this operation, press KEYSTONE button again. Even if you do not do anything, the dialog will automatically disappear after ten seconds. KEYSTONE button VIDEO ASPECT MAGNIFY ON COMPUTER MY SOURCE/ DOC.
Operating Using the magnify feature the MAGNIFY ON button on the remote control. 1. Press The picture will be magnified, and the MAGNIFY dialog will appear on the screen. When the MAGNIFY ON button is pressed for the first time after the projector is turned on, the picture will be zoomed by 1.5 times. On the dialog, triangle marks to show each direction will be displayed. MAGNIFY ON/OFF button VIDEO ASPECT MAGNIFY ON COMPUTER MY SOURCE/ DOC.
Operating Temporarily freezing the screen 1. Press the FREEZE button on the remote control. The “FREEZE” indication will appear on the screen (however, the indication will not appear when the OFF is selected for the MESSAGE item in the SCREEN menu (49)), and the projector will go into the FREEZE mode, which the picture is frozen. To exit the FREEZE mode and restore the screen to normal, press the FREEZE button again. FREEZE button VIDEO ASPECT MAGNIFY ON COMPUTER MY SOURCE/ DOC.
Operating Using the menu function This projector has the following menus: PICTURE, IMAGE, INPUT, SETUP, AUDIO, SCREEN, OPTION, SECURITY and EASY MENU. EASY MENU consists of functions often used, and the other menus are classified into each purpose and brought together as the ADVANCED MENU. Each of these menus is operated using the same methods. While the projector is displaying any menu, the MENU button on the projector works as the cursor buttons. The basic operations of these menus are as follows.
Operating Using the menu function (continued) close the MENU, press the MENU button again or select EXIT and press 3. To the ◄ cursor button or ENTER button. Even if you do not do anything, the dialog will automatically disappear after about 30 seconds. ● I f you want to move the menu position, use the cursor buttons after pressing the POSITION button. ● Some functions cannot be performed when a certain input port is selected, or when a certain input signal is displayed.
EASY MENU EASY MENU From the EASY MENU, items shown in the table below can be performed. Select an item using the ▲/▼ cursor buttons. Then perform it according to the following table. Item Description ASPECT Using the ◄/► buttons switches the mode for aspect ratio. See the ASPECT item in IMAGE menu (36). KEYSTONE Using the ◄/► buttons corrects the vertical keystone distortion. KEYSTONE item in SETUP menu (43). See the Using the ◄/► buttons switches the picture mode.
EASY MENU Item ECO MODE INSTALLATION Pressing the ► button displays the INSTALLATION dialog. See the INSTALLATION item in SETUP menu (44). RESET Performing this item resets all of the EASY MENU items except the FILTER TIME and LANGUAGE. A dialog is displayed for confirmation. Selecting the OK using the ► button performs resetting. FILTER TIME The usage time of the air filter is shown in the menu. Performing this item resets the filter time which counts usage time of the air filter.
PICTURE menu PICTURE menu From the PICTURE menu, items shown in the table below can be performed. Select an item using the ▲/▼ cursor buttons, and press the ► cursor button or ENTER button to execute the item. Then perform it according to the following table. Item BRIGHTNESS CONTRAST Description Using the ◄/► buttons adjusts the brightness. Dark ó Light Using the ◄/► buttons adjusts the contrast. Weak ó Strong Using the ▲/▼ buttons switches the gamma mode.
PICTURE menu Item Description Using the ▲/▼ buttons switches the color temperature mode. To adjust CUSTOM COLOR TEMP Selecting a mode whose name includes CUSTOM and then pressing the ► button or the ENTER button displays a dialog to aid you in adjusting the OFFSET and GAIN of the selected mode. OFFSET adjustments change the color intensity on the whole tones of the test pattern. GAIN adjustments mainly affect color intensity on the brighter tones of the test pattern.
PICTURE menu Item Description SHARPNESS Using the ◄/► buttons adjusts the sharpness. Weak ó Strong • There may be some noise and/or the screen may flicker for a moment when an adjustment is made. This is not a malfunction. MY MEMORY This projector has 4 memories for adjustment data (for all the items of the PICTURE menu). Selecting a function using the ▲/▼ buttons and pressing the ► or ENTER button performs each function.
IMAGE menu IMAGE menu From the IMAGE menu, items shown in the table below can be performed. Select an item using the ▲/▼ cursor buttons, and press the ► cursor button or ENTER button to execute the item. Then perform it according to the following table. Item Description Using the ▲/▼ buttons switches the mode for aspect ratio.
IMAGE menu Item Description OVER SCAN Using the ◄/► buttons adjusts the over-scan ratio. Small (It magnifies picture) ó Large (It reduces picture) • This item can be selected only for a video and component video signal. • For an HDMITM signal, this item can also be selected if either (1) or (2) applies. (1) HDMI FORMAT item in the INPUT menu is set to VIDEO. (2) HDMI FORMAT item in the INPUT menu is set to AUTO, and the projector recognizes that it receives video signals.
IMAGE menu Item Description H PHASE Using the ◄/► buttons adjusts the horizontal phase to eliminate flicker. Right ó Left • This item can be selected only for a computer signal or a component video signal. This function is unavailable for signal from the HDMI port. H SIZE Using the ◄/► buttons adjusts the horizontal size. Small ó Large • This item can be selected only for a computer signal. This function is unavailable for signal from the HDMI port.
INPUT menu INPUT menu From the INPUT menu, items shown in the table below can be performed. Select an item using the ▲/▼ cursor buttons, and press the ► cursor button or ENTER button to execute the item. Then perform it according to the following table. Item Description Using the ▲/▼ buttons switches the progress mode.
INPUT menu Item VIDEO FORMAT Description The video format for VIDEO port can be set. (1) Use the ▲/▼ buttons to select the input port. (2) Using the ◄/► buttons switches the mode for video format. AUTO ó NTSC ó PAL ó SECAM N-PAL ó M-PAL ó NTSC4.43 • This item is performed only for video signal from the VIDEO port. • The AUTO mode automatically selects the optimum mode. • The AUTO operation may not work well for some signals. If the picture becomes unstable (e.g.
INPUT menu Item Description COMPUTER IN The computer input signal type for COMPUTER IN1 and IN2 ports can be set. (1) Use the ▲/▼ buttons to select the COMPUTER IN port to be set. (2) U se the ◄/► buttons to select the computer input signal type. (COMPUTER IN1) AUTO ó SYNC ON G OFF (COMPUTER IN2) AUTO ó SYNC ON G OFF ó MONITOR OUT • Selecting the AUTO mode allows you to input a sync on G signal or component video signal from the port (12).
INPUT menu 42 Item Description RESOLUTION The resolution for the COMPUTER IN1 and COMPUTER IN2 input signals can be set on this projector. (1) In the INPUT menu select the RESOLUTION using the ▲/▼ buttons and press the ► button. The RESOLUTION menu will be displayed. (2) In the RESOLUTION menu select the resolution you wish to display using the ▲/▼ buttons. Selecting AUTO will set a resolution appropriate to the input signal.
SETUP menu SETUP menu From the SETUP menu, items shown in the table below can be performed. Select an item using the ▲/▼ cursor buttons, and press the ► cursor button or ENTER button to execute the item. Then perform it according to the following table. Item KEYSTONE Description Using the ◄/► buttons corrects the vertical keystone distortion. Shrink the bottom of the image ó Shrink the top of the image • The adjustable range of this function will vary among inputs.
SETUP menu Item Description Using the ▲/▼ buttons switches the ECO MODE. NORMAL ó ECO ó INTELLIGENT ECOó SAVER ECO MODE • When the ECO is selected, acoustic noise and screen brightness are reduced. • When INTELLIGENT ECO is selected, the brightness of the lamp changes according to the level of the input signal. The lamp becomes brighter when the input signal level is high and darker when the level is low.
SETUP menu Item Description STANDBY MODE Using ▲/▼ buttons switches the standby mode setting between NORMAL and SAVING. NORMAL ó SAVING When SAVING is selected, the power consumption in the standby mode is lowered with some functional restriction as below: • The RS-232C communication control is disabled except turning the projector on and changing the STANDBY MODE setting.
AUDIO menu AUDIO menu From the AUDIO menu, items shown in the table below can be performed. Select an item using the ▲/▼ cursor buttons, and press the ► cursor button or the ENTER button to execute the item. Then perform it according to the following table. Item VOLUME Using the ◄/► buttons adjusts the volume. SPEAKER Using the ▲/▼ buttons turns on/off the built-in speaker. ON ó OFF When OFF is selected, the built-in speaker does not work.
SCREEN menu SCREEN menu From the SCREEN menu, items shown in the table below can be performed. Select an item using the ▲/▼ cursor buttons, and press the ► cursor button or ENTER button to execute the item. Then perform it according to the following table. Item LANGUAGE Description Using the ▲/▼/◄/► buttons switches the OSD (On Screen Display) language. ENGLISH ó FRANÇAIS ó DEUTSCH ó ESPAÑOL (shown in the LANGUAGE dialog) Press the ENTER or INPUT button to save the language setting.
SCREEN menu Item Description Using the ▲/▼ buttons switches the mode for the start-up screen. The start-up screen is a screen displayed when no signal or an unsuitable signal is detected. MyScreen ó ORIGINAL ó OFF START UP MyScreen MyScreen : S creen can be registered by the MyScreen item (below). ORIGINAL : S creen preset as the standard screen. OFF : P lain black screen. • To avoid remaining as an afterimage, the START UP screen will change to the AUTO BLANK screen after several minutes.
SCREEN menu Item Description MyScreen Lock Using the ▲/▼ buttons turns on/off the MyScreen lock function. ON ó OFF When the ON is selected, the item MyScreen is locked. Use this function for protecting the current MyScreen. • This function cannot be selected when the ON is selected to the MyScreen PASSWORD item in SECURITY menu (61). MESSAGE Using the ▲/▼ buttons turns on/off the message function. ON ó OFF When the ON is selected, the following message function works.
SCREEN menu Item SOURCE NAME Description Each input port for this projector can have a name applied to it. (1) Use the ▲/▼ buttons on the SCREEN menu to select SOURCE NAME and press the ► or ENTER button. The SOURCE NAME menu will be displayed. (2) Use the ▲/▼ buttons on the SOURCE NAME menu to select the port to be named and press the ► button. The SOURCE NAME dialog will be displayed. Right side of the menu is blank until a name is specified.
SCREEN menu Item Description SOURCE NAME (continued) (6) The current name will be displayed on the first line. Use the ▲/▼/◄/► buttons and the ENTER or INPUT button to select and enter characters. To erase 1 character at one time, press the RESET button or press the ◄ and INPUT button at the same time. Also if you move the cursor to DELETE or ALL CLEAR on screen and press the ENTER or INPUT button, 1 character or all characters will be erased. The name can be a maximum of 16 characters.
SCREEN menu Item Description The C.C. is the function that displays a transcript or dialog of the audio portion of a video, files or other presentation or other relevant sounds. It is required to have NTSC format video or 480i@60 format component video source supporting C.C. feature to utilize this function. It may not work properly, depending on equipment or signal source. In this case, please turn off the Closed Caption.
OPTION menu OPTION menu From the OPTION menu, items shown in the table below can be performed. Select an item using the ▲/▼ cursor buttons, and press the ► cursor button or ENTER button to execute the item, except for the items LAMP TIME and FILTER TIME. Then perform it according to the following table. Item Description AUTO SEARCH Using the ▲/▼ buttons turns on/off the automatic signal search function.
OPTION menu Item Description Using the ▲/▼ buttons adjusts the time to count down to automatically turn the projector off. Long (max. 99 minutes) ó Short (min. 0 minute = DISABLE) AUTO POWER OFF When the time is set to 0, the projector is not turned off automatically. When the time is set to 1 to 99, and when the passed time with no-signal or an unsuitable signal reaches at the set time, the projector lamp will be turned off.
OPTION menu Item Description LAMP TIME The lamp time is the usage time of the lamp, counted after the last resetting. It is shown in the OPTION menu. Pressing the RESET button on the remote control or the ► button of the projector displays a dialog. To reset the lamp time, select the OK using the ► button. CANCEL OK • Please reset the lamp time only when you have replaced the lamp, for a suitable indication about the lamp. • For the lamp replacement, see the section Replacing the lamp (65).
OPTION menu Item Description MY BUTTON This item is to assign one of the following functions to MY BUTTON 1/2 on the remote control (6). (1) Use the ▲/▼ buttons on the MY BUTTON menu to select a MY BUTTON - (1/2) and press the ► or ENTER button to display the MY BUTTON setup dialog. (2) Then using the ▲/▼/◄/► buttons sets one of the following functions to the chosen button. Press the ENTER or INPUT button to save the setting. • COMPUTER IN1: Selects the input from COMPUTER IN1 port.
OPTION menu Item Description MY BUTTON (continued) • PICTURE MODE: Changes the PICTURE MODE (31). •F ILTER RESET: Displays the filter time reset confirmation dialogue (55). • TEMPLATE: Makes the template pattern selected to the TEMPLATE item (51) appear or disappear. • AV MUTE: Turns the picture and audio on/off. • RESOLUTION: Turns on/off the RESOLUTION dialog (42). •E CO MODE: Changes the ECO MODE (44). • SAVER MODE: Changes the SAVER MODE (44 ECO MODE).
OPTION menu Item Description AUTO ADJUST Using the ▲/▼ buttons to select one of the mode. When the DISABLE is selected, the automatic adjustment feature is disabled. FINE ó FAST ó DISABLE FINE: Finer tuning including H.SIZE adjustment. FAST: Faster tuning, setting H.SIZE to prearranged data for the input signal. • Depending on conditions, such as input image, signal cable to the projector, environment around the projector, etc., the automatic adjustment may not work correctly.
OPTION menu Item Description REMOTE FREQ. (1) Use the ▲/▼ button to change the projector's remote sensor frequency setting (17). 1:NORMAL ó 2:HIGH (2) Use the ◄/► button to change the projector's remote sensor on or off. ON ó OFF The factory default setting is for both 1:NORMAL and 2:HIGH to be on. If the remote control does not function correctly, disable either of them. It's not possible to disable both options at the same time.
SECURITY menu SECURITY menu This projector is equipped with security functions. From the SECURITY menu, items shown in the table below can be performed. To use SECURITY menu: User registration is required before using the security functions. Enter to the SECURITY menu 1. P ress the ► button. The ENTER PASSWORD box will be displayed. 2. U se the ▲/▼/◄/► buttons to enter the registered password. The factory default password is as follows. 5702 This password can be changed (below).
SECURITY menu Item Description The MyScreen PASSWORD function can be used to prohibit access to the MyScreen function and prevent the currently registered MyScreen image from being overwritten. 1 Turning on the MyScreen PASSWORD MyScreen PASSWORD 1-1 Use the ▲/▼ buttons on the SECURITY menu to select MyScreen PASSWORD and press the ► button to display the MyScreen PASSWORD on/ off menu. 1-2 Use the ▲/▼ buttons on the MyScreen PASSWORD on/off menu to select ON.
SECURITY menu Item Description PIN LOCK is a function which prevents the projector from being used unless a registered Code is input. 1 Turning on the PIN LOCK PIN LOCK 1-1 Use the ▲/▼ buttons on the SECURITY menu to select PIN LOCK and press the ► button or the ENTER button to display the PIN LOCK on/off menu. 1-2 Use the ▲/▼ buttons on the PIN LOCK on/ off menu to select ON and the Enter PIN Code box will be displayed. 1-3 Input a 4 part PIN code using the ▲/▼/◄/►, COMPUTER or INPUT button.
SECURITY menu Item Description The MY TEXT PASSWORD function can prevent the MY TEXT from being overwritten. When the password is set for the MY TEXT; • The MY TEXT DISPLAY menu will be unavailable, which can prohibit changing the DISPLAY setting. • The MY TEXT WRITING menu will be unavailable, which can prevent the MY TEXT from being overwritten.
SECURITY menu Item 64 Description MY TEXT DISPLAY (1) U se the ▲/▼ buttons on the SECURITY menu to select the MY TEXT DISPLAY and press the ► or ENTER button to display the MY TEXT DISPLAY on/off menu. (2) U se the ▲/▼ buttons on the MY TEXT DISPLAY on/off menu to select on or off. ON ó OFF When it is set ON, the MY TEXT will be displayed on the START UP screen and the INPUT_ INFORMATION when the INFORMATION on the SERVICE menu is chosen.
Maintenance Maintenance Replacing the lamp A lamp has finite product life. Using the lamp for long periods of time could cause the pictures darker or the color tone poor. Note that each lamp has a different lifetime, and some may burst or burn out soon after you start using them. Preparation of a new lamp and early replacement are recommended. To prepare a new lamp, make contact with your dealer and tell the lamp type number.
Maintenance Replacing the lamp (continued) Lamp warning HIGH VOLTAGE HIGH TEMPERATURE HIGH PRESSURE WARNING ►The projector uses a high-pressure mercury glass lamp. The lamp can break with a loud bang, or burn out, if jolted or scratched, handled while hot, or worn over time. Note that each lamp has a different lifetime, and some may burst or burn out soon after you start using them.
Maintenance Cleaning and replacing the air filter Please check and clean the air filter periodically. When the indicators or a message prompts you to clean the air filter, comply with it as soon as possible. The air filter has two kinds of filters inside. Replace the filters when they are damaged or too soiled. To prepare the new filters, make contact with your dealer and tell the following type number. 2 Type number : UX38851 (Filter set) When you replace the lamp, please replace the air filter.
Maintenance Cleaning and replacing the air filter (continued) the projector on and reset the filter time using the FILTER TIME item in 9. Turn the EASY MENU. (1) Press the MENU button to display a menu. (2) Point at the FILTER TIME using the ▼/▲ button, then press the ► button. A dialog will appear. (3) Press the ► button to select “OK” on the dialog. It performs resetting the filter time.
Maintenance Other care Inside of the projector In order to ensure the safe use of your projector, please have it cleaned and inspected by your dealer about once every year. Caring for the lens If the lens is flawed, soiled or fogged, it could cause deterioration of display quality. Please take care of the lens, being cautious of handling. the projector off, and unplug the power cord. Allow the projector to cool 1. Turn sufficiently.
Troubleshooting Troubleshooting If an abnormal operation should occur, stop using the projector immediately. WARNING ►Never use the projector if abnormal operations such as smoke, Troubleshooting strange odor, excessive sound, damaged casing or elements or cables, penetration of liquids or foreign matter, etc. should occur. In such cases, immediately disconnect the power plug from the power outlet. After making sure that the smoke or odor has stopped, contact to your dealer or service company.
Troubleshooting Related messages (continued) Message Description The internal temperature is rising. The projector is operating in low power. Please turn the power off, and allow the projector to cool down at least 20 minutes. After having confirmed the following items, please turn the power ON again. • Is there blockage of the air passage aperture? • I s the air filter dirty? If so, please clean or replace the air filter (67 ~ 68).
Troubleshooting Regarding the indicator lamps When operation of the LAMP, TEMP and POWER indicators differs from usual, check and cope with it according to the following table. POWER LAMP TEMP Description indicator indicator indicator Lighting Turned Turned The projector is in a standby state. Please refer to the section “Power on/off”. In Orange off off Blinking In Green Turned off Turned off The projector is warming up. Lighting In Green Turned off Turned off The projector is in an on state.
Troubleshooting Regarding the indicator lamps (continued) POWER LAMP TEMP indicator indicator indicator Description The cooling fan is not operating. Blinking In Red or Lighting In Red Turned off Blinking In Red Please turn the power off, and allow the projector to cool down at least 20 minutes. After the projector has sufficiently cooled down, please make confirmation that no foreign matter has become caught in the fan, etc., and then turn the power on again.
Troubleshooting Regarding the indicator lamps (continued) NOTE • When the interior portion has become overheated, for safety purposes, the projector is automatically shut down, and the indicator lamps may also be turned off. In such a case, disconnect the power cord, and wait at least 45 minutes. After the projector has sufficiently cooled down, please make confirmation of the attachment state of the lamp and lamp cover, and then turn the power on again.
Troubleshooting Resetting all settings When it is hard to correct some wrong settings, the FACTORY RESET function of SERVICE item in OPTION menu (59) can reset all settings (except LANGUAGE, FILTER TIME, LAMP TIME, FILTER MESSAGE and SECURITY settings and etc.) to the factory default. Be sure to set ALTITUDE after resetting all the settings (67).
Troubleshooting Phenomena that may be easy to be mistaken for machine defects (continued) Phenomenon Sound does not come out. Cases not involving a machine defect The signal cables are not correctly connected. Correctly connect the audio cables. 12, 13 The MUTE function is working. Restore the sound pressing MUTE or VOLUME +/button on the remote control. 20 The volume is adjusted to an extremely low level. Adjust the volume to a higher level using the menu function or the remote control.
Troubleshooting Phenomena that may be easy to be mistaken for machine defects (continued) Phenomenon Video screen display freezes. Colors have a faded- out appearance, or Color tone is poor. Pictures appear dark. Pictures appear blurry. Cases not involving a machine defect Reference page The FREEZE function is working. Press FREEZE button to restore the screen to normal. 28 Color settings are not correctly adjusted.
Troubleshooting Phenomena that may be easy to be mistaken for machine defects (continued) Phenomenon Some kind of image degradation such as flickering or stripes appear on screen. Cases not involving a machine defect Reference page When the projector is operating in Eco mode, flickering may appear on screen. Set ECO MODE to NORMAL, and set AUTO ECO MODE to OFF, in the SETUP menu. 43, 44 The OVER SCAN ratio is too big. Adjust OVER SCAN in the IMAGE menu smaller. 37 Excessive VIDEO NR.
Specifications Specifications Please see the Specifications in the User’s Manual (concise) which is a book. End User License Agreement for the Projector Software • Software in the projector consists of the plural number of independent software modules and there exist our copyright or/and third party copyrights for each of such software modules. • Be sure to read “End User License Agreement for the Projector Software” which is separated document.