Projector ENGLISH CP-S240/CP-X250 CP-S245/CP-X255 User's Manual – Quick Guide Thank you for purchasing this projector. WARNING ►Before using this product, please read the "User's Manual Safety Guide" and related manuals to ensure the proper use of this product. After reading them, store them in a safe place for future reference. NOTE • The information in this manual is subject to change without notice. • The manufacturer assumes no responsibility for any errors that may appear in this manual.
Arrangement Arrangement WARNING ►Install the projector in a suitable environment according to instructions of the "User's Manual - Safety Guide". CAUTION ►This projector has some intake vents also on the bottom. Avoid blocking vents. Put nothing that is sucked or sticks to the bottom of projector.
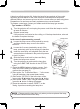
Adjusting the projector's elevator CAUTION ►If you press the elevator button without holding the projector, the projector might crash down, overturn, smash your fingers and possibly result in malfunction. To prevent damaging the projector and injuring yourself, always hold the projector whenever using the elevator buttons to adjust the elevator feet. ►Do not incline the projector rightward or leftward. Also do not incline it backward or forward exceeding 9 degrees.
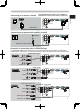
Connecting your devices Connecting your devices Examples of connection with a computer * In the default setting, the AUDIO IN1 port is the audio port for the RGB IN1 and RGB IN2 AUDIO IN2 Y Rin the SETUP menu. ports.
Y AUDIO IN2 R CONTROL CB/PB L CR/PR RGB IN1 AUDIO OUT RGB IN2 RGB IN2 RGB OUT USB K AUDIO IN1 VIDEO Connecting your devices S-VIDEO Use the RGB IN OUT switch to select RGB OUT (RGB OUT is selected if the switch is pushed in).
Putting batteries into the remote control / Connecting the power supply Putting batteries into the remote control WARNING ►Always handle the batteries with care and use them only as directed. Improper use may result in battery explosion, cracking or leakage, which could result in fire, injury and/or pollution of the surrounding environment. • Be sure to use only the batteries specified. Do not use batteries of different types at the same time. Do not mix a new battery with used one.
Operating WARNING ►When the power is on, a strong light is emitted. Do not look into the lens of projector. Also do not peep at the inside of projector through a hole. Turning on the power 1. the STANDBY/ON (projector or 2. Press remote control) button. Set the power switch to the ON position. POWER (Steady orange) POWER POWER (Blinking in green) (Steady green) Displaying select an input signal, use the button of INPUT (projector), or the buttons 1. To of RGB, VIDEO or SEARCH (remote control).
Control buttons / Remote control Control buttons LAMP indicator TEMP indicator Cursor buttons ▲,▼,◄,► POWER indicator STANDBY/ON button INPUT button Remote control SEARCH button STANDBY/ON button RGB button VIDEO VIDEO button ASPECT button HOME button MAGNIFY ON button OFF button RGB AUTO BLANK HOME PAGE UP VOLUME END PAGE DOWN MUTE ASPECT ON MAGNIFY AUTO button SEARCH FREEZE KEYSTONE MUTE button PAGE DOWN button KEYSTONE button MENU POSITION POSITION button ESC button PAGE UP b
Lamp WARNING HIGH VOLTAGE HIGH TEMPERATURE HIGH PRESSURE ►The projector uses a high-pressure mercury glass lamp. The lamp can break with a loud bang, or burn out, if jolted or scratched, handled while hot, or worn over time. Note that each lamp has a different lifetime, and some may burst or burn out soon after you start using them. In addition, when the bulb bursts, it is possible for shards of glass to fly into the lamp housing, and for gas containing mercury to escape from the projector’s vent holes.
Lamp (continued) A lamp has a finite product life. Using the lamp for long periods of time could cause the pictures darker or the color tone poor. Note that each lamp has a different lifetime, and some may burst or burn out soon after you start using them. Preparation of a new lamp and early replacement are recommended. To prepare a new lamp, contact your dealer and tell the lamp type number. Type number = DT00731. the projector off, and unplug the power cord. Allow the lamp to cool for 1.
Air filter WARNING ►Before caring, make sure the power switch is off and the power cable is not plugged in, then allow the projector to cool sufficiently. The care in a high temperature state of the projector could cause an electric shock, a burn and/or malfunction to the projector. ►Use only the air filter of the specified type. Do not use the projector with the air filter and the filter cover removed. It could result in a fire and/or malfunction to the projector. ►The air filter should be cleaned periodically.
Air filter (continued) a vacuum cleaner to the air filter 4. Apply and the filter cover. Please replace the air filter when it is damaged or too soiled. Replace the air filter in its original position. Secure the air filter in place by pressing each of the six locations. Make sure there is no dust or dirt Air filter’s remaining after the cover is in place. If any knob dust or dirt remains use a vacuum cleaner to remove it as when placing the filter cover on the air filter.
Replacing Internal Clock battery Consumption of the battery makes the clock not to work correctly. (Please refer to the User’s Manual - Operating Guide.) When the clock is wrong or it has stopped, please replace the battery according to the following procedures. WARNING ►Always handle the batteries with care and use them only as directed. Battery may explode if mistreated. Do not recharge, disassemble or dispose of in fire.
About “User’s Manual – Operating Guide” The “User’s Manual - Operating Guide” of this projector is written into the CD-ROM. Before using, please read the following and use the CD-ROM correctly. CAUTION • Only use the CD-ROM in a computer CD drive. The CD-ROM is designed for PC use only.