Projector CP-X600 User's Manual – Operating Guide Thank you for purchasing this projector. WARNING ►Before using this product, please read the "User's Manual Safety Guide" and related manuals to ensure the proper use of this product. After reading them, store them in a safe place for future reference. About this manual Various symbols are used in this manual. The meanings of these symbols are described below.
Content Content About this manual. . . . . . . . . . . 1 Content. . . . . . . . . . . . . . . . . . . 2 Projector features. . . . . . . . . . . 3 Preparations. . . . . . . . . . . . . . . 3 Contents of package. . . . . . . . . . . . . 3 Fastening the lens cover. . . . . . . . . . 3 Part names. . . . . . . . . . . . . . . . 4 Projector . . . . . . . . . . . . . . . . . . . . . . 4 Control panel. . . . . . . . . . . . . . . . . . .
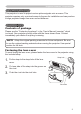
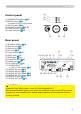
Projector features / Preparations Projector features This projector is used to project various picture signals onto a screen. This projector requires only a minimal amount of space for installation and can produce a large projected image from even a short distance. Preparations Contents of package Please see the “Contents of package” in the “User’s Manual (concise)” which is a book. Your projector should come with the items shown there. Contact immediately your dealer if anything is missing.
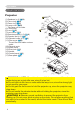
Part names Part names Projector (1) Speakers (x 4) (36). (2) Focus ring (18) (3) Zoom ring (18) (4) Lamp cover (52) The lamp unit is inside. (5) Front cover (6) Lens (56) (7) Lens cover (3) (8) Remote sensors (x 3) (14) (9) Elevator feet (x 2) (9) (10) Elevator knobs (x 2) (9) (11) F ilter cover (54) The air filter and intake vent are inside.
Part names Control panel (1) STANDBY/ON button (15) (2) MENU button (22) It consists of four cursor buttons.
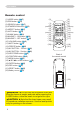
Part names Remote control (1) VIDEO button (17) (2) RGB button (16) (3) SEARCH button (17) (4) STANDBY/ON button (15) (5) ASPECT button (17) (6) AUTO button (18) (7) BLANK button (21) (8) MAGNIFY - ON button (20) (9) MAGNIFY - OFF button (20) (10) VOLUME button (16) (11) MUTE button (16) (12) FREEZE button (20) (13) MY BUTTON - 1 button (43) (14) MY BUTTON - 2 button (43) (15) KEYSTONE button (19) (16) POSITION button (19) (17) MENU button (22) (18) ▲/▼/◄/► cursor buttons (22) (19) ENTER
Setting up Setting up Install the projector according to the environment and manner the projector will be used in. WARNING ►Place the projector in a stable horizontal position. If the projector falls or is knocked over it could cause injury and/or damage to the projector. Using a damaged projector could then result in fire and/or electric shock. • Do not place the projector on an unstable, slanted or vibrational surface such as a wobbly or inclined stand.
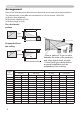
Setting up Arrangement Refer to the illustrations and tables below to determine screen size and projection distance. The values shown in the table are calculated for a full size screen: 1024×768 (a) Screen size (diagonal) (b) Projection distance (±10%) (c) Screen height (±10%) On a horizontal surface (a) (b) (c) up (c) down Suspended from the ceiling (a) (c) up (c) down • Keep a space of 30 cm or more between the sides of the projector and other objects such as walls.
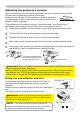
RGB OUT VIDEO RGB1 Y RGB2 M1-D CB/PB Setting up CR/PR Adjusting the projector's elevator When the place to put the projector is slightly uneven to the left or right, use the REMOTE CONTROL AUDIO elevator feet to place the projector horizontally. S-VIDEO (3.5Φ) R L R L OUT CONTROL 3 AUDIO IN 4the projector in order to project at Using theAUDIO feetINcan also tilt q a suitable angle to the screen, elevating the front side ofACthe IN projector within 8 degrees.
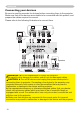
Setting up Connecting your devices Be sure to read the manuals for devices before connecting them to the projector. Make sure that all the devices are suitable to be connected with this product, and prepare the cables required to connect. Please refer to the following illustrations to connect them.
Setting up Connecting your devices (continued) NOTE • Be sure to read the manuals for devices before connecting them to the projector, and make sure that all the devices are suitable to be connected with this product. Before connecting to a PC, check the signal level, the signal timing, and the resolution. - Some signal may need an adapter to input this projector. - Some PCs have multiple screen display modes that may include some signals which are not supported by this projector.
Setting up Connecting power supply 1. Connect the connector of the power cord to the AC inlet of the projector. 2. Firmly plug the power cord's plug into the outlet. AC inlet Connector of the power cord to the outlet WARNING ►Please use extra caution when connecting the power cord, as incorrect or faulty connections may result in fire and/or electrical shock. • Only use the power cord that came with the projector. If it is damaged, contact your dealer to newly get correct one.
Remote control Remote control Putting batteries Please load the batteries before using the remote control. If the remote control starts to malfunction, replace the batteries. If you will not use the remote control for an extended period, remove the batteries from the remote control and store them in a safe place. back and remove the 1. Slide battery cover in the direction of the arrow. Align and insert the two AA batteries according to their plus and minus terminals as indicated in the remote control.
Remote control About the remote control signal The remote control works with the projector’s remote sensors. This projector has three remote sensors on the front, on the top, and on the back. The sensors can be respectively turned active or inactive using the “REMOTE RECEIV” in the SERVICE item of OPTION menu (46). Each sensor senses the signal within the following range when the sensor is active. The front and top sensors: 60 degrees (30 degrees to the left and right of the sensor) within 3 meters about.
Power on/off Power on/off Turning on the power sure that the power cord is firmly and 1. Make correctly connected to the projector and the outlet. the lens cover, and set the power switch to 2. Remove the ON position. STANDBY/ON button VIDEO RGB ASPECT MAGNIFY ON OFF SEARCH BLANK AUTO HOME PAGE UP END PAGE DOWN VOLUME MUTE The power indicator will light up in steady orange (58). Then wait several seconds because the buttons may not function for these several seconds.
Operating Operating Adjusting the volume the VOLUME button on the remote control. 1. Press A dialog will appear on the screen to aid you in adjusting the volume. the cursor buttons ▲/▼ to adjust the volume. 2. Use To close the dialog and complete the operation, press the VIDEO RGB ASPECT MAGNIFY ON HOME SEARCH AUTO BLANK PAGE UP VOLUME VOLUME button again. Even if you do not do anything, the dialog will automatically disappear after a few seconds.
Operating Selecting an input signal (continued) the VIDEO button on the remote control to select an 1. Press input for video signal. Each time you press the button, the projector switches its video input port as below.
Operating Adjusting the zoom and focus 1. Use the zoom ring to adjust the screen size. 2. Use the focus ring to focus the picture. Focus ring Zoom ring Top Using the automatic adjustment feature 1. Press the AUTO button on the remote control. VIDEO RGB SEARCH For an RGB signal The vertical position, the horizontal position, the horizontal phase and the horizontal size will be automatically adjusted. And the aspect ratio will be automatically set to default.
VIDEO RGB ASPECT SEARCH BLANK AUTO Operating MAGNIFY ON Adjusting the position OFF the POSITION button on the remote control. 1. Press The “POSITION” indication will appear on the screen. the cursor buttons ▲/▼/◄/► to adjust the picture 2. Use position. FREEZE HOME PAGE UP END PAGE DOWN MY BUTTON 1 VOLUME 2 MUTE KEYSTONE MENU POSITION ENTER When you want to reset the operation, press the RESET button on the remote control during the operation.
Operating Using the magnify feature the ON button of MAGNIFY on the remote control. 1. Press The “MAGNIFY” indication will appear on the screen (although the indication will disappear in several seconds with no operation), and the projector will go into the MAGNIFY mode. 2. VIDEO RGB MAGNIFY ON OFF FREEZE SEARCH AUTO BLANK HOME PAGE UP VOLUME END PAGE DOWN MUTE ASPECT MY BUTTON 1 KEYSTONE Use the cursor buttons ▲/▼ to adjust the zoom level.
Operating Temporarily blanking the screen the BLANK button on the remote control. 1. Press The blank screen will be displayed instead of the screen VIDEO RGB SEARCH AUTO BLANK HOME PAGE UP VOLUME END PAGE DOWN MUTE ASPECT of input signal. Please refer to the BLANK item in SCREEN menu (37). To exit from the blank screen and return to the input signal screen, press the BLANK button again.
Operating Using the menu function VIDEO RGB SEARCH AUTO BLANK HOME PAGE UP VOLUME END PAGE DOWN This projector has the following menus: PICTURE, IMAGE, INPUT, SETUP, AUDIO, SCREEN, OPTION, and EASY MENU. EASY MENU consists of functions often used, and the other menus are classified into each purpose. Each of these menus is operated using the same methods. The basic operations of these menus are as follows.
EASY Menu '#5; /'07 =4)$ ? EASY Menu From the EASY MENU, items shown in the table below can be performed. Select an item using the ▲/▼ cursor buttons on the projector or remote control. Then perform it according to the following table. Item ASPECT #52'%6 #761 -';5610' ':'%76' -';5610' -';5610' 2+%674' /1&' 014/#. $4+)*60'55 %1064#56 %1.14 6+06 5*#420'55 9*+52'4 014/#. /+4414 014/#. 4'5'6 (+.6'4 6+/' J .#0)7#)' '0).
EASY Menu EASY Menu (continued) Item BRIGHTNESS CONTRAST COLOR TINT SHARPNESS WHISPER MIRROR Description Using the ◄/► buttons adjusts the brightness. See the BRIGHTNESS item in PICTURE menu (25). Using the ◄/► buttons adjusts the contrast. See the CONTRAST item in PICTURE menu (25). Using the ◄/► buttons adjusts the strength of whole color. See the COLOR item in PICTURE menu (26). Using the ◄/► buttons adjusts the tint. See the TINT item in PICTURE menu (26).
PICTURE Menu PICTURE Menu From the PICTURE menu, items shown in the table below can be performed. Select an item using the ▲/▼ cursor buttons on the projector or remote control, and press the ► cursor button on the projector or remote control, or the ENTER button on the remote control to execute the item. Then perform it according to the following table. Item BRIGHTNESS CONTRAST /'07 =4)$ ? 2+%674' +/#)' +0276 5'672 #7&+1 5%4''0 126+10 '#5; /'07 5'.
PICTURE Menu PICTURE Menu (continued) Item Description Using the ▲/▼ buttons switches the color temperature mode.
PICTURE Menu PICTURE Menu (continued) Item Description Using the ▲/▼ cursor buttons changes the active iris control mode. PRESENTATION ó THEATER ó TURN OFF ACTIVE IRIS PRESENTATION THEATER TURN OFF Feature The active iris displays the best presentation image for both bright and dark scenes. The active iris displays the best theater image for both bright and dark scenes. The active iris is always open. • The screen may flicker when the PRESENTATION or THEATER modes are selected.
IMAGE Menu IMAGE Menu From the IMAGE menu, items shown in the table below can be performed. Select an item using the ▲/▼ cursor buttons on the projector or remote control, and press the ► cursor button on the projector or remote control, or ENTER button on the remote control to execute the item. Then perform it according to the following table. Item /'07 =4)$ ? 2+%674' +/#)' +0276 5'672 #7&+1 5%4''0 126+10 '#5; /'07 5'.
IMAGE Menu IMAGE Menu (continued) Item Description H PHASE Using the ▲/▼ buttons adjusts the horizontal phase to eliminate flicker. Right ó Left • This item can be selected only for an RGB signal or a component video signal. (except 525i (480i), 625i (576i), SCART RGB) H SIZE AUTO ADJUST EXECUTE Using the ▲/▼ buttons adjusts the horizontal size. Large ó Small • This item can be selected only for an RGB signal. • When this adjustment is excessive, the picture may not be displayed correctly.
INPUT Menu INPUT Menu From the INPUT menu, items shown in the table below can be performed. Select an item using the ▲/▼ cursor buttons on the projector or remote control, and press the ► cursor button on the projector or remote control, or ENTER button on the remote control to execute the item. Then perform it according to the following table. /'07 =4)$ ? 2+%674' +/#)' +0276 5'672 #7&+1 5%4''0 126+10 '#5; /'07 5'.'%6 241)4'55+8' 68 8+&'1 04 /+& & ;%5 56+.. %1.
INPUT Menu INPUT Menu (continued) Item Description Using the ▲/▼ buttons switches the function of the COMPONENT (Y, Cb/Pb, Cr/Pr) port. COMPONENT ó SCART RGB When the SCART RGB is selected, the COMPONENT (Y, Cb/Pb, Cr/Pr) and VIDEO ports will function as a SCART RGB port. A SCART adapter or SCART cable is required for a SCART RGB input to the projector. For details, contact your dealer.
INPUT Menu INPUT Menu (continued) Item FRAME LOCK RGB IN Description Using the ▲/▼ buttons turns the frame lock function on/off. TURN ON ó TURN OFF • This item can be performed only on an RGB signal with a vertical frequency of 50 to 60 Hz. • When the TURN ON is selected, a moving pictures are displayed more smoothly. • This function may cause a certain degradation of the picture. In such a case, please select the TURN OFF. Set the RGB input signal type for the RGB port.
INPUT Menu INPUT Menu (continued) Item Description The resolution for the RGB1 and RGB2 input signals can be set on this projector. (1) In the INPUT menu select the RESOLUTION using the ▲/▼ buttons and press the ► button. 4'51.76+10 The RESOLUTION menu will be displayed. (2) In the RESOLUTION menu select the resolution you wish to display using the ▲/▼ buttons. Selecting AUTO will set a resolution appropriate to the input signal.
SETUP Menu SETUP Menu From the SETUP menu, items shown in the table below can be performed. Select an item using the ▲/▼ cursor buttons on the projector or remote control, and press the ► cursor button on the projector or remote control, or the ENTER button on the remote control to execute the item. Then perform it according to the following table. Item /'07 =4)$ ? 2+%674' +/#)' +0276 5'672 #7&+1 5%4''0 126+10 '#5; /'07 5'.
SETUP Menu SETUP Menu (continued) Item WHISPER Description Using the ▲/▼ buttons turns off/on the whisper mode. NORMAL ó WHISPER • When the WHISPER is selected, acoustic noise and screen brightness are reduced. Using the ▲/▼ buttons switches the mode for mirror status. MIRROR NORMAL ó H:INVERT ó V:INVERT ó H&V:INVERT If the Transition Detector is TURN ON and MIRROR status is changed, Transition Detector Alarm (50) will be displayed when projector is restarted after the power switch is turned off.
AUDIO Menu AUDIO Menu From the AUDIO menu, items shown in the table below can be performed. Select an item using the ▲/▼ cursor buttons on the projector or remote control, and press the ► cursor button on the projector or remote control, or ENTER button on the remote control to execute the item. Then perform it according to the following table. /'07 =4)$ ? 2+%674' +/#)' +0276 5'672 #7&+1 5%4''0 126+10 '#5; /'07 81.7/' 52'#-'4 #7&+1 5'.
SCREEN Menu SCREEN Menu From the SCREEN menu, items shown in the table below can be performed. Select an item using the ▲/▼ cursor buttons on the projector or remote control, and press the ► cursor button on the projector or remote control, or ENTER button on the remote control to execute the item. Then perform it according to the following table. Item /'07 =4)$ ? 2+%674' +/#)' +0276 5'672 #7&+1 5%4''0 126+10 '#5; /'07 5'.'%6 .#0)7#)' '0).+5* /'07 215+6+10 $.#0- $.
SCREEN Menu SCREEN Menu (continued) Item Description Using the ▲/▼ buttons switches the mode for the start-up screen. The start-up screen is a screen displayed when no signal or an unsuitable signal is detected. MyScreen ó ORIGINAL ó TURN OFF MyScreen START UP ORIGINAL TURN OFF Feature Screen can be registered by the MyScreen item (39). Screen preset as the standard screen. Plain black screen.
SCREEN Menu SCREEN Menu (continued) Item Description MyScreen This item allows you to capture an image for use as a MyScreen image which can be used as the BLANK screen and START UP screen. Display the image you want to capture before executing the following procedure. 1. Selecting this item displays a dialog titled “MyScreen”. It will ask you if you start capturing an image from the current screen.
SCREEN Menu SCREEN Menu (continued) Item Description MESSAGE Using the ▲/▼ buttons turns on/off the message function. TURN ON ó TURN OFF When the TURN ON is selected, the following message function works. “AUTO IN PROGRESS” while automatically adjusting “NO INPUT IS DETECTED” “SYNC IS OUT OF RANGE” “Searching….” while searching for the input “Detecting….
OPTION Menu OPTION Menu From the OPTION menu, items shown in the table below can be performed. Select an item using the ▲/▼ cursor buttons on the projector or remote control, and press the ► cursor button on the projector or remote control, or ENTER button on the remote control to execute the item, except for the items LAMP TIME and FILTER TIME. Then perform it according to the following table.
OPTION Menu OPTION Menu (continued) Item Description Using the ▲/▼ buttons adjusts the time to count down to automatically turn the projector off. Long (max. 99 minutes) ó Short (min. 0 minute = DISABLE) AUTO OFF AUTO OFF ENABLE AUTO OFF DISABLE 0 When the time is set to 0, the projector is not turned off automatically. When the time is set to 1 to 99, and when the passed time with nosignal or an unsuitable signal reaches at the set time, the projector lamp will be turned off.
OPTION Menu OPTION Menu (continued) Item MY BUTTON Description This item is to assign one of the following function to MY BUTTON 1 and 2 on the remote control (6). Choose 1 or 2 on the MY BUTTON menu using the ◄/► button first. Then using the ▲/▼ buttons sets one of the following functions to the chosen button. • RGB1: Sets port to RGB1. • RGB2: Sets port to RGB2. • COMPONENT: Sets port to COMPONENT (Y, Cb/Pb, Cr/Pr). • S-VIDEO: Sets port to S-VIDEO. • VIDEO: Sets port to VIDEO.
OPTION Menu OPTION Menu (continued) Item Description AUTO ADJUST Using the ▲/▼ buttons enables/disables the #761 #&,756 automatic adjustment.When DISABLE is selected, '0#$.' &+5#$.' the automatic adjustment feature is disabled, although rough adjustment is automatically performed depending on the basic setting. ENABLE ó DISABLE • Depending on conditions, such as input image, signal cable to the projector, environment around the projector, etc., the automatic adjustment may not work correctly.
OPTION Menu OPTION Menu (continued) Item Description KEY LOCK Using the ▲/▼ buttons turns on/off the key lock feature. When TURN ON is selected, the buttons on the projector except the STANDBY/ON button are locked. TURN ON ó TURN OFF • Please use to avoid a mischief and touching accidentally. This function does not have any effect on the remote control. SERVICE REMOTE RECEIV. (1) Select a remote sensor using the ▲/▼ button.
OPTION Menu OPTION Menu (continued) Item Description This projector is equipped with security functions. User registration is required before using the security functions. Please contact your local dealer. 1. Using Security Features 1.1 Inputting the PASSWORD SECURITY 1.1-1 Use the ▲/▼ buttons on the OPTION menu to select SECURITY and press the ► button. The ENTER PASSWORD box will be displayed. The factory default PASSWORD is 2400. This PASSWORD can be changed (1.2 Changing the PASSWORD).
OPTION Menu OPTION Menu (continued) Item Description 1.3 If you have forgotten your PASSWORD 1.3-1 Follow the procedure in 1.1-1 to display the ENTER PASSWORD BOX. 1.3-2 While the ENTER PASSWORD BOX is displayed, press and hold the RESET button on the remote control for about 3 seconds or press and hold the INPUT and ► buttons on the projector for about 3 seconds. The 10 digit Inquiring Code will be displayed.
OPTION Menu OPTION Menu (continued) Item Description 2.2-4 Move the cursor to the right side of the CHECK PASSWORD BOX and press the /[5ETGGP ► button to display the PASSWORD for %1/2.'6' about 20 seconds, please make note of the PASSWORD during this time. '06'4 ':+6 Pressing the ENTER button on the remote control PASSWORD BOX or INPUT button on the projector will return to MyScreen PASS WORD on/off menu.
OPTION Menu OPTION Menu (continued) Item SECURITY Description 3.1-3 Input a 4 part PIN Code using the ▲/▼/◄/► /RGB and INPUT buttons. 2+0 $1: +PRWV 2+0 %QFG A CONFIRMATION BOX will appear. Reenter the same PIN Code. This will complete the PIN Code 4)$ registration. PIN BOX NOTE: If there is no key input for about 55 seconds while the PIN BOX or the CONFIRMATION BOX are displayed the menu will close.
OPTION Menu OPTION Menu (continued) Item Description 4. Using the Transition Detector Function While the Transition Detector function is ON, when power switch is started to supply to the projector, it might react as below. • Transition Detector alarm shown below might appear on screen, if the projector has been moved or re-installed. • Transition Detector alarm might appear on screen, if the MIRROR setting has been changed.
OPTION Menu OPTION Menu (continued) Item Description 4.3 Setting the Transition Detector off 4.3-1 Follow the procedure in 4.1-1 to display the Transition Detector on/off menu. 4.3-2 Select TURN OFF to display the ENTER PASSWORD BOX (large). Enter the registered PASSWORD and the screen will return to the Transition Detector on/off menu. If an incorrect PASSWORD is input the menu will close. If necessary repeat the process from 4.3-1. SECURITY 4.4 If you have forgotten your PASSWORD 4.
Maintenance Maintenance Lamp A lamp has finite product life. Using the lamp for long periods of time could cause the pictures darker or the color tone poor. Note that each lamp has a different lifetime, and some may burst or burn out soon after you start using them. Preparation of a new lamp and early replacement are recommended. To prepare a new lamp, contact your dealer and tell the lamp type number. Type number = DT00771 Replacing the lamp The lamp cover the projector off, and unplug the power cord.
Maintenance Lamp (continued) WARNING HIGH VOLTAGE HIGH TEMPERATURE HIGH PRESSURE ►The projector uses a high-pressure mercury glass lamp. The lamp can break with a loud bang, or burn out, if jolted or scratched, handled while hot, or worn over time. Note that each lamp has a different lifetime, and some may burst or burn out soon after you start using them.
Maintenance Air filter Please check and clean the air filter periodically. If the air filter becomes clogged by dust or the like, internal temperatures rise, which could cause a fire, a burn or malfunction to the projector. When the indicators or a message prompts you to clean the air filter, comply with it as soon as possible. Note that the projector may shut down, when the projector heats too much. Please replace the air filter when it is damaged or too soiled.
Maintenance Air filter (continued) Turn the projector on and reset the filter time using the FILTER TIME item in the EASY MENU (24). 9. (1) Press the MENU button to display a menu. (2) Point at the “FILTER TIME” using the ▼/▲ button, then press the ► button. A dialog will appear. (3) Press the ▲ button to select “RESET” on the dialog. It performs resetting the filter time.
Maintenance Other care Inside of the projector In order to ensure the safe use of your projector, please have it cleaned and inspected by your dealer about once every year. Caring for the lens If the lens is flawed, soiled or fogged, it could cause deterioration of display quality. Please take care of the lens, being cautious of handling. Turn the projector off, and unplug the power cord. Allow the projector to cool sufficiently.
Troubleshooting Troubleshooting Related messages When the unit's power is on, messages such as those shown below may be displayed. When any such message is displayed on the screen, please follow the instructions described below. If the same message is displayed after the remedy, or if a message other than the following appears, please contact your dealer or service company.
Troubleshooting Regarding the indicator lamps Lighting and flashing of the POWER indicator, the LAMP indicator, and the TEMP indicator have the meanings as described in the table below. Please follow the instructions within the table. If the same indication is displayed after the remedy, or if an indication other than the following is displayed, please contact your dealer or service company.
Troubleshooting Regarding the indicator lamps (continued) POWER LAMP TEMP indicator indicator indicator Description The cooling fan is not operating. Blinking In Red or Lighting In Red Turned off Blinking In Red Please turn the power off, and allow the projector to cool down at least 20 minutes. After the projector has sufficiently cooled down, please make confirmation that no foreign matter has become caught in the fan, etc., and then turn the power on again.
Troubleshooting Phenomena that may be easy to be mistaken for machine defects WARNING ►Never use the projector if abnormal operations such as smoke, strange odor, excessive sound, damaged casing or elements or cables, penetration of liquids or foreign matter, etc. should occur. In such cases, immediately turn off the power switch and then disconnect the power plug from the power outlet. After making sure that the smoke or odor has stopped, contact your dealer or service company.
Troubleshooting Phenomena that may be easy to be mistaken for machine defects (continued) Phenomenon Cases not involving a machine defect The signal cables are not correctly connected. Correctly connect the audio cables. The MUTE function is working. Sound does not come out. Restore the sound pressing the MUTE or VOLUME button on the remote control. The volume is adjusted to an extremely low level. Adjust the volume to a higher level using the menu function or the remote control.
Troubleshooting Phenomena that may be easy to be mistaken for machine defects (continued) Phenomenon Cases not involving a machine defect The brightness and/or contrast are adjusted to an extremely low level. Adjust BRIGHTNESS and/or CONTRAST settings to a higher level using the menu function. Pictures appear dark. The WHISPER function is working. Select NORMAL for the WHISPER item in the SETUP menu. The lamp is approaching the end of its product lifetime. Replace the lamp.
Warranty And After-Service / Specification Warranty and after-service If a problem occurs with the equipment, first refer to the “Troubleshooting” and run through the suggested checks. If this does not resolve the problem, please contact your dealer or service company. They will tell you what warranty condition is applied. Specification Item Product name Liquid Crystal Panel Panel size Specification Liquid crystal projector 2.0 cm (0.
Specifications 319 Specifications (continued) 154 139 418 [unit: mm] 64