Rotary Hammer Bohrhammer Marteau perforateur Martello perforatore Boorhamer Martillo perforador Martelo perfurador DH 38SS Read through carefully and understand these instructions before use. Diese Anleitung vor Benutzung des Werkzeugs sorgfältig durchlesen und verstehen. Lire soigneusement et bien assimiler ces instructions avant usage. Prima dell’uso leggere attentamente e comprendere queste istruzioni. Deze gebruiksaanwijzing s.v.p. voor gebruik zorgvuldig doorlezen.
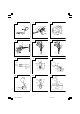
1 2 3 2 7 5 34 5 A 1 1 4 6 3 6 5 6 8 9 8 7 9 B A C 0 10 11 12 D F G D E H 1 00Table_DH38SS_WE 1 4/27/09, 16:59
13 14 15 I K L J I 16 17 M 18 N J I 19 O 73 7 mm 17 mm P 2 00Table_DH38SS_WE 2 4/27/09, 16:59
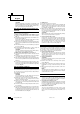
English Deutsch Français Italiano 1 Tool shank Werkzeugschaft Queue Gambo 2 Grease or machine oil Schmierfett oder Maschinenöl Graisse ou huile pour machine Grasso o olio della macchina 3 Retainer (tool holer) Rückhalter (Werkzeughalter) Tige de retenue (fixation de l’outil) Sostegno (portautensile) 4 Retainer edge Werkzeugrückhalterkante Bord de la retenue Bordo sostegno 5 Push button Drucktaste Poussoir Pulsante 6 Front cover Frontdeckel Couvercle frontal Coperchio anterior
Nederlands Español Português 1 Boorschacht Barrena Cabo de ferramenta 2 Smeervet of machineolie Grasa o aceite de máquina Lubrificante ou óleo para máquinas 3 Houder (voor gereedschap) Retén (soporte de herramienta) Retentor (fixador de ferramenta) 4 Rand van houder Borde del retén Extremidade do retentor 5 Druktoets Botón pulsador Botão de pressão 6 Voorzijde Cubierta delantera Cobertura dianteira 7 Uitlaatopening Salida Abertura 8 Zijgreep Mango lateral Empunhadura latera
Symbols WARNING The following show symbols used for the machine. Be sure that you understand their meaning before use. Read all safety warnings and all instructions. Failure to follow the warnings and instructions may result in electric shock, fire and/or serious injury. Symbole WARNUNG Die folgenden Symbole werden für diese Maschine verwendet. Achten Sie darauf, diese vor der Verwendung zu verstehen. Lesen Sie sämtliche Sicherheitshinweise und Anweisungen durch.
English GENERAL POWER TOOL SAFETY WARNINGS WARNING Read all safety warnings and all instructions. Failure to follow the warnings and instructions may result in electric shock, fire and/or serious injury. Save all warnings and instructions for future reference. The term “power tool” in the warnings refers to your mainsoperated (corded) power tool or battery-operated (cordless) power tool. 1) Work area safety a) Keep work area clean and well lit. Cluttered or dark areas invite accidents.
English ROTARY HAMMER SAFETY WARNINGS 1. 2. 3. Wear ear protectors Exposure to noise can cause hearing loss. Use auxiliary handles supplied with the tool. Loss of control can cause personal injury. Do not touch the bit during or immediately after operation. The bit becomes very hot during operation and could cause serious burns. 4. 5. 6. Before starting to break, chip or drill into a wall, floor or ceiling, thoroughly confirm that such items as electric cables or conduits are not buried inside.
English (1) Anchor adapter (for Rotation + Hammering) Anchor size: W1/4, W5/16, W3/8, W1/2, W5/8 (No. 20) (No. 25) (No. 30) (No. 40) (No. 50) (2) Drift key 䡬 Crushing (Hammering) (1) Bull point Overall length: 280, 450 mm 䡬 Groove digging and edging (Hammering) (1) Cold chisel Overall length: 280, 450 mm 䡬 Asphalt cutting (Hammering) 4. How to install tool NOTE For tools such as a bull point and a cold chisel, use only Hitachi genuine parts.
English CAUTION When the warming up operation is performed, hold the side handle and the main body securely with both hands to maintain a secure grip and be careful not to twist your body by the jammed drill bit. DRILLING AND DRIVING-IN OPERATIONS FOR ANCHORS Use the optional accessories for anchors, such as anchor adapter and taper shank adapter. 1. When a rotation hammering anchor adapter is used. (1) Install the self-drilling anchor in the anchor adapter (Fig. 7).
English 4. Inspecting the carbon brushes (Fig. 19) The Motor employs carbon brushes which are consumable parts. When they become worn to or near the “wear limit”, it could result in motor trouble. When an auto-stop carbon brush is equipped, the motor will stop automatically. At that time, replace both carbon brushes with new ones which have the same carbon brush Numbers shown in the figure. In addition, always keep carbon brushes clean and ensure that they slide freely within the brush holders. 5.
Deutsch ALLGEMEINE SICHERHEITSHINWEISE FÜR ELEKTROGERÄTE WARNUNG Lesen Sie sämtliche Sicherheitshinweise und Anweisungen durch Wenn die Warnungen und Anweisungen nicht befolgt werden, kann es zu Stromschlag, Brand und/oder ernsthaften Verletzungen kommen. Bitte bewahren Sie alle Warnhinweise und Anweisungen zum späteren Nachschlagen auf. Der Begriff „Elektrowerkzeug“ bezieht sich in den Warnhinweisen auf Elektrowerkzeuge mit Netz- (schnurgebunden) oder Akkubetrieb (schnurlos).
Deutsch Bei Beschädigungen lassen Sie das Elektrowerkzeug reparieren, ehe Sie es benutzen. Viele Unfälle mit Elektrowerkzeugen sind auf schlechte Wartung zurückzuführen. f) Halten Sie Schneidwerkzeuge scharf und sauber. Richtig gewartete Schneidwerkzeuge mit scharfen Schneidkanten bleiben weniger häufig hängen und sind einfacher zu beherrschen.
Deutsch Konusschaftadapter Anwendbare Bohrerspitze Morsekonus (Nr. 1) Bohrerspitze (Konusschaft) 11 12 14,3 14,5 17,5 mm Morsekonus (Nr. 2) Bohrerspitze (Konusschaft) 21,5 mm 䡬 Asphaltschneiden (Hämmern) (1) Spatmeißel 䡬 Spritze (für Schnipselentfernung) Der Konusschaftadapter in Form von A-Konus oder B-Konus wird wahlweise geliefert, aber die passende Bohrerspitze wird nicht mitgeliefert.
Deutsch (6) Am Werkzeug ziehen, um sicherzustellen, dass es vollständig verriegelt ist. HINWEIS Zum Abnehmen das obige Verfahren umgekehrt ausfüren. WENN DIE DRUCKTASTE NICHT SAUBER ARBEITET Wenn die Drucktaste nicht sauber arbeitet, Schmutz aus dem Inneren mit einem Draht etc. durch die Öffnung entfernen. Dann mit Schmieröl schmieren, und die Drucktaste mehrmals drücken, um sie sauber arbeiten zu lassen. (Abb.
Deutsch VORSICHT Nehmen Sie beim Abnehmen dez Zentrierstiftes und der Führungsplatte den Stecker aus der Steckdose. 3. Abnehmen der Bohrkrone Entfernen Sie den Bohrkronenschaft von der Maschine, halten Sie die Bohrkrone mit einer Hand, während Sie mit einem Hammer zwei oder drei mal kräftig auf den Kopf des sechskantigen Teil des Bohrkronenschaftes schlagen, wodurch sich die Rundkopfschraube löst und der Bohrer abgenommen werden kann. (Abb.
Deutsch Information über Betriebslärm und Vibration Die gemessenen Werte wurden entsprechend EN60745 bestimmt und in Übereinstimmung mit ISO 4871 ausgewiesen. Gemessener A-gewichteter Schallpegel: 103 dB (A) Gemessener A-gewichteter Schalldruck: 92 dB (A) Messunsicherheit KpA: 3 dB (A) Bei der Arbeit immer einen Gehörschutz tragen. Gesamtvibrationswerte (3-Achsen-Vektorsumme), bestimmt gemäß EN60745.
Français AVERTISSEMENTS DE SÉCURITÉ GÉNÉRAUX CONCERNANT LES OUTILS ÉLECTRIQUES AVERTISSEMENT Lire tous les avertissements de sécurité et toutes les instructions. Tout manquement à observer ces avertissements et instructions peut engendrer des chocs électriques, des incendies et/ou des blessures graves. Conservez tous les avertissements et toutes les instructions pour vous y référer ultérieurement.
Français f) Maintenir les outils coupants aiguisés et propres. Des outils coupants bien entretenus avec des bords aiguisés sont moins susceptibles de se coincer et plus simples à contrôler. g) Utiliser l'outil électrique, les accessoires et les mèches de l'outil, etc. conformément à ces instructions en tenant compte des conditions d'utilisation et du travail à réaliser. L'utilisation de l'outil électrique pour des opérations différentes de celles pour lesquelles il a été conçu est dangereuse.
Français 䡬 Perçage de trous à large diamètre (rotation + percussion) (1) Goujon (plaque de (2) Couronne central guidage) (3) Queue de cournne (1) Goujon central 䢇 Appliqué à couronnes 38 mm ~ 105 mm 䢇 Appliqué à couronnes 32 mm et 35 mm REMARQUE Ne pas utiliser de couronnes 25 mm et 29 mm. (2) Couronne 䢇 Dia. ext.
Français 1. Comment percer des trous (Fig. 4) (1) Tirer l’interrupteur après avoir appliqué la pointe de la mèche à la position de forage. (2) Il n’est pas nécessaire d’appuyer de force sur le corps du marteau perforateur. Il sera suffisant d’appuyer légèrement sur le percussion jusqu’à ce que les éclats soient déchargés librement.
Français 1. Période de remplacement Remplacer la graisse après chaque période de 6 moins d’utilisation. Se procurer la graisse chez l’Agence de Service Autorisée Hitachi la plus proche. Procéder au remplacement. 2. Plein de graisse ATTENTION Avant de faire le plein de la graisse, fermer l’interrupteur et débrancher l’outil de la prise de courant. (1) Enlever le couvercle du carter et essuyer la graisse à l’intérieur. (Fig.
Italiano AVVERTIMENTI GENERALI DI SICUREZZA SUGLI UTENSILI ELETTRICI AVVERTENZA Leggere tutti gli avvertimenti di sicurezza e tutte le istruzioni. La mancata osservanza degli avvertimenti e delle istruzioni potrebbe essere causa di scosse elettriche, incendi e/o gravi lesioni. Salvare tutti gli avvertimenti e le istruzioni per riferimenti futuri. Il termine “elettroutensili” riportato nelle avvertenze si riferisce agli elettroutensili azionati con alimentazione di rete (via cavi) o a batterie (senza cavi).
Italiano f) Mantenere gli strumenti di taglio affilati e puliti. Gli strumenti di taglio in condizioni di manutenzione adeguata, con bordi affilati, sono meno soggetti al bloccaggio e sono più facilmente controllabili. g) Utilizzare l'elettroutensile, gli accessori, le barrette, ecc. in conformità a quanto riportato nelle presenti istruzioni, tenendo in debita considerazione le condizioni operative e il tipo di lavoro da eseguire.
Italiano 䡬 Siringa (per la rimozione dei truccioli) Adattatore del gambo conico Punta usabile Conicità Morse (No. 1) Punta (gambo conico) 11 12 14,3 14,5 17,5 mm Conicità Morse (No. 2) Punta (gambo conico) 21,5 mm Conicità A L’adattatore del gambo conico per conicità A o conicità B è fornito quale accessorio facoltativo, ma la punta corrispondente non è fornita.
Italiano QUANDO IL PULSANTE NON FUNZIONA BENE Quando il pulsante non funziona bene, eliminare lo sporco all’interno tramite l’uscita usando del filo di ferro, ecc. Quindi lubrificare con olio lubrificante e premere il pulsante varie volte per farlo funzionare correttamente. (Fig. 3) MODO D’USO NOTA: Assicurarsi che il bullone ad alette sulla maniglia laterale sia ben serrato prima di utilizzare l’utensile. 1. Come perforare (Fig.
Italiano 3. Come smontare la corona Togliere il gambo della corona dall’utensile, tenere la corona con una mano e percuotere forte la testa della porzione esagonale del gambo della corona con un martello a mano per due o tre volte, finché la vite a testa tonda non è allentata. L’apparecchio a questo punto è pronto per lo smontaggio. (Fig.
Italiano AVVERTENZA 䡬 Il valore di emissione vibrazioni durante l’uso effettivo dell’utensile può essere diverso dal valore dichiarato in base alle modalità di utilizzo dell’utensile stesso.
Nederlands ALGEMENE VEILIGHEIDSWAARSCHUWINGEN VOOR ELEKTRISCH GEREEDSCHAP WAARSCHUWING Lees alle waarschuwingen en instructies aandachtig door. Nalating om de waarschuwingen en instructies op te volgen kan in een elektrische schok, brand en/of ernstig letsel resulteren. Bewaar alle waarschuwingen en aanwijzingen voor eventuele naslag in de toekomst.
Nederlands Slecht onderhouden elektrisch gereedschap is verantwoordelijk voor een groot aantal doe-het-zelf ongelukken. f) Houd snijwerktuigen scherp en schoon. Goed onderhouden snijwerktuigen met scherpe snijranden lopen minder snel vast en zijn gemakkelijker in het gebruik. g) Elektrisch gereedschap, toebehoren, bits enz. moeten in overeenstemming met deze instructies worden gebruikt waarbij de werkomstandigheden en het werk in overweging moeten worden genomen.
Nederlands 䡬 Asfaltsnijden (Hameren) Adaptor voor vernauwde schacht Toepasselijk boorstuk Morse tap (Nr. 1) Boorstuk (vernauwde schacht) 11 12 14,3 14,5 17,5 mm Norse tap (Nr. 2) Boorstuk (vernauwde schacht) 21,5 mm Adaptor voor vernauwde schacht die samen A-tap of Btap vormen, zijn als los verkrijgbare toebehoren beschikbaar, maar het boorstuk wordt niet meegeleverd.
Nederlands (5) Druk de gereedschaphouder terug om het gereedschap vast te zetten. (6) Trek aan het gereedschap om te controleren of dit volledig vergrendeld is. OPMERKING Verwijder de boor door deze handeling in omgekeerde volgorde uit te voeren. ALS DE DRUKTOETS NIET SOEPEL WERKT Als de druktoets niet soepel werkt, probeert u dan of vuil uit het inwendige kunt verwijderen met een stuk draad e.d., via de uitlaatopening.
Nederlands VERVERSEN VAN OLIE De constructie van dit apparaat is luchtdicht, zodat olie niet kan uitlekken, en het apparaat beschermd is tegen stof. Het apparaat kan dus voor lange tijd gebruikt worden zonder verdere smering. Vervang de olie zoals hieronder is beschreven. 1. Periodieke vervanging van de olie Vervang de olie nadat het apparaat 6 maanden gebruikt is. Vervangingsolie is verkrijgbaar bij de officiële Hitachi Service Agent. 2.
Nederlands WAARSCHUWING 䡬 De trillingsemissiewaarde tijdens het feitelijke gebruik van het elektrisch gereedschap kan afwijken van de opgegeven waarde afhankelijk van de manieren waarop het gereedschap wordt gebruikt.
Español ADVERTENCIAS DE SEGURIDAD GENERAL DE LA HERRAMIENTA ELÉCTRICA ADVERTENCIA Lea todas las instrucciones y advertencias de seguridad. Si no se siguen las advertencias e instrucciones, podría producirse una descarga eléctrica, un incendio y/o daños graves. Guarde todas las advertencias e instrucciones para futura referencia.
Español Se producen muchos accidentes por no realizar un mantenimiento correcto de las herramientas eléctricas. f) Mantenga las herramientas de corte afiladas y limpias. Las herramientas de corte correctamente mantenidas con los bordes de corte afilados son más fáciles de controlar. g) Utilice la herramienta eléctrica, los accesorios y las brocas de la herramienta, etc. de acuerdo con estas instrucciones, teniendo en cuenta las condiciones laborales y el trabajo que se va a realizar.
Español 䡬 Jeringa (extracción de resíduos) Adaptador de espiga cónica Barrena aplicable Cono Morse (N°. 1) Barrena (espiga cónica) 11 12 14,3 14,5 17,5 mm Cono Morse (N°. 2) Barrena (espiga cónica) 21,5 mm Adaptador de espiga cónica formada por el dispositivo ahusador A o el B, provisto como accesorio opcional, pero no se provee barrena de perforar.
Español (6) Tire de la herramienta para asegurarse de que se encuentran completamente bloqueado. NOTA Quitar la herramienta invirtiendo el orden de instalación. CUANDO EL BOTÓN PULSADOR NO FUNCIONE SUAVEMENTE Cuando el botón pulsador no funcione suavemente, elimine las suciedad del interior a través de la salida con un alambre, etc. Después aplique aceite lubricante y presione varias veces el botón pulsador para hacer que funcione suavemente. (Fig.
Español (3) Cuando el orificio alcanza una profundidad de 5 mm la posición del orificio puede determinarse perfectamente. Luego, quitar el pasador central y la placa guía de la barrena tubular y continuar taladrando. PRECAUCION Cuando se quita el pasador central y la placa guía, siempre hay que desenchufar el aparato del tomacorriente. 3.
Español Información sobre el ruido propagado por el aire y vibración Los valores medidos se determinaron de acuerdo con EN60745 declararon de conformidad con ISO 4871. Nivel de potencia auditiva ponderada A: 103 dB (A) Nivel de presión auditiva ponderada A: 92 dB (A) Duda KpA: 3 dB (A) Utilice protectores para los oídos. Valores totales de la vibración (suma de vectores triax.) determinados de acuerdo con EN60745.
Português AVISOS GERAIS DE SEGURANÇA PARA A FERRAMENTA ELÉCTRICA AVISO Leia todas as instruções e avisos de segurança. Se não seguir todas as instruções e os avisos, pode provocar um choque eléctrico, incêndio e/ou ferimentos graves. Guarde todos os avisos e instruções para referência futura. O termo “ferramenta eléctrica” em todos os avisos refere-se à sua ferramenta ligada à corrente (com fios) ou à ferramenta eléctrica a baterias (sem fios).
Português g) Utilize a ferramenta eléctrica, acessórios e pontas de ferramentas, etc., de acordo com estas instruções, tomando em consideração as condições de trabalho e o trabalho a ser efectuado. A utilização de uma ferramenta eléctrica para operações diferentes das concebidas pode resultar num mau funcionamento. 5) Manutenção a) Faça a manutenção da sua ferramenta eléctrica por um pessoal de reparação qualificado e utilize apenas peças de substituição idênticas.
Português 䡬 Seringa (para retirada de lascas) Adaptador de haste cônica Broca de aplicação Cone Morse (N° 1) Broca (haste cônica) 11 12 14,3 14,5 17,5 mm Cone Morse (N° 2) Broca (haste cônica) 21,5 mm Adaptador de haste cônica formando cônico-A e cônico-B fornecido como acessório opcional, mas a broca para ele não é fornecida. Cônico-A Cônico-B 䡬 Lubrificante A de martelo 500 g (em lata) 70 g (num tubo verde) 30 g (num tubo verde) Os acessórios opcionais estão sujeitos a mudanças sem aviso prévio.
Português SE O BOTÃO DE PRESSÃO NÃO FUNCIONAR BEM Se o botão de pressão não funcionar adequadamente, remova a sujeira do interior através da abertura existente com o uso de um arame, etc. Aplique então óleo lubrificante e pressione várias vezes o botão de pressão para fazer com que o botão funcione adequadamente (Fig. 3). MODO DE USAR O MARTELO GIRATÓRIO NOTA: Antes de utilizar a ferramenta, certifique-se de que o parafuso de orelhas na pega lateral está correctamente apertado. 1.
Português 3. Como desmontar o núcleo de broca Retire o cabo do núcleo de broca do martelo perfurador, segure o núcleo de broca com uma mão e bata com força duas ou três vezes na parte sextavada do cabo de núcleo de broca com um martelo manual. A cabeça redonda do parafuso se afrouxa e o martelo perfurador fica pronto para a desmontagem. (Fig. 17) COMO TROCAR O LUBRIFICANTE Esta máquina é hermeticamente fechada para protegêla contra a poeira e para evitar o vazamento de lubrificante.
Português AVISO 䡬 O valor de emissão de vibrações durante a utilização da ferramenta eléctrica pode ser diferente do valor declarado, consoante as formas de utilização da ferramenta.
46 08Back_DH38SS_WE 46 4/27/09, 17:03
47 08Back_DH38SS_WE 47 4/27/09, 17:03
Item No. 1 2 3 4 5 6 7 8 9 10 11 12 13 14 15 16 17 18 19 20 21 22 23 24 25 26 27 28 29 30 31 32 33 34 35 36 37 38 39 40 41 42 43 44 45 46 47 48 49 50 51 52 53 54 55 56 57 58 59 60 61 62 63 64 65 66 67 Part Name Q’TY RETAINER DUST COVER ROLL PIN D4 × 20 SEAL LOCK HEX. SOCKET HD. BOLT M6 × 25 FRONT COVER O-RING (S-25) O-RING RETAINER PIN DAMPER (B) PUSHING BUTTON SET SPRING CYLINDER CASE HEX SOCKET HD.
49 08Back_DH38SS_WE 49 4/27/09, 17:03
English Nederlands GARANTIEBEWIJS GUARANTEE CERTIFICATE 1 2 3 4 5 Model No. Serial No. Date of Purchase Customer Name and Address Dealer Name and Address (Please stamp dealer name and address) Deutsch 1 2 3 4 5 Español CERTIFICADO DE GARANTIA GARANTIESCHEIN 1 2 3 4 5 Modell-Nr. Serien-Nr.
1 2 3 4 ✄ 5 51 08Back_DH38SS_WE 51 4/27/09, 17:03
52 08Back_DH38SS_WE 52 4/27/09, 17:03
53 08Back_DH38SS_WE 53 4/27/09, 17:03
Hitachi Power Tools Europe GmbH Siemensring 34, 47877 willich 1, F. R. Germany Tel: +49 2154 49930 Fax: +49 2154 499350 URL: http://www.hitachi-powertools.de Hitachi Power Tools Netherlands B. V. Brabanthaven 11, 3433 PJ Nieuwegein, The Netherlands Tel: +31 30 6084040 Fax: +31 30 6067266 URL: http://www.hitachi-powertools.nl Hitachi Power Tools (U. K.) Ltd. Precedent Drive, Rooksley, Milton Keynes, MK 13, 8PJ, United Kingdom Tel: +44 1908 660663 Fax: +44 1908 606642 URL: http://www.hitachi-powertools.co.
Nederlands English EC VERKLARING VAN CONFORMITEIT Wij verklaren onder eigen verantwoordelijkheid dat dit produkt conform de richtlijnen of gestandardiseerde documenten EN60745, EN55014 en EN61000 voldoet aan de eisen van EEG Bepalingen 2004/108/EC en 98/37/EC. Dit product voldoet ook aan de essentiële vereisten van 2006/42/EC toegepast vanaf december 2009, in plaats van 98/37/EC. Deze verklaring is van toepassing op produkten voorzien van de CE-markeringen.