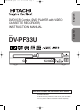
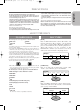
03.1.22 7:19 PM Page 1 English H9450UD(EN).qx33 Español DVD/VCR Combo (DVD PLAYER with VIDEO CASSETTE RECORDER) INSTRUCTION MANUAL MODEL DV-PF33U Recordable ReWritable OPEN/CLOSE POWER/STANDBY CHANNEL STOP PLAY DVD OUTPUT VCR TIMER REC REC/IRT REW LINE 2 F.FWD VIDEO IN STOP/EJECT PLAY L (mono) AUDIO IN R INSTRUCCIONES EN ESPAÑOL INCLUIDAS. Instruction manual To obtain the best performance and ensure years of troublefree use, please read this instruction manual completely.
H9450UD(EN).qx33 03.1.22 7:19 PM Page 2 WARNING: TO REDUCE THE RISK OF FIRE OR ELECTRIC SHOCK, DO NOT EXPOSE THIS APPLIANCE TO RAIN OR MOISTURE. CAUTION RISK OF ELECTRIC SHOCK DO NOT OPEN CAUTION: TO REDUCE THE RISK OF ELECTRIC SHOCK, DO NOT REMOVE COVER (OR BACK). NO USER SERVICEABLE PARTS INSIDE. REFER SERVICING TO QUALIFIED SERVICE PERSONNEL.
H9450UD(EN).qx33 03.1.22 7:19 PM Page 3 1. Read Instructions - All the safety and operating instructions should be read before the appliance is operated. 2. Retain Instructions- The safety and operating instructions should be retained for future reference. 3. Heed Warnings - All warnings on the appliance and in the operating instructions should be adhered to. 4. Follow Instructions - All operating and use instructions should be followed. 5.
H9450UD(EN).qx33 03.1.22 7:19 PM Page 4 A NOTE ABOUT RECYCLING This product’s packaging materials are recyclable and can be reused. Please dispose of all materials in accordance with your local recycling regulations. Batteries should never be thrown away or incinerated but disposed of in accordance with your local regulations concerning chemical wastes. The serial number of this product may be found on the back of the DVD/VCR. This serial number is unique to your machine.
H9450UD(EN).qx33 03.1.22 7:19 PM Page 5 ■ LASER SAFETY . . . . . . . . . . . . . . . . . . . . . . . . . . . . . . . . . . 2 ■ IMPORTANT SAFEGUARDS . . . . . . . . . . . . . . . . . . . . . . . . 3 ABOUT COPYRIGHT . . . . . . . . . . . . . . . . . . . . . . . . . . . . . . 4 SUPPLIED ACCESSORIES . . . . . . . . . . . . . . . . . . . . . . . . . . 4 SYMBOLS USED IN THIS MANUAL. . . . . . . . . . . . . . . . . . 4 ■ FEATURES . . . . . . . . . . . . . . . . . . . . . . . . . . . . . . . . . . . . . .
H9450UD(EN).qx33 03.1.22 7:19 PM Page 6 FEATURES DVD Mode ¡Progressive Scan system ¡Dolby Digital sound This DVD/VCR can handle Dolby Digital surround sound with 5.1 channels when connected to a Dolby Digital decoder. ¡Still/fast/slow/step playback ¡Random playback for audio CD and MP3 ¡Program playback for audio CD and MP3 ¡DVD menus in a desired language ¡Screen saver/Auto power-off functions The screen saver program starts when there is no input from the DVD/VCR for five minutes in the stop mode.
H9450UD(EN).qx33 03.1.22 7:19 PM Page 7 INSTALLATION LOCATION For safety and optimum performance of your DVD/VCR: • Install the DVD/VCR in a horizontal and stable position. Do not place anything directly on top of the DVD/VCR. Do not place the DVD/VCR directly on top of the TV. • Shield it from direct sunlight and keep it away from sources of intense heat. Avoid dusty or humid places. Avoid places with insufficient ventilation for proper heat dissipation.
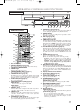
H9450UD(EN).qx33 03.1.22 7:19 PM Page 8 OPERATING CONTROLS AND FUNCTIONS 1 FRONT PANEL 2 4 5 3 OPEN/CLOSE POWER/STANDBY CHANNEL STOP PLAY DVD OUTPUT VCR TIMER REC REC/IRT REW LINE 2 F.FWD VIDEO IN 21 19 20 REMOTE CONTROL 22 54 53 SURROUND OPEN/CLOSE AUDIO SPEED EJECT 23 SKIP/CH. 1 2 3 4 5 6 7 8 9 0 + 10 DVD VCR 52 SKIP/CH.
03.1.22 7:19 PM Page 9 25. DISPLAY Button ● DVD mode [page 29] Press to access or remove the display screen during DVD or Audio CD playback. ● VCR mode [page 22] Press to access or remove the VCR’s on-screen status display. 26. TV Button Press to exclusively control the TV. 27. DVD Button [page 12] Press to select DVD mode for the remote control. ● You can switch the OUTPUT mode either by pressing OUTPUT on the front panel, or by pressing DVD or VCR on the remote control.
H9450UD(EN).qx33 03.1.22 7:19 PM Page 10 watch TV using the VCR tuner. ● TV Position To watch TV or to view one program while recording another. 52. SKIP/CH Buttons ● DVD mode Press to skip Chapters or Tracks. ● VCR mode Press to change TV channels on the VCR. 53. OPEN/CLOSE Button Press to open or close the disc loading tray. 54. EJECT Button Press to eject the video cassette from the VCR. 54. AUDIO Button [page 28] Press to select a desired audio language or sound mode.
H9450UD(EN).qx33 03.1.22 7:19 PM Page 11 Tour of the Remote Control VOL VIDEO/TV VOL CD • Moves the cursor and determines its position. • Moves the cursor and determines its position. • Brings up the DVD player's Setup menu. • Brings up the DVD player's Setup menu. • To skip Chapters. • To skip Tracks. VCR English DVD ENTER/Arrow Button (UP/DOWN or LEFT/RIGHT TV CH Button) ENTER TV CH SETUP Button SETUP SKIP Buttons SKIP/CH. SKIP/CH. CH Buttons • To change channels. SKIP/CH. SKIP/CH.
DISPLAY DISPLAYS DURING OPERATION DVD Stays on when the A-B repeat function is on. Stays on when the repeat function is on. No disc inserted / can not read Lights up when a DVD is inserted into the tray. Stays on when repeat track function is on. Tray open Stays on when repeat chapter function is on. Tray closed Stays on when repeat title function is on. Loading the Disc When a disc is being Play back LOADING THE BATTERIES Lights up when the inserted disc comes to a pause.
H9450UD(EN).qx33 03.1.22 7:19 PM Page 13 HOOKUPS 2 3 DVD/VCR 4 5 English 1 REAR VIEW DVD VCR S-VIDEO COMPONENT AUDIO VIDEO OUT OUT OUT AUDIO OUT AUDIO IN DIGITAL AUDIO OUT ANT-IN ANT-OUT L L R R Y CB PB L CR PR R COAXIAL VIDEO OUT VIDEO IN I P PROGRESSIVE 12 11 10 9 1. ANT-IN (Antenna In) Jack Connect your antenna, Cable Box, or Direct Broadcast System. 2.
CONNECTION TO AN AUDIO SYSTEM Stereo system R Dolby Digital decoder or DTS decoder L DVD/VCR VCR AUDIO OUT AUDIO IN L L R R VIDEO OUT VIDEO IN DVD S-VIDEO OUT COMPONENT VIDEO OUT AUDIO OUT DIGITAL AUDIO OUT Y CB/ PB L CR/ PR R COAXIAL Notes ¡ – 14 – EN 1L25
H9450UD(EN).qx33 03.1.
H9450UD(EN).qx33 03.1.22 7:19 PM Page 16 REMOTE CONTROL OF THE TV You can use the DVD/VCR remote control to control your TV by following the steps below. PROGRAMMING THE REMOTE CONTROL FOR THE TV 1 Turn off the TV. CONTROLLING THE TV Once programmed, the DVD/VCR’s remote control is ready to control the TV. NOTE: Be aware that not all of your TV’s functions may work even though the remote control is correctly programmed. 2 Program the remote control Aim the DVD/VCR’s remote control at your TV set.
H9450UD(EN).qx33 03.1.22 7:19 PM Page 17 AUTOMATIC CHANNEL SET UP 6 After scanning, the tuner stops on the low- VCR You can automatically program the tuner to scan only the channels you receive in your area. ¡Channel memory programming is NOT needed when you connect the VCR to a cable box or a satellite box as in "DVD/VCR TO TV CONNECTION" on page 13. In this case, select channel 3 on your TV. Then, the channel you want to record or view may be selected at the cable box or satellite box.
H9450UD(EN).qx33 03.1.22 7:19 PM Page 18 TO ADD/DELETE CHANNELS CLOCK SET UP When scanning, some channels may be skipped due to a weak signal. In such cases, you can add the channels to the VCR memory manually. VCR 1 Select main menu by pressing MENU. 1 Press MENU until the main menu appears.(If you have already - MENU TIMER PROGRAMMING [OFF] REPEAT set the clock, you only have AUTO CHANNEL SET UP CLOCK SET LANGUAGE SELECT to press it once.
H9450UD(EN).qx33 03.1.22 7:19 PM Page 19 NORMAL PLAYBACK 1 Select main menu by pressing MENU. VCR 2 Select "AUTO REPEAT" by pressing K or L. 1 Insert a prerecorded tape. The DVD/VCR will turn on. 3 Begin auto repeat playback by pressing B ¡If the safety tab has been removed, the VCR will start playback automatically. ¡If a cassette is in DVD/VCR, STOP symbol appears in TV screen when turning on the DVD/VCR(VCR mode). so that ON appears next to "AUTO REPEAT".
H9450UD(EN).qx33 03.1.22 7:19 PM Page 20 RECORDING FUNCTION VCR It may be UNLAWFUL to record copyrighted material without the consent of the copyright owner. Accidental Erasure Prevention To prevent accidental recording on a recorded cassette, remove its record safety tab. To record on it later, cover the Record safety tab hole with cellophane tape. ¡If a tape ends during IRT, the VCR will stop, eject the tape, and switch to the DVD mode automatically as the TIMER light blinks.
03.1.22 7:19 PM 4) Set the start time Page 21 ¡When all timer recordings are finished, the TIMER ONE TIME PROGRAM PROGRAM NUMBER 4 DATE 05 /12 MON START TIME - - : - - - END TIME - - : - - - CHANNEL -REC SPEED - - light will flash. To use the DVD/VCR again as usual, press TIMER to disable the flashing TIMER light, then press VCR/TV to select the VCR position. Select either VCR or DVD mode, then continue with the other features as described in this manual.
H9450UD(EN).qx33 03.1.22 7:19 PM Page 22 SPECIAL FEATURES ¡Always use video-quality shielded cables with COPYING A VIDEO TAPE VCR You can make copies of video tapes made by friends or relatives for your enjoyment. Warning: Unauthorized recordings of copyrighted video tapes may be an infringement of copyright laws. Connect the recording DVD/VCR (this unit), the playing VCR (another source) and your TV using the following diagram.
03.1.22 7:19 PM Page 23 AUTO REWIND REAL TIME TAPE COUNTER When a tape reaches the end during recording, playback, or fast-forward, the tape will automatically rewind to the beginning. After rewinding finishes, the DVD/VCR will eject the tape and switch itself off. ¡The DVD/VCR will not rewind the tape automatically during timer recording or Instant Recording Timer. ¡This shows the elapsed recording or playback time in hours, minutes, and seconds.
H9450UD(EN).qx33 03.1.22 7:19 PM Page 24 DISC MENUS RESUME DVD DVD 1 Press MENU. ¡The DVD main menu will appear. 2 If the feature is not available, CD 1 During playback, press STOP. ¡Resume message will appear on the TV screen. 2 Press PLAY, playback will resume from the symbol point at which playback was stopped. ¡To cancel resume, press STOP twice. ¡If turn off the DVD/VCR, resume function can- may appear on the TV screen.
03.1.22 7:19 PM Page 25 ZOOM DVD The Zoom function allows you to enlarge the video image and to pan through the enlarged image. 1 Press ZOOM during playback. ¡Playback will continue. 2 Press ZOOM repeatedly to select the required zoom factor: x2, x4 or OFF. Using SKIP H, G During playback, press SKIP G to move the next track. Press it repeatedly to skip subsequent tracks. Press SKIP H to go back to beginning of the current track. Press it repeatedly to go to the previous tracks.
H9450UD(EN).qx33 03.1.22 7:19 PM Page 26 REPEAT TRACK MARKER SETUP SCREEN DVD CD CD Use markers to memorise your favourite places on a disc. 1 Press SEARCH MODE four times (CD: three times) during playback. To activate the repeat function, press REPEAT during playback. ¡The repeat mode changes as described below every time you press the button. TRACK (current track repeat) ALL (entire disc repeat) OFF (repeat off) ¡The display screen and Markers will appear on the TV screen.
03.1.22 7:19 PM Page 27 PROGRAM RANDOM PLAYBACK CD CD You may determine the order in which tracks will play. 1 In stop mode, press MODE. ¡The PROGRAM screen will appear. This shuffles the playing order of tracks instead of playback in the original sequence. 1 In stop mode, press MODE twice. ¡RANDOM screen 2 Press ▲ or ▼ to select a track, then press appears. RANDOM CD [AUDIO] TOTAL 0:45:55 ENTER. ¡Press CLEAR/C.
H9450UD(EN).qx33 03.1.22 7:19 PM Page 28 Notes ¡Folders are known as Groups; files are known as Tracks. ¡MP3 files are accompanied by 3 icon. ¡Maximum of 255 folders can be recognized. ¡Maximum of 256 files can be recognized. ¡Up to 8 hierarchies can be created. This player recommends the use of files recorded at the below specifications: ¡Sampling frequency: 44.1kHz or 48kHz ¡Constant bit rate: 112kbps ~ 320kbps. RANDOM PLAYBACK MP3 1 Press MODE twice while playback is stopped.
03.1.22 7:19 PM Page 29 CHANGING THE ON-SCREEN DISPLAY SUBTITLE LANGUAGE DVD DVD The DVD allows you to select a language for subtitles during DVD disc (if available) playback. CD You can check the information about the current disc by pressing DISPLAY on the remote control. 1 Press SUBTITLE during playback. For DVDs 1 Press DISPLAY during playback to show 2 Press SUBTITLE repeatedly to select your desired subtitle language. ¡The subtitle language will be displayed on the dis- current Chapter.
H9450UD(EN).qx33 03.1.22 7:19 PM Page 30 ¡With some DVDs, it may be difficult to find if they 2 Press B to select CUSTOM, then press are compatible with parental lock. Be sure to check if the parental lock function operates in the way that you have set. ¡Record the password in case you forget it. ENTER. 3 Press Arrow (s/B) to select PARENTAL, then press ENTER. IF YOU FORGET THE PASSWORD PARENTAL PARENTAL LEVEL ALL 1 Press 4, 7, 3, 7 at step 4.
03.1.22 7:19 PM Page 31 BLACK LEVEL SETTING DISPLAY SETTING DVD DVD Adjust the Black Level Settings to make the black parts of the picture as bright as you preferred. You can change certain aspects of the DVD display screens, on-screen messages and the display panel on the front of the DVD/VCR. 1 Press MODE during playback. 1 Press SETUP in STOP mode. ON 2 Press B to select CUSTOM, then press ENTER. ¡CUSTOM mode will appear. 2 Press ENTER to switch ON/OFF. ON: Makes the dark parts brighter.
H9450UD(EN).qx33 03.1.22 7:19 PM Page 32 AUDIO: ¡Sets the audio language. SUBTITLE: ¡Sets the subtitle language. DISC MENU: ¡Sets the language for DVD menu. PLAYER MENU: QUICK ¡Sets the language for the On-screen display. LANGUAGE SETTING DVD Language options are not available with some discs. 1 Press SETUP in STOP mode. 2 Press B to select CUSTOM, then press 5 Press Arrow (K/ L) to select a setting, then ENTER. press ENTER. ¡CUSTOM mode will appear.
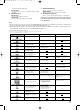
H9450UD(EN).qx33 03.1.22 7:19 PM Page 33 If the DVD/VCR does not perform properly when operated as instructed in this Owner's Manual, check the DVD/VCR consulting the following checklist. D V D V C R V C R PROBLEM No power. The DVD/VCR does not respond to the remote control. Timer recording is impossible. Cannot go into Record mode. Playback picture is partially noisy Cannot view a tape but the audio is OK. No, or poor, playback picture. TV programs cannot be seen normally.
H9450UD(EN).qx33 03.1.22 7:19 PM Page 34 MAINTENANCE SERVICING ¡Should your DVD/VCR become inoperative, do not try to correct the problem by yourself. There are no user-serviceable parts inside. Turn off, unplug the power cord, and please call our help line at 1-800448-2244 to locate an Authorized Service Center. CLEANING THE CABINET ¡Use a soft cloth slightly moistened with a mild detergent solution. Do not use a solution containing alcohol, spirits, ammonia or abrasives.
H9450UD(EN).qx33 03.1.22 7:19 PM Page 35 SPECIFICATIONS DVD/VCR Combo (DVD player with Video Cassette Recorder) Discs: DVD video Audio CD Video Cassette tape Converter output: VHF Channel 3 or 4. Power source: 120 V AC +/- 10%, 60 Hz +/- 0.5% Power consumption: 24 W (standby: 7.0 W) Operating temperature: 41°F(5°C) to 104°F(40°C) Dimensions: W 17-1/8” (435 mm) English Product type: H 3-7/8” (99 mm) D 8-5/8” (218 mm) Weight: 8.1 lbs (3.
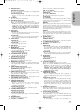
H9450UD(EN).qx33 03.1.22 7:19 PM Page 36 CONTROLES DEL FUNCIONAMIENTO Y SUS FUNCIONES PANEL DELANTERO 1 2 4 5 3 OPEN/CLOSE POWER/STANDBY CHANNEL STOP PLAY DVD OUTPUT VCR TIMER REC REC/IRT REW LINE 2 F.FWD VIDEO IN 21 19 20 STOP/EJECT PLAY L (mono) AUDIO IN R 17 15 13 11 9 18 16 14 12 10 7 8 6 CONTROL REMOTO 22 54 53 SURROUND OPEN/CLOSE AUDIO SPEED EJECT 23 SKIP/CH. 1 2 3 4 5 6 7 8 9 0 + 10 DVD VCR 52 SKIP/CH.
03.1.22 7:19 PM Page 37 23. Botón y/I (POWER/STANDBY) Presione para conectar y desconectar la alimentación. (Para las indicaciones del interruptor de funcionamiento, y/I” indica el estado de espera “I” indica la conexión y “y de alimentación eléctrica. 24. Botones numéricos ● Modo DVD Presione para seleccionar directamente una pista (CD de audio) para su reproducción. ● Modo VCR Presione para seleccionar canales de TV en la videograbadora.
● Modo VCR 48. 49. 50. 51. Presione para comenzar la reproducción. Botón VCR Presione para seleccionar el modo VCR para el control remoto. ● Usted puede cambiar el modo OUTPUT ya sea presionando el OUTPUT en el panel delantero o el DVD o VCR en el control remoto. Sin embargo, si usted presiona el OUTPUT en el panel delantero primero, usted necesita volver a seleccionar el modo correspondiente presionando el DVD o el VCR en el control remoto.
H9450UD(EN).qx33 03.1.22 7:19 PM Page 39 CAMBIO DE VCR/DVD Como este producto utiliza videograbadoras y reproductores DVD, es necesario seleccionar el modo de CAMBIO AL MODO VCR CAMBIO AL MODO DVD Presione el VCR en el control remoto. (Verifique que la luz VCR OUTPUT está encendida.) Presione el DVD en el control remoto. (Verifique que la luz DVD OUTPUT está encendida.) Notas ¡Presionando sólo el OUTPUT en el panel delantero no cambia el modo del control remoto.
H9450UD(EN).qx33 03.1.22 7:19 PM Page 40 CONEXIONES DVD/VCR A CONEXION DE TV CANAL DE SALIDA RF 1. Desconecte el cable de alimentación CA de la toma de corriente CA. 2. Desconecte la antena o cable del TV. 3. Conecte la antena o cable a la toma ANT-IN del DVD/VCR. 4. Conecte el DVD/VCR al TV utilizando el cable RF. 5. Enchufe los cables de alimentación CA del DVD/VCR y TV dentro de las tomas de corriente CA. Si su TV no tiene terminales A/V: 1.
03.1.22 7:19 PM Page 41 REPRODUCCIÓN DE UN DISCO PREPARACION DE RELOJ REPRODUCCIÓN BÁSICA VCR DVD 1 Seleccione el menú principal presionando MENU. ¡Si el reloj no está ajustado, aparece priemero el 2 Seleccione “CLOCK SET” presionando K o 3 Ajuste el reloj. 1) Ajuste el mes Para empezar ¡Conecte la alimentación del TV, amplificador y menú CLOCK SET. En este caso, siga el paso (3). L. Luego presione B. CD cualquier otro componente que se encuentre conectado al DVD/VCR.
H9450UD(EN).qx33 03.1.22 7:19 PM Page 42 Hitachi has made every effort to assure you hours of trouble free operation from your unit . However , should you require service , a network of Hitachi Authorized Service Facilities has been established in all 50 states and Puerto Rico . Each facility will provide you with convenient and expedient assistance . Our service "Hot line" operator will direct you to the Hitachi Authorized Service Facility nearest you .
H9450UD(EN).qx33 03.1.
H9450UD(EN).qx33 03.1.22 7:19 PM Page 44 WARRANTY NOT FINAL Printed in China TJ16671 C Hitachi, Ltd.