DVD VIDEO RECORDER OPEN/CLOSE / POWER/STANDBY REC MODE TIME SLIP CHANNEL STOP PLAY REC SKIP/FR FF/SKIP ERASE Operating Instructions Model No. DV-RX5000U Dear customer Thank you for purchasing this product. For optimum performance and safety, please read these instructions carefully. Before connecting, operating or adjusting this product, please read these instructions completely. Please keep this manual for future reference.
. Getting started CAUTION! THE FOLLOWING APPLIES ONLY IN THE U.S.A. THIS PRODUCT UTILIZES A LASER. USE OF CONTROLS OR ADJUSTMENTS OR PERFORMANCE OF PROCEDURES OTHER THAN THOSE SPECIFIED HEREIN MAY RESULT IN HAZARDOUS RADIATION EXPOSURE. DO NOT OPEN COVERS AND DO NOT REPAIR YOURSELF. REFER SERVICING TO QUALIFIED PERSONNEL.
IMPORTANT SAFETY INSTRUCTIONS 1) 2) 3) 4) 5) 6) 7) 8) 9) Read these instructions. Keep these instructions. Heed all warnings. Follow all instructions. Do not use this apparatus near water. Clean only with dry cloth. Do not block any ventilation openings. Install in accordance with the manufacturer’s instructions. Do not install near any heat sources such as radiators, heat registers, stoves, or other apparatus (including amplifiers) that produce heat.
Table of contents Getting started Editing Getting started IMPORTANT SAFETY INSTRUCTIONS . . . . . . . . . . . . . . . . . . . . 3 Features . . . . . . . . . . . . . . . . . . . . . . . . . . . . . . . . . . . . . . . . . . . . . 3 Accessories . . . . . . . . . . . . . . . . . . . . . . . . . . . . . . . . . . . . . . . . . . 4 Setting up STEP 1 Antenna and television connections . . . . . . . . . . . . . . . 5 STEP 2 The remote control . . . . . . . . . . . . . . . . . . . . . . . . . . . . .
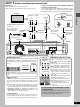
Antenna and television connections To enjoy sound through other audio equipment (➜page 42) To enjoy progressive video Preparation ≥Refer to the television’s operating instructions. ≥Turn the television off and disconnect its AC power supply cord. Connect to the component video (480P) input terminals on a television compatible with this unit’s copy guard system. (Video will not be displayed correctly if connected to an incompatible television.
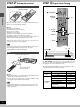
STEP 2 The remote control STEP 3 Plug-in Auto Tuning Batteries R6/LR6, AA, UM-3 - Setting up + - ê, DVD POWER + DVD POWER TV ê ê DVD TV VCR Plus+ TV/VIDEO REC MODE REC Numbered buttons 1 2 3 4 5 6 W,X,CH CH VOLUME 7 8 9 0 100 CANCEL SKIP ≥Insert so the poles (i and j) match those in the remote control. ≥Do not use rechargeable type batteries. SLOW/SEARCH PAUSE STOP PLAY DIRECT NAVIGATOR Do not: ≥mix old and new batteries. ≥use different types at the same time.
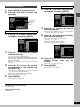
≥Confirm that the antenna is connected correctly. ≥Turn on the television and select the appropriate video input to suit the connections to this unit. 1 2 Press [3, 4] to select “Channel” and press [1]. SETUP Press [Í, DVD POWER] to turn the unit on.
STEP 4 VCR Plusi guide channel settings 3 e.g., when the current antenna system is CATV. DVD POWER TV ê Press [3, 4] to select “VCR Plusr CH Setting” and press [ENTER].
Other channel settings Press [SETUP] to show the menus. Press [3, 4] to select “Channel” and press [1]. SETUP Channel Set Up Disc Video Audio Display TV Screen Antenna System E ENTER Channel Set Up Disc Video Audio Display TV Screen Proceed with the steps described below.
STEP 5 Set up to match your television To return to the previous screen Press [RETURN]. DVD POWER TV DVD Í Í, POWER TV When you are finished DVD, TV Press [SETUP].
Disc information Play-only discs DVD-Video DVD-RAM 4.7 GB/9.4 GB, 12 cm (5z) 2.8 GB, 8 cm (3z) DVD-R 4.7 GB 12 cm (5z) 1.4 GB, 8 cm (3z) for General Ver. 2.0 ≥We recommend using Hitachi Maxell discs as they have been confirmed to be compatible with this unit. Other discs may not perform correctly. ≥Do not allow the disc to become dirty or scratched. Fingerprints, dirt, dust, scratches or deposits of cigarette smoke on the recording surface may make it impossible to use the disc for recording.
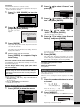
Control reference guide Setting up Remote control 1 23 4 5 6 7 9 = ê ê DVD TV D VCR Plus+ TV/VIDEO REC MODE REC G 1 2 3 4 5 6 7 8 9 0 100 E F H CH VOLUME I J K L CANCEL SKIP SLOW/SEARCH PAUSE STOP 8 DIRECT NAVIGATOR PLAY PLAY LIST MENU TOP MENU : ; DVD POWER TV ENTER < > ?@ A B C FUNCTIONS RETURN PROG/CHECK ADD/DLT CM SKIP TIME SLIP OPEN/CLOSE STATUS FRAME SETUP AUDIO INPUT SELECT DISPLAY ERASE F Rec POSITION MEMORY MARKER N M O P QR S T How to open the
Main unit U V G ? H F B OPEN/CLOSE / POWER/STANDBY REC MODE S VIDEO IN VIDEO IN L (mono) AUDIO IN R TIME SLIP CHANNEL STOP PLAY REC SKIP/FR ERASE FF/SKIP LINE 2 (L2) W X Setting up 1 Y O 7 K 6J Controls such as 1 function the same as the buttons on the remote control. X Display Y Time slip indicator (TIME SLIP) . . . . . . . . . . . . . . . . . . . . . . . 22 U Remote control signal sensor . . . . . . . . . . . . . . . . . . . . . . . . . 6 V Disc tray . . . . . . . . . . . . . .
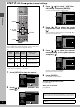
Recording television programs 1 4 2 35 Disc tray [RAM] [DVD-R] 1 2 Recording ? 3 CAN 4 Press [REC MODE] to select the recording mode (➜ next page). e.g., when you select “XP” CEL PLAY SE PAU ? ; Ensure [DVD, TV] is switched to “DVD” and press [W, X, CH] to select the channel. e.g., when you select channel 4 5 1 Numbered buttons ≥Press the button again to close the tray. ≥It is not possible to record continuously from one side of a double sided disc to the other.
Inserting discs Recording from a video cassette recorder [RAM] [DVD-R] [RAM] [DVD-R] You can insert a cartridge or non-cartridge disc. Preparation Connect a video cassette recorder to this unit’s input terminals (➜page 43). Insert label-up. 1 Insert inside the tray’s guides. Press [INPUT SELECT] to select the input channel for the equipment you have connected. Cartridge disc Insert label-up with the arrow facing in. Select L1, L2, or L3.
Playing discs Disc tray 1 [RAM] [DVD-R] [DVD-V] [VCD] [CD] [MP3] 2 ERASE 1 2 ? 3 ≥Press the button again to close the tray. ≥If cartridge protection is activated (➜page 11), play begins automatically when you close the tray. [RAM] ≥You cannot play continuously from one side of a doublesided disc to the other. Eject the disc and turn it over. :/6, 5/9 Playing back DVD/TV Press [Í, DVD POWER] to turn the unit on. Press [< OPEN/CLOSE] to open the tray and insert a disc (➜ page 15).
Using the Direct Navigator [RAM] [DVD-R] [VCD] Switch [DVD, TV] to “DVD” and A list of programs is created as you record them. You can use this list to find programs to watch. Press the numbered buttons (0, 1j9) to select an item. 1 Press [DIRECT NAVIGATOR]. The highlighted program plays in the background. DIRECT NAVIGATOR [DVD-V] Press [3, 4, 2, 1] to select an item and press [ENTER]. 3 ≥You may also be able to use the numbered buttons (0, 1j9) to select an item.
Other methods of play Slow-motion play [RAM] [DVD-R] [DVD-V] [VCD] DVD POWER TV DVD Í TV While paused Í Press [6] or [5]. VCR Plus+ TV/VIDEO REC MODE REC Press and hold [D] or [E] on the main unit.
2 Selecting an amount of time to skip— Time Slip Press [3, 4] to select the program and press [ENTER]. DIRECT NAVIGATOR [RAM] [DVD-R] ! During play ! 1 Press [TIME SLIP].
Marking places to play again—MARKER Using on-screen menus to mark positions DVD POWER TV ê ê DVD TV Displaying the marker icon VCR Plus+ TV/VIDEO REC MODE REC 1 2 1 3 4 6 5 The on-screen menus appear. (e.g.
Using menus to play MP3 discs Using the tree screen to find a group 1 DVD POWER TV ê ê DVD TV Numbered buttons 1 2 3 4 5 6 7 8 9 0 100 While stopped Press [1] while a track is highlighted to display the tree screen. VCR Plus+ TV/VIDEO REC MODE REC Selected group no. /Total group no. ≥If the group has no track, “– –” is displayed as group number. CH VOLUME CANCEL MENU G 8 T 14 TOTAL 1/111 SLOW/SEARCH PAUSE STOP DIRECT NAVIGATOR PLAY PLAY LIST No.
Playing while you are recording Simultaneous rec and play [RAM] DVD POWER TV DVD Í You can play a program previously recorded. TV Í 1 VCR Plus+ TV/VIDEO REC MODE REC 1 2 During recording Press [DIRECT NAVIGATOR]. 3 Time slip indicator lights. CH 4 6 5 2 VOLUME 7 8 9 0 100 CANCEL SKIP STOP SLOW/SEARCH PAUSE PLAY 1 ∫ DIRECT NAVIGATOR DIRECT NAVIGATOR PLAY LIST MENU TOP MENU 3, 4 ENTER ENTER Playing back Press [3, 4] to select a program and press [ENTER].
Changing audio Using the FUNCTIONS window 7 DIRECT NAVIGATOR PLAY LIST MENU TOP MENU 8 9 0 100 CANCEL SKIP ENTER STOP SLOW/SEARCH PAUSE PLAY DIRECT NAVIGATOR FUNCTIONS PROG/CHECK ADD/DLT CM SKIP TIME SLIP OPEN/CLOSE STATUS FRAME SETUP AUDIO INPUT SELECT DISPLAY ERASE F Rec MENU TOP MENU 3, 4, 2, 1 ENTER ENTER FUNCTIONS FUNCTIONS POSITION MEMORY MARKER RETURN CM SKIP TIME SLIP PROG/CHECK ADD/DLT [RAM] [DVD-V] [VCD] You can change the audio being received or played.
Timer recording Preparation ≥Ensure the clock (and guide channels for VCR Plusr recording, ➜page 8) are set correctly. ≥Release protection (cartridge ➜page 11, disc ➜page 34) before proceeding. [RAM] ê, DVD POWER DVD POWER TV ê ê DVD TV VCR Plus+ TV/VIDEO REC MODE REC REC MODE VCR Plus+ Numbered buttons , REC 1 2 3 4 5 6 7 8 9 0 100 Entering VCR Plusi codes is an easy way of programming the unit for recording. You can find these codes in newspapers and magazines.
Manually programming timer recordings 4 You can enter up to 16 programs up to a month in advance. Each daily or weekly program is counted as one program. 3/26 TUE12:55 PM Remaining Recording Time 1:58 SP 3/26 TUE 12:55 PM No CHANNEL DATE ON OFF MODE CHECK 01 64 ABC 3/ 26 TUE 1:00 PM 2:00 PM SP Enable New Timer Program A line that is ready for programming is highlighted. Displayed if the recording can fit in the remaining space on the disc.
Timer recording Message displayed in the CHECK line ê, DVD POWER Some of the information shown in the CHECK line may not be correct while you are recording. Enable: Displayed if the recording can fit in the remaining space on the disc. > (Date): For recordings made daily or weekly, the display will show until when recordings can be made (up to a maximum of one month from the present time) based on the time remaining on the disc.
Entering text Preparation Release protection (cartridge ➜page 11, program ➜page 32, disc ➜page 34) before proceeding. DVD POWER TV ê ê DVD TV 1 VCR Plus+ TV/VIDEO REC MODE REC Numbered buttons 1 2 3 4 5 6 After the titling screen appears Press [3, 4, 2, 1] to select the character and press [ENTER].
Creating play lists DVD POWER TV ê ê DVD TV 1 While stopped 2 Press [PLAY LIST]. Press [3, 4] to select “–– ––/––” and press [ENTER].
4 Playing play lists 1 While stopped The scene you select is played. Press [PLAY LIST]. To show scene 10 and later Press [3, 4, 2, 1] to select “Next” and press [ENTER]. ≥You can also select a page of scenes by entering a 3-digit number with the numbered buttons. e.g., “5”: [0] ➜ [0] ➜ [5] “15”: [0] ➜ [1] ➜ [5] PLAY LIST No.
Editing play lists [RAM] ➜ page 29, Playing play list scenes Play Scenes Operation Edit Scenes While stopped Press [PLAY LIST]. 1 3/26 0:45:00 PLAY LIST Edit Scenes Add Move Re-edit Erase 001 00:00.19 002 003 004 --- --- --- --- PLAY LIST 001 002 Select Page 003 0 ~ 9 004 --- SELECT ENTER 01 10/23 02 10/26 03 10/21 - - --/-- 0:03 0:07 0:06 --:-- SELECT --- No DATE TOTAL SCENE 3 No.
Add (maximum of 999 scenes) Press [ , , , ] to select the place where you want to add the scene and press [ENTER]. PLAY LIST PLAY LIST No.3 Add Scenes 01 PLAY ! Scene No. 5 Start End Next Press [ENTER] at the start point of the scene. Press [ENTER] at the end point of the scene. Exit SELECT ENTER 0 : 00 . 05 RETURN Start End 0 : 00 . 05 --:--.-- Press [ , ] to select “Exit” and press [ENTER]. The new scene is inserted before the highlighted scene.
Editing programs Operation Press [DIRECT NAVIGATOR]. Erase Program Erase Program [RAM] [DVD-R] 0 : 58 SP Remaining Recording Time Corresponding PLAY LIST will also be erased. Erase The program, and play lists created from it, are erased irretrievably when you use this procedure. Check carefully before proceeding.
Press [ ] to select “Erase” and press [ENTER]. [Note] The disc’s available recording time may not increase after erasing short programs. Computer data cannot be erased. The available recording time on DVD-R does not increase when you erase programs. The program is erased. No CH 01 4 02 6 03 13 DATE TIME TOTAL 3 No EDIT SELECT 0 ~ 9 Press [ENTER] at the start point of the section you want to erase.
Disc setting Operation Enter Title While stopped Press [FUNCTIONS]. Entering text ➜ page 27 Enter Title _ 1 1 2 3 2 A B C 3 D 4 G E F d H I g j m k n o [ ] _ p q r s ( t u v { } ) - w x " ' y : z ; \ ` | ^ 5 J ERASE SET 0 –– 100 SELECT K L 6 M N O 7 P 8 T Q R U V 9 W X 0 .
Press [2] to set disc protection and press [ENTER]. DISC SETTING Prog # Used 7 Free 0 : 42 (SP) 0 : 58 Total Mark 10 Enter Title Disc Protection On Erase all programs SELECT Format ENTER The lock symbol appears closed when the disc is write-protected. RETURN [Note] Press [2] to select “Yes” and press [ENTER]. Press [2] to select “Start” and press [ENTER]. Formatting starts. ≥ A message appears when formatting is finished. All programs and play lists are erased.
Using on-screen menus Disc menu Not available when playing CDs and MP3 discs. e.g., DVD-RAM DVD POWER TV ê ê DVD TV Disc Play Video Audio VCR Plus+ TV/VIDEO REC MODE REC Numbered buttons 1 2 3 4 5 6 7 8 9 0 100 SKIP PAUSE Sound track PLAY LIST ENTER FUNCTIONS ^=======J RETURN PROG/CHECK ADD/DLT CM SKIP TIME SLIP OPEN/CLOSE STATUS FRAME Subtitle AUDIO INPUT SELECT DISPLAY ERASE F Rec Advanced operation DISPLAY Common procedures 3 4 Press [DISPLAY].
Play menu e.g., DVD-RAM Disc Play Video Audio Repeat play Marker OFF 1s10 Item †††††††††† Content Repeat play Each time you press [3, 4]: [RAM] [DVD-R] PRG: Program All PL: Play list ([RAM]) OFF [DVD-V] Chapter Title OFF [VCD] [CD] Track All OFF [MP3] Track Group OFF Remarks ≥You cannot use repeat play to repeat an entire DVD-Video. ≥Repeat play does not work if the disc’s elapsed play time is not shown on the unit’s display. ≥[ERASE] does not work while in repeat play mode.
Using on-screen menus Video menu Not available when playing CDs and MP3 discs. [RAM] [DVD-R] [DVD-V] [VCD] Disc Play Video Audio Picture Normal MPEG-DNR ON Advanced operation Item 38 Content Picture Normal: Default setting Soft: Soft picture with fewer video artifacts Fine: Details are sharper Cinema: Mellows movies, enhances detail in dark scenes. MPEG-DNR You can turn the recommended settings for 3D NR, block NR, and mosquito NR on and off.
On-screen displays Displays appear on the television when you operate the unit to let you know what operation was performed and what condition the unit is in. ≥You can change the setting in the SETUP menu so the first display does not appear automatically (➜page 47, Display—Status Messages). DVD POWER TV ê ê DVD TV VCR Plus+ TV/VIDEO REC MODE REC 1 2 Changing the information displayed 3 CH 4 5 6 7 8 9 0 100 Press [STATUS]. VOLUME The display changes each time you press the button. e.g.
Home Theater Refer to the relevant pages for details. Enjoying CATV/Satellite broadcasts What you want to do Enjoying CATV/Satellite broadcasts How to do it Connect a cable TV box or satellite receiver. Reference pages 41 Settings Reference pages Tune to channels correctly. 9 Change the necessary settings on the equipment you have connected. — SETUP—Audio— Digital Audio Output ≥Set PCM Down Conversion to suit the equipment. ≥Set Dolby Digital and DTS to suit the equipment.
≥The equipment connections described are examples. ≥Peripheral equipment and optional cables sold separately unless otherwise indicated. ≥Before connection, turn off all equipment and read the appropriate operating instructions. ≥The signal from the cable TV box or satellite receiver passes through this unit to the television even when this unit is turned off. Connecting a cable TV box/satellite receiver You need to subscribe to a cable TV or satellite TV service, to enjoy viewing their programming.
Home Theater Connecting an amplifier or system component This model can play Dolby Digital, but only in two channels. This model does not have a DTS decoder. You must connect a unit with a Dolby Digital or DTS decoder to enjoy surround sound. A B Digital connection To enjoy multi-channel surround sound Connect an amplifier with a built-in decoder or a decoder-amplifier combination. ≥Change the settings in “Digital Audio Output” (➜page 47).
Connecting other video equipment Connecting to the L2 input terminals on the front of the unit Connecting to the input terminals on the rear of the unit, L1 and L3 / POWER/STANDBY S VIDEO IN VIDEO IN L (mono) AUDIO IN R R-AUDIO-L VIDEO S-VIDEO (L1) R-AUDIO-L VIDEO S-VIDEO (L3) IN 1 LINE 2 (L2) OUT IN 3 VIDEO This unit yellow white red This unit R-AUDIO-L red white yellow S video cable§ S video cable§ Audio/Video cable (included) Other video equipment Other video equipment Connect
Other antenna connections Other antenna connection to the unit Use one of the following connections to suit the antenna lead. ∫ A single twin lead 300–75 ≠ transformer (not included) Other antenna connection from the unit to the television Use one of the following connections to suit the antenna terminals on your television. Refer to the television’s operating instructions.
Changing the remote control code 1 While stopped Press [SETUP] to show the menus.
Changing the unit’s settings Summary of settings This chart shows the initial settings for this unit. See page 48 for details on menu operation. ≥Underlined items are the factory presets. Tabs Menus Options ≥TV Channel Antenna System (➜page 7) ≥CATV Select to suit the type of antenna you are using. Channels are set corresponding to the antenna system you select. Auto Channel Setting (➜page 7) The unit sets the channels automatically.
Tabs Video Menus Still Mode Select the type of picture shown when you pause play. Options ≥Automatic ≥Field: Less blurred field stills are shown. Select if jittering occurs when “Automatic” is selected. ≥Frame: Sharper frame stills are shown. Select if small text or fine patterns cannot be seen clearly when “Automatic” is selected. ≥Input Level (Lighter/Darker): Black Level Control Select normal, lighter or darker for adjusting the black level Adjusts the black level of the input signal (e.g.
Changing the unit’s settings Common procedures See page 46 for menu and option details. DVD POWER TV ê ê DVD 1 TV VCR Plus+ TV/VIDEO REC MODE REC Numbered buttons While stopped Press [SETUP] to show the menus.
Clock settings Preparation 1 2 Manual Clock Setting 3 Channel Set Up Disc Video Audio Display TV Screen Off Timer Proceed with the steps described below. Re-initialize Setting SELECT MONTH Channel Set Up Disc Video Audio Display TV Screen 6 hr Remote Control Code Set Code 1 Clock Settings Auto Clock Setting Manual Clock Setting 4 TAB ENTER RETURN Press [3, 4] to select “Auto Clock Setting” and press [ENTER].
Glossary \ Bitstream This is the digital form of multi-channel audio data (e.g., 5.1 channel) before it is decoded into its various channels. CPRM (Content Protection for Recordable Media) CPRM is the copyright protection technology that is used to protect broadcasts that are allowed to be recorded only once (e.g. some CATV broadcasts). Decoder A decoder restores the coded audio signals on DVDs to normal. This is called decoding.
Error messages On the television Page No disc. ≥You haven’t inserted a disc. Correctly insert a disc that this unit can use. ≥The disc is upside down. If it is a single-sided disc, insert it so the label is facing up. 11 15 This is non-recordable disc. ≥The unit cannot record on the disc you inserted. Insert a DVD-RAM or unfinalized DVD-R. ≥You inserted an unformatted DVD-RAM. Format the disc with this unit. 11 34 This disc cannot be read. ≥You inserted an incompatible disc.
Troubleshooting guide Before requesting service, make the below checks. Power Page No power. ≥Insert the AC power supply cord securely into a known active AC outlet. 5 The unit switches to the standby mode. ≥This is a power saving feature. You can turn it off if you would prefer (Set Up—Off Timer— Off). Press [Í, DVD POWER] to turn the unit on. ≥One of the unit’s safety devices may have activated. Press [Í, DVD POWER] to turn the unit on. 46 ≥Some operations may be prohibited by the disc.
Sound Page No sound. Low volume. Distorted sound. ≥Check the connections. Check the input mode on the amplifier if you have connected one. Cannot hear the desired audio type. ≥Press [AUDIO] to select the desired audio type. Cannot switch audio during stereo or SAP broadcasts. ≥You have used digital connection. Set “Dolby Digital” to “PCM” or connect to other equipment using audio cables (analog connection). ≥You cannot change the audio type when a DVD-R is in the disc tray.
Troubleshooting guide Recording and timer recording Cannot record. VCR Plusr programming does not work properly. ≥You haven’t inserted a disc or the disc you inserted cannot be recorded on. Insert a disc the unit can record onto. ≥The disc is unformatted. Format the disc so this unit can record on it. ≥The write-protect tab on the cartridge is set to PROTECT. ≥Some programs have limitations on the number of times they can be recorded (CPRM). ≥The disc is protected with DISC SETTING.
Specifications Optical pick-up: Recordable discs: Recording time: Discs played: Video system TV system: Recording system: Input: DVD video recording standards (DVD-RAM), DVD video standards (DVD-R) System with 1 lens, 2 integration units (662 nm wavelength for DVDs, 790 nm wavelength for CDs) 12 cm (5q) 4.7 GB DVD-RAM discs 12 cm (5q) 9.4 GB DVD-RAM discs 8 cm (3q) 2.8 GB DVD-RAM discs 12 cm (5q) 4.7 GB DVD-R discs 8 cm (3q) 1.4 GB DVD-R discs (for General Ver. 2.0) Max. 6 hours (using 4.
Instalación básica Conexiones del televisor y de la antena A la antena Televisor Cable de TV AUDIO IN R L VIDEO IN VHF/UHF RF IN Antena exterior Antena interior o Rojo Blanco Amarillo Cable de alimentación de CA (incluido) Conecte por último. Conecte también los cables de alimentación de CA para el otro equipo.
Ajuste esta guía de canales de manera que pueda utilizar los códigos i VCR Plus para la grabación con temporizador. Instalación para ajustar su televisor Cambie los ajustes si su televisor es: ≥De pantalla panorámica (relación del ancho a la altura de la imagen 16:9) ≥Progresivo – Si desea información más detallada, lea el manual de instrucciones de su televisor. 1 Pulse [SETUP] para visualizar los menús. 2 Pulse [3, 4] para “Canal” y pulse [1]. seleccionar 1 Pulse [SETUP] para visualizar los menús.
Grabación de programas de televisión [RAM] [DVD-R] 423 5 Bandeja del disco 1 1 2 ? 1 ≥Vuelva a pulsar el botón para cerrar la bandeja. ≥En un disco de doble cara, no es posible grabar de manera continua desde una cara a la otra. Será necesario expulsar el disco y darle la vuelta. Indicador Time Slip TIME SLIP 3 4 TV/VIDEO 3 5 1 Botones numerados CAN Asegúrese de que [DVD, TV] se encuentre en la posición “DVD” y pulse [W, X, CH] para seleccionar el canal. por ejemplo.
Introducción de discos Reproducción durante la grabación [RAM] [RAM] [DVD-R] Puede introducir un disco con o sin estuche. Reproducción desde el inicio del programa que está grabando—Reproducción encadenada Disco sin estuche Introduzca la etiqueta mirando hacia arriba. Introduzca dentro de las guías de la bandeja. Pulse [1] (PLAY). La reproducción se inicia desde el principio del programa que se está grabando. (Se enciende el indicador Time Slip).
Reproducción de discos Bandeja del disco 1 [RAM] [DVD-R] [DVD-V] [VCD] [CD] [MP3] 2 ERASE 1 2 ? 3 :/6, 5/9 ≥Vuelva a pulsar el botón para cerrar la bandeja. ≥Si está activada la protección del estuche, pulsando [< OPEN/CLOSE] se iniciará automáticamente la reproducción. [RAM] ≥En un disco de doble cara, no es posible reproducir de manera continua desde una cara a la otra. Será necesario expulsar el disco y darle la vuelta.
Utilización del Navegador directo [RAM] [DVD-R] [VCD] Interruptor [DVD, TV] a “DVD” y Al grabar una serie de programas, se crea un lista. Puede utilizar esta lista para encontrar programas para su visualización. Pulse los botones numerados (0, 1j9) para seleccionar un elemento. 1 Pulse [DIRECT NAVIGATOR]. El programa resaltado se reproduce de fondo. por ejemplo.
Index Angle . . . . . . . . . . . . . . . . . . . . . . . . 36 Antenna system . . . . . . . . . . . . . . . . 7 Audio attribute . . . . . . . . . . . . . . . . 36 Channel caption . . . . . . . . . . . . . . . . 9 Channel setting . . . . . . . . . . . . . . . . 9 Chasing play . . . . . . . . . . . . . . . . . . 22 Cleaning disc . . . . . . . . . . . . . . . . . . . . . . . . . . 50 lens . . . . . . . . . . . . . . . . . . . . . . . . . 54 main unit . . . . . . . . . . . . . . . . . . . . .