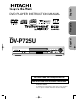
English DVD PLAYER INSTRUCTION MANUAL Français DIGITAL VIDEO Español MODEL DV-P725U REV FWD OPEN / CLOSE POWER / STANDBY PHONES PHONES LEVEL MIN TOP MENU MENU MAX INSTRUCTIONS EN FRANÇAIS INCLUS. INSTRUCCIONES EN ESPAÑOL INCLUIDAS. Instruction manual To obtain the best performance and ensure years of troublefree use, please read this instruction manual completely.
WARNING: TO REDUCE THE RISK OF FIRE OR ELECTRIC SHOCK, DO NOT EXPOSE THIS APPLIANCE TO RAIN OR MOISTURE. CAUTION RISK OF ELECTRIC SHOCK DO NOT OPEN CAUTION: TO REDUCE THE RISK OF ELECTRIC SHOCK, DO NOT REMOVE COVER (OR BACK). NO USER SERVICEABLE PARTS INSIDE. REFER SERVICING TO QUALIFIED SERVICE PERSONNEL.
1) Read Instructions - All the safety and operating instructions should be read before the product is operated. 2) Retain Instructions - The safety and operating instructions should be retained for future reference. 3) Heed Warnings - All warnings on the product and in the operating instructions should be adhered to. 4) Follow Instructions - All operating and use instructions should be followed. 5) Cleaning - Unplug this product from the wall outlet before cleaning.
A NOTE ABOUT RECYCLING This product’s packaging materials are recyclable and can be reused. Please dispose of any materials in accordance with your local recycling regulations. Batteries should never be thrown away or incinerated but disposed of in accordance with your local regulations concerning chemical wastes. The serial number of this product may be found on the back of the DVD player. No others have the same serial number as yours.
■ LASER SAFETY . . . . . . . . . . . . . . . . . . . . . . . . . . . . . . . . . . . . . . . . . . . . . . . . . . . . . . . . . . . . . . . . . . . . . . . . . . . . . . . . . . . . . . . . . 2 ■ IMPORTANT SAFEGUARDS. . . . . . . . . . . . . . . . . . . . . . . . . . . . . . . . . . . . . . . . . . . . . . . . . . . . . . . . . . . . . . . . . . . . . . . . . . . . . . . 3 ABOUT COPYRIGHT . . . . . . . . . . . . . . . . . . . . . . . . . . . . . . . . . . . . . . . . . . . . . . . . . . . . . . . . . . . .
FEATURES ¡Progressive Scan system ¡Playing an MP3 disc Unlike conventional interlace scanning, the progressive scan system provides less flickering andimages in higher resolution than that of traditional television signals. ¡Dolby Digital sound This player can handle Dolby Digital surround sound having 5.1 channels when connected to a Dolby Digital decoder. You can enjoy MP3 files which are recorded on CD-R/RW.
PLAYABLE DISCS DISC TYPES The following discs can be played back on this DVD player. [DVD] Data on a DVD is divided into sections called "titles", and then into subsections called "chapters", each of which is given a title or chapter number. Playback conditions are preset on some DVD video discs, and these playback conditions take priority over user operations on this player. If a function you selected do not run as desired, refer to the manual accompanying the disc.
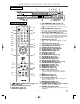
OPERATING CONTROLS AND FUNCTIONS FRONT PANEL 2 1 3 4 5 67 8 REV PHONES PHONES LEVEL TOP MENU MIN 13 REMOTE CONTROL SEARCH SURROUND MODE OPEN CLOSE 23 3 1 A-B REPEAT 24 1 2 3 4 5 6 7 8 9 0 +10 AUDIO DISPLAY 22 REPEAT 25 26 27 28 29 MODE ZOOM ANGLE CLEAR SUBTITLE 9 21 MENU TOP MENU 20 10 30 31 32 ENTER RETURN SETUP 33 19 SKIP 6 5 34 7 4 PLAY STOP FR SEARCH FF SEARCH 18 12 PAUSE/STEP TV POWER VOL 14 CH 17 VIDEO/TV 15 TV 16 DV RM 1. 2. 3. 4. 5.
Tour of the Remote Control DVD VCD English Buttons on remote control work in different ways for DVD, VCD and CD : Refer to the following table for correct use. CD POWER/STANDBY Button A-B REPEAT Button A-B REPEAT REPEAT Button REPEAT • Turns the player on and off. • Turns the player on and off. • Turns the player on and off. • Marks a segment to repeat between A and B. • Marks a segment to repeat between A and B. • Marks a segment to repeat between A and B.
Tour of the Remote Control DVD MENU Button MENU TOP MENU Button TOP MENU VCD • Brings up the Menu on a disc. • Brings up the Top Menu CD on a disc. ENTER Button (UP/DOWN or LEFT/RIGHT Button) • • Moves the cursor and determines its position. Moves the cursor and • determines its position. Moves the cursor and determines its position. ENTER RETURN Button RETURN SETUP Button SETUP • • Returns to a previous menu. Brings up the DVD player's • Returns to a previous menu.
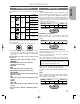
Stays on when the A-B repeat function is on. English DISPLAYS DURING OPERATION DISPLAY Power on Lights up when a DVD is inserted on the tray. No disc inserted Stays on when the repeat function is on. Tray open Tray closed Loading the Disc Lights up when the inserted disc comes to a pause. Stays on when the inserted disc is being played back. CD: Lights up when a CD is inserted on the tray. VCD: Lights up when a Video CD is inserted on the tray.
HOOKUPS DESCRIPTION-REAR PANEL DIGITAL AUDIO OUT ANALOG AUDIO OUT COMPONENT VIDEO OUT S-VIDEO OUT CR/PR Y I OPTICAL COAXIAL 1 R L 2 VIDEO OUT CB/PB 3 4 P PROGRESSIVE 5 6 1. DIGITAL AUDIO OUT JACKS: Use either an optical or coaxial digital cable to connect to a compatible Dolby Digital receiber. Use to connect to a Dolby Digital decoder or DTS decoder. 2. ANALOG AUDIO OUT JACKS Connect to the Audio input jacks of A/V-compatible TV or wide screen TV, Stereo system. 3.
Notes ¡Be sure to turn off the power to all components in the system before connecting another component. ¡Refer to the Instruction Manuals for your TV, stereo system and any other components to be connected to the DVD player.
CONNECTION TO A TV (FOR VIDEO) Basic Audio Method 1 Method 2 Method 3 Good picture Better picture Best picture COMPONENT S-VIDEO IN TV R L S-VIDEO IN VIDEO IN CR Y CB or PR AV Cable Y S-Video Cable or ANALOG AUDIO OUT PB Video Cables or S-VIDEO OUT COMPONENT VIDEO OUT Y CR/PR DVD R L Analog Audio out VIDEO OUT CB/PB Video out S-Video out Component Video out • Method 1 DVD Player + TV with Video Input Jack • Method 2 DVD Player + TV with S-Video Input Jack • Method 3 DVD Pla
PLAYING A DVD VIDEO OR AN AUDIO CD OR A VIDEO CD DVD CD VCD Getting started Turn on the power of the TV, amplifier and any other components which are connected to the DVD player. (Change the input system to suit the DVD player, and check that the sound volume is correct.) Notes ¡While the setup menu is shown you can not open or close the tray.
USING THE TITLE MENU DVD RESUMING PLAYBACK FROM THE POINT WHERE PLAYBACK STOPPED DVD With a DVD containing a title menu, you can select desired titles from the menu. CD VCD 1 Press the STOP button during playback. 1 Press the TOP MENU button. ¡Playback will stop, and then appear the resuming ¡The title menu will appear. message at the center. 2 Select the desired title. ¡Press the arrow buttons (L/K/B/s) to change the Press 'PLAY' to play from here.
DVD CD STARTING FROM A DESIRED TRACK VCD 1 Press the FF SEARCH g or FR SEARCH h button during playback. ¡For DVDs or Video CDs, pressing the FF SEARCH g or FR SEARCH h button cycles the playback speed in four steps. In case of DVDs, the sound will mute. ¡For audio CDs, the playback speed is ×16 fixed. ¡For Video CDs, the playback speed is ×2, ×8 or ×30. FR SEARCH FF SEARCH Button Button x2 CD There are 2 ways you can jump to a desired track. By using only the NUMERIC buttons.
CHAPTER SEARCH: 1 Directly enter the desired chapter numberwith the numeric buttons when the disc is being played or paused. ¡When you finish entering the number, the selected title or chapter will start automatically. CD VCD DVD TRICKS WITH THE SKIP BUTTONS (H, G) If the SKIP button G is pressed during playback or while playback is paused, the current track/chapter will be skipped and the next track/chapter will start.
Notes No repeat playback. REPEAT [OFF] ¡With DVDs, the A-B repeat section can be set only The current Track is played back repeatedly. REPEAT [ALL] The whole Disc is played back repeatedly. within the current title. ¡With audio CDs, the A-B repeat section can be set within the current track. ¡A-B repeat is not available with some scenes in DVD. ¡To cancel the A point which was set, press the CLEAR button.
Notes Note ¡Adding programs is not possible during program ¡Zooming function does not work while disc menu is playback. You must stop the current playback before such operations can be carried out. shown. PLAYING AN MP3 DISC ¡Press the CLEAR button to cancel a program. The most recently entered program will then be deleted. MP3 ¡Up to 99 programs can be entered. 1 Insert an MP3 file-recorded disc. ¡Playback from a desired track and random playback are not available during program playback.
Notes CHANGING THE ONSCREEN DISPLAY DURING MP3 DISC PLAY Just type in the TRACK number with the numeric buttons. MP3 ¡If the typed TRACK number is not available, the The information on an MP3 disc in play can be checked. ¡Playback cannot be started from a desired time 1 Press the DISPLAY button during playback. ¡The TRACK currently in play will be highlighted. ALBUM NAME “disable” symbol appears and the direct search mode is cancelled. count.
¡Press the s button to go to the next upper hierarchy. Notes ¡If the entire program cannot be displayed at once on ¡Press the CLEAR button, and the last-programmed entry will be deleted. the screen, “L” appears to go to the next page. 3 When the disc has been programmed, press the PLAY button. ¡Press the RETURN button, and the STOP screen will show up with the program contents in memory. ¡The program setting will be cancelled when the ¡Programmed play starts.
DVD The DVD player has a function which allows you to select the desired language for subtitles. selected language. ¡The screen display will disappear after about 5 seconds. ¡When “SUBTITLE NOT AVAILABLE” appears onscreen, it means no subtitle is recorded on the scene. CHANGING THE CAMERA ANGLE (Multi-Angle Pictures) 1 Press the SUBTITLE button during playback, and then press the SUBTITLE button to select the desired subtitle language.
CHANGING THE ON-SCREEN DISPLAY 2 Press the DISPLAY button again. ALL 4/12 0:13:45 -0:45:40 DVD CD VCD ALL: Current track number / the number of total tracks. You can check the information about the disc by pressing the DISPLAY button on the remote control. TIME: Elapsed time of the current disk and remaining time of the current disc. ¡Use the number button to start from a desired track. For DVDs 1 Press the DISPLAY button during playback. 3 Press the DISPLAY button to exit the display.
CHANGING THE SETUP ITEMS 4 Press the K/ L buttons to select a desired 1 Press the SETUP button in STOP mode. item, and then press the ENTER button. ¡The setup screen will appear. ¡If Other is selected on the Audio, Subtitle or Disc SETUP MENU Menu setting screen, the Language Code setting screen will appear. Press the numeric buttons to enter the desired language code while referring to the list on page 29. 1.LANGUAGE OPTIONS 2.DISPLAY OPTIONS 3.AUDIO OPTIONS 4.
DISPLAY SETTINGS SETUP MENU DISPLAY OPTIONS 1.TV ASPECT 2.FRONT DISPLAY 3.ANGLE MARK 4.AUTO POWER OFF 1 Press the SETUP button in STOP mode. ¡The setup screen will appear. SELECT: / EXIT: SETUP 4:3 L-BOX BRIGHT ON ON SET: ENTER CANCEL: RETURN SETUP MENU SETUP MENU 1.LANGUAGE OPTIONS 2.DISPLAY OPTIONS 3.AUDIO OPTIONS 4.PARENTAL SELECT: / EXIT: SETUP DISPLAY OPTIONS 1.TV ASPECT 2.FRONT DISPLAY 3.ANGLE MARK 4.
AUDIO SETTINGS ¡The setup screen will SETUP MENU appear. 1.LANGUAGE OPTIONS 2.DISPLAY OPTIONS 3.AUDIO OPTIONS 4.PARENTAL SELECT: / EXIT: SETUP English DTS (Default : OFF) BITSTREAM : Output DTS sound Set to BITSTREAM when the unit is connected to DTS Decoder. 1 Press the SETUP button in STOP mode. SETUP MENU AUDIO OPTIONS 1.DRC 2.DOLBY DIGITAL 3.DTS 4.DOWN SAMPLING SET: ENTER CANCEL: RETURN SELECT: / EXIT: SETUP 2 Press the K/ L buttons to select Audio and then press the ENTER button.
When Parental Level is selected ¡Press the K/ L buttons to select PARENTAL LOCK an item from ALL or 8 to 1, and then press the ENTER button. 1 Press the SETUP button in STOP mode. ¡The setup screen will appear. SETUP MENU PARENTAL CONTROLS SETUP MENU 1.RATING LEVEL 2.CHANGE PASSWORD 1.LANGUAGE OPTIONS 2.DISPLAY OPTIONS 3.AUDIO OPTIONS 4.
No.
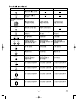
REMOTE CONTROL OF THE TV PROGRAMMING THE REMOTE CONTROL OF THE TV CONTROLLING THE TV 1 Turn off the TV. 2 Program the remote control Aim the DVD’s remote control at your TV set. Hold down the TV POWER button while you press the number corresponding to your brand of television as shown in the chart. For example; If you have a Hitachi television, press the TV POWER and 1 at the same time.
If the DVD player does not perform properly when operated as instructed in this Instruction Manual, check the player by consulting the following checklist. Symptom No power Remedy Cause ¡Loose power plug. ¡Insert the power plug firmly into the wall outlet. ¡The remote control is not aimed ¡Aim the remote control directly at the sensor on at the sensor on the player. The player does not ¡Obstacles present between the remote control and the sensor.
HANDLING PRECAUTIONS SERVICING CABINET CLEANING Should your DVD player become inoperative, do not try to correct the problem by yourself. There are no user-serviceable parts inside. Turn off, unplug the power cord, and please call our help line at 1-800-4482244, to locate an Authorized Service Center. ¡Wipe the front panel and other exterior surfaces of the DVD player with a soft cloth immersed in lukewarm water and wrung dry. ¡Never use a solvent or alcohol.
Product type : DVD Player Discs : DVD video English SPECIFICATIONS Audio CD Video CD Output signal format : Frequency response DVD (linear sound) : CD : NTSC color 20 Hz to 22 kHz (sample rate: 48 kHz) 20 Hz to 44 kHz (sample rate: 96 kHz) 20 Hz to 20 kHz Signal-to-noise ratio (S/N ratio) CD : 110 dB (EIAJ) Dynamic range DVD (linear sound) : CD : 95 dB 94 dB (EIAJ) Total distortion factor CD : 0.005% (EIAJ) Wow and flutter : Below the measurement limitation (+/-0.
MEMO
Hitachi has made every effort to assure you hours of trouble free operation from your unit . However , should you require service , a network of Hitachi Authorized Service Facilities has been established in all 50 states and Puerto Rico . Each facility will provide you with convenient and expedient assistance . Our service "Hot line" operator will direct you to the Hitachi Authorized Service Facility nearest you .