
Operation Manual


7
English
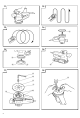
4. Installing the sanding paper
Since the attachment is a hook-and-loop type, the
sanding paper can be installed easily by just press-
ing it onto the pad. When installing the sanding
paper, in order to match it to the holes in the pad,
gently fold it along the axis of two holes as shown
in Fig. 4.
Next, use the holes along the fold as a guide to
match the sanding paper and the pad. Finally, press
the entire sanding paper uniformly onto the pad.
5. Installing and removing the dust bag.
(1) Installation
As shown in Fig. 5, hold the dust gate and push
in the dust bag into the dust bag holder.
(2) Removal
As shown in Fig. 6, push the dust gate's tab hard
and remove the dust bag.
6. Removing and Installing the front knob
The front knob can be conveniently removed when
it gets in the way, such as when sanding in corners.
(1) Removal
As shown in Fig. 7, firmly press the front knob catch
and pull off the front knob in the direction of the
arrows.
(2) Installation
As shown in Fig. 8, match the upper part of the
front knob with the upper part of the front knob
contact area and push the front knob in the direc-
tion of the arrow.
7. Adjustment of speed (FSV13Y only)
The FSV13Y is equipped with the electric control
circuit which enables non-step speed control. To
adjust the speed, turn the dial shown in Fig. 9.
When the dial is set to “1”, the sander operates
at the minimum speed (6500/min). When the dial
set to “5”, the sander operates at the maximum
speed (11000/min). Adjust the speed according to
the material to be cut and working efficiency.
PRACTICAL OPERATING PROCEDURES
CAUTION
Never apply water or grinding fluid when sanding. This
could result in electrical shock.
1. How to hold the random orbit sander
Hold the handle and front knob and lightly press
the sander down so that the sanding paper uni-
formly touches the work surface. (Fig. 10)
The top of the housing can also be held with one
hand to control the sander. (Fig. 11)
CAUTION: When operating with one hand, make sure
not to cover the whole ventilation hole.
2. How to move the random orbit sander
Move the sander by either moving it up and down
or by moving it in circles while gradually progress-
ing in a sideways direction. (Figs. 12 and 13)
3. Turning on the sander
Place the sander on the work surface before turning
it on. Keep the sander in contact with the work
surface even after turning it off.
CAUTION
When idling, the pad may fly apart. Therefore, make
sure not to turn on the switch when the sander is
removed from the work surface, and do not operate
the sander when it is lifted up.
4. Switching the sander ON and OFF
By pulling the trigger and pushing the stopper, the
switch will remain ON even when the trigger is
released, promoting continuous, efficient operation.
By pulling the trigger again, the stopper is released
and the switch is turned OFF.
5. Immediately after use: Warnings
䡬 Always turn the sander off and unplug it after your
work is done.
䡬 Since the sander may suck in dust and debris, be
careful not to place it where there is much dust
and debris when it is still spinning right after use.
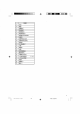
By adjusting the dial, match the speed to the material and type of work.
Material
Grain
Dial scale
Rough grinding Fine grinding
Paintwork:
Sanding 180 400 3 ~ 5
Repairs
(scratches, rust spots) 120 240 2 ~ 4
Stripping 40 80 2 ~ 4
Wood:
Softwood 60 – 80 240 3 ~ 5
Hardwood 60 180 3 ~ 5
Veneers 240 320 2 ~ 4
Metals:
Aluminium 80 240 2 ~ 4
Steel 60 240 3 ~ 5
Stainless steel 120 240 3 ~ 5
Note: Please use this table as a standard.