
Safety Instructions


8
English
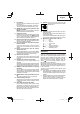
(1) As shown in Fig. 3, the blade angle can be freely
changed if the grip (B) is turned in the direction of
Ⓑ
in a state where grip (B) is slid in the direction of
Ⓐ
.
Grip (B)
Fig. 3
(2) Release grip (B) and turn the tool, and make sure that
it is locked completely.
8. Removing Tool
As shown in Fig. 2, pull grip, and pull out the tool.
CAUTION
Be sure to grip the handle and side handle during
work. Do not hold by the grip during work. If you
pull it by mistake, the bull point could jump out.
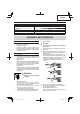
9. Side handle
The side handle can be fi xed at any desired position;
360 degrees, and can also be fi xed at any position in
the back-and-forth direction.
(1) Loosen the handle by turning the grip in the direction
of
Ⓐ
as shown in Fig. 4.
(2) Adjust it to a position where vertical (up-and-down)
operation can be facilitated as illustrated in Fig. 5, Fig. 6
and Fig. 7.
(3) Turn the grip in the direction of
Ⓑ
and fi x the handle.
Ⓐ
Fig. 4
Fig. 6
Fig. 5
Fig. 7
Grip
Ⓑ
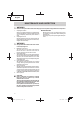
10. Power lamp
The power lamp lights up when the power cord is
plugged into an electrical outlet. (Fig. 8)
Fig. 8
Power lamp
11. Regulating the number of hammering (Fig. 9)
This Demolition Hammer is equipped with a built-in
electronic control circuit that can adjust and regulate
the number of times of hammering. This Demolition
Hammer can be used by adjusting the impact rate
selector switch, depending upon the contents of
operation, such as chiseling fragile materials, chipping,
centering, etc.
Fig. 9
Impact rate
selector switch
Display lamp
Pressing the impact rate selector switch switches impact
rates as shown in Table 1.
Table 1
Display lamp
sequence
Impacts per
Minute
1,430 1,900 2,370 2,850
NOTE
The impact rate cannot be changed by pressing the
impact rate selector switch while the motor is rotating.
To change impact rate, switch off the tool fi rst.
000BookH45MEYNA.indb8000BookH45MEYNA.indb8 2016/06/0917:38:422016/06/0917:38:42