Digital Terrestrial TV Receiver Model HDB72 Instruction Manual To obtain the best performance and ensure years of trouble-free use, please read this instruction manual completely.
CONTENTS 1. INTRODUCTION.................................................................................................................................................... 2 SOME DOS AND DON'TS ON THE SAFE USE OF EQUIPMENT .......................................................................... 3 POWER CORD (MAINS LEAD)................................................................................................................................. 4 2. SAFETY PRECAUTIONS ..................................
1. INTRODUCTION Thank you for purchasing this product. It will give you good service if you take note of all safety notices and recommendations.
SOME DOS AND DON'TS ON THE SAFE USE OF EQUIPMENT This equipment has been designed and manufactured to meet international safety standards but, like any electrical equipment, care must be taken if you are to obtain the best results and safety is to be assured. ************** DO read the operating instructions before you attempt to use the equipment.
POWER CORD (MAINS LEAD) Do not place the product where a piece of furniture or other heavy object could trap the power cord (mains lead). Handle the power cord by the plug. Do not pull out the plug by tugging the cord and never touch the power cord when your hands are wet as this could cause a short circuit or electric shock. Never make a knot in the cord or tie it with other cords. The power cords should be routed in such a way that they are not likely to be stepped on.
No naked flame sources, such as lighted candles, should be placed on the apparatus. Do not place any objects into the ventilation slots. Should any of the above take place, do NOT open the unit yourself. You will invalidate your warranty and cause a possible safety hazard, as there are high voltages inside. Lightning During thunderstorms or going on holiday, it is recommended that the aerial ( if outdoor) is disconnected, to prevent damage to the aerial input circuits. WARNING Battery Disposal.
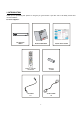
YOUR DIGITAL RECEIVER FRONT PANEL: ON/OFF PROG UP PROG DOWN REAR PANEL: 35021695 ANT. IN TV OUT AERIAL IN AERIAL OUT SCART (TV) SCART (VCR/AUX) TV SCART VCR SCART AUDIO L AUDIO R AUDIO OUT LEFT/RIGHT 3. PREPARING 3.1. REMOTE CONTROL First open the battery cover on the underside of the remote control. Put in both batteries 1.5Volt (RO3/AAA) referring to the imprinted symbols (+/-) in the battery case and put on the battery cover again.
3.2.2. CONNECTION TO A VCR 1) Connect one end of a SCART cable to the TV SCART connector on the STB and the other end to a SCART socket on your TV 2) Connect one end of a second SCART cable to the VCR SCART connector on the STB and the other end to a SCART Socket on your VCR (Video Cassette Recorder). Ø When the receiver is in standby mode: When connected device (VCR or DVD) is switched on, the device will be automatically routed to TV.
3.2.3. AERIAL CONNECTION If the lead from your TV aerial is currently connected into your TV, then remove this lead from your TV and connect to the “Antenna In” socket on your STB. Please note that reception of Digital TV requires a good quality external TV antenna. It is not recommended that the STB is connected to an internal aerial. 3.2.4. PUTTING INTO OPERATION Ensure that all connections have been made before connection to the mains supply.
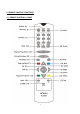
4. REMOTE CONTROL FUNCTIONS 4.1.
BUTTON FUNCTION 1 Standby Switches the receiver on and into Standby. 2 Mute Mutes received audio. 3 TV/DTV Switches between DTV and STB (see page 20 for details). 4 Menu Displays the Main Menu / Exits menus. 5 Up, Down, Left, Right Moves between menu items. 6 Select Makes selection in a menu. 7 Number keys Changes channels. Enters numbers and letters into menus. 8 Guide Displays and exit electronic programme guide. 9 V+, V- Adjusts the received audio volume.
5. MENU INTERFACE FIRST TIME INSTALLATION When the box is started from standby for the first time there will be no channels stored in memory. A “First time Installation” menu will be displayed. Select the TV type (screen format). To continue, press the SELECT key. A warning message will appear, which asks you, if you want to start automatic search or not. Choose the option YES, press the SELECT button to start Automatic search.
5.1.1.1. NAVIGATING THE WHOLE LIST OF CHANNELS moves the cursor to select the previous or next channel. RED and GREEN buttons In the channel table select page up and down. To watch a specific channel, highlight it using the buttons or the Red/Green buttons, then press SELECT, if the SELECT box is highlighted. The name and number of the selected channel will be displayed in the top-right corner of the screen. If the selected channel is password protected, a pop up menu will be displayed.
When you leave the Configuration menu by pressing [MENU] the favourite mode is activated. Now, changing channel using the [P+] or [P-] keys will switch to only those channels marked as favourites in the channel list. You can still access all the channels in the channel list by keying in their channel list number or by selection from the Channel List screen. Alternatively you can switch off the favourite mode from the Favourite Mode line of the Configuration menu.
5.2.2. FIRST TIME INSTALLATION The user can use this item to load default settings, which had been loaded to the receiver at the factory. To install factory settings, highlight ‘First Time Installation’ menu and press SELECT key, then you will be asked to confirm for deleting all channels and settings. If you select YES and press the SELECT button, all channels in the channel table will be deleted. 5.3. CONFIGURATION You can configure the settings of your box.
5.3.5. FAVOURITE MODE This function enables or disables the favourite channel list mode by pressing “3/4” buttons and press OK. If there is no favourite channel, a warning message is displayed. 5.3.6. EPG PREFERENCE Digital terrestrial television channels can broadcast simultaneous Next&Now and 7-Days electronic program. Highlight the EPG Preference line in the Configuration menu and use the “3” or “4“ keys to select Next&Now or 7-Days. 5.3.7.
5.3.9. PARENTAL SETTINGS Use “5/6” buttons to go to Parental Settings option. Press SELECT button to enter Parental Settings Menu. A box asking for the lock key is displayed. There is only one key which is set to “0000” initially. Enter lock key. If it is incorrect, it is returned back. If it is correct, the Parental Settings Menu including following items is displayed: There you can set/reset locking for the Main Menu, or the Installation Menu to restrict access.
Start, End and Date field data are entered using number keys. Current time and date are shown on the lower-right part of the screen to help you. After the desired detail fields are filled, one can turn back to the timer info summary list by pressing “OK” to save the settings, or by pressing “Menu” to cancel these new settings. A set timer is cancelled (disabled) by changing the mode to “Inactive” in timer summary list.
Press MENU to view the 7 day EPG. Press “5/6” to navigate in Channels or Programmes. “3/4”key to navigate through the channel and program list. With RED/GREEN keys you can change schedule time. By pressing YELLOW/BLUE you can advance the schedule backward/ forward of a day. If you press info key you can see easily the detailed help information and by pressing info key again you can exit Help menu. The starting time for EPG is the current time. You can see the event information for the next two hours.
6.3. CHANNEL NAVIGATION There are two ways to navigate through the channels: 1. Pressing P+/P- keys will help you to go to the next or the previous channel in the list. 2. Pressing a number key will activate a small digit entry window on the left upper corner of the screen. After a digit is entered, the box will wait for 2 seconds till you enter another digit. If no digit is entered during these 2 seconds, then the box will switch to the entered number channel.
6.5. DIGITAL TELETEXT Many digital terrestrial television channels not only broadcast pictures and sound for programmes but also pages of information on the programmes, the weather, news and many other topics. This digital teletext can be displayed by the receiver.Some channels are entirely given over to digital teletext and carry no normal TV programme at all. These dedicated digital teletext channels will not give a quarter-screen image in the EPG or the Channel List screen.
7. TROUBLE SHOOTING GUIDE TROUBLE POSSIBLE REASONS The standby led is not lit. Mains cable is not connected. No picture or sound. No signal or weak signal. The settings you have done in the menus have not been changed. The digital set-top box was unplugged without first going to standby. · The digital set-top box is in standby. The remote control is not working. · Remote control is incorrectly aimed. · Battery exhausted. WHAT TO DO Check if the mains cable is plugged into the power socket.
8.
9. IMPORTANT NOTICE DIGITAL SWITCHOVER AND YOUR TV EQUIPMENT WHAT YOU NEED TO DO TO ENJOY WATCHING TV DURING AND FOLLOWING DIGITAL SWITCHOVER Starting in 2008* and ending in 2012, television services in the UK will go completely digital, TV region by TV region. To continue using this digital TV equipment during and following digital switchover, you will need to “reset” your digital TV channels.
10.
The mark is in compliance with the Waste Electrical and Electronic Equipment Directive 2002/96/EC (WEEE). The mark indicates the requirement NOT to dispose the equipment including any spent or discarded batteries as unsorted municipal waste, but use the return and collection systems available. If the batteries or accumulators included with this equipment, display the chemical symbol Hg, Cd, or Pb, then it means that the battery has a heavy metal content of more than 0.0005% Mercury, or more than 0.