
Use and Care Manual


— 11 —
English
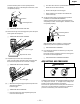
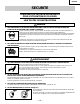
(Set the switching device to the upward position
completely as shown in the diagram. Otherwise, it will
not operate properly.)
THE NAILER MUST NOT LEAK AIR.
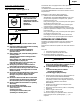
(3) Remove the finger from the trigger and press the push
lever against the workpiece.
THE NAILER MUST NOT OPERATE.
(4) Separate the push lever from the workpiece.
Next, point the nailer downward, pull the trigger and
then wait in that position for 5 seconds or longer.
THE NAILER MUST NOT OPERATE.
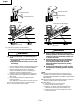
(5) 1 Without touching the trigger, depress the push lever
against the workpiece.
Pull the trigger.
THE NAILER MUST OPERATE.
2 Hold the trigger back while separating the push
lever from the workpiece.
The nailer will remain in operated status (the driver
blade will remain at the bottom).
3 Remove the finger from the trigger.
Nailer operation will end (the driver blade will
return to the top).
(6) Set the switching device to the downward position
(CONTACT ACTUATION MECHANISM).
(Set the switching device to the downward position
completely as shown in the diagram. Otherwise, it will
not operate properly.)
With the Nailer off the workpiece, pull the trigger.
Depress the push lever against the workpiece.
THE NAILER MUST OPERATE.
(7) If no abnormal operation is observed, you may load
nails in the Nailer.
Drive nails into the workpiece that is the same type to
be used in the actual application.
THE NAILER MUST OPERATE PROPERLY.
ADJUSTING AIR PRESSURE
WARNING
Do not exceed 120 psi (8.3 bars 8.5 kgf/cm
2
).
Adjust the air pressure at recommended operating pressure
70 – 120 psi (4.9 – 8.3 bar 5 – 8.5 kgf/cm
2
) according to the
length of nails and the hardness of workpiece.
The correct air pressure is the lowest pressure which will
do the job. Using the Nailer at a higher than required air
pressure unnecessarily over stresses the Nailer.
Switching Device
Pull Trigger
Switching Device
Depress Push Lever
Upward position
Do not pull Trigger
Downward position