
user manual


3.6.1
3 - 95
3.6 Saving and Recording Images
3.6.1 Saving and Recording Images
It is possible to record images using conventional photo films and printers, and/or as image data
files (to disk drive). There are four methods of image recording:
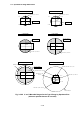
(1) Taking photographs (optional photo-recording unit is necessary)
For photographic image recording, you can use Direct Photo or Memory Photo recording.
Memory Photo can produce multiple photographs from a given image.
See <3.6.6 Taking Photographs (Option)>.
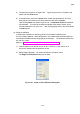
(2) Saving images
Direct Saving, which saves an image on the scanning image display, and Captured Image
Saving, which saves captured images, are available.
Also available is a Quick Save function, which can automatically save captured images
under a specified name. Using these functions, it is possible to save images that are
processed on SEM Data Manager.
(3) Printing images
Printing of images using Windows-supported printers is available.
Refer to <3.9.10 Printing Images Using Report Generation Function>.
(4) Copying images to other application software
Scanning Image can be copied to Windows-clipboard. You can use the image on
application software by simply pasting it.
When the optional PCI image database software is installed, images are transferred directly
to it without saving images.
Refer to <3.9.11 Copy Image>.
(5) Related information
Auto data display, and text and graphics written on the image using data entry functions are
recorded with the image. A text file including image information such as operating
condition, date and others is created when the image is saved. It is saved in the same
directory as the image. The measurement function option allows you to save and output
images by writing any text to them as well as incorporating the results of measurements
(measured values and cursors).
NOTICE: For storing images, we suggest the use of external storage devices, as the storage
capacity of PC hard drives is limited. Also, external storage devices are
recommended for data backup.