
user manual


3.6 Saving and Recording Images
3 - 102
3.6.4 Saving a Scanning Image (Direct Save)
The scanning image, simply frozen or captured, can be saved. Resolution of saved image is
1280 x 960 or 640 x 480 depending on present screen mode when saved just after freezing the
image. When saved after capturing, resolution follows capture resolution.
Graphics and texts written using Data Entry function and CD measurement function are put on
saved images when saved while they are shown on the image.
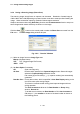
Click the Save
button on the control panel or select the Direct Save command from the
File menu. The Save Image dialog window will open.
Fig. 3.6-5 "Save As" Window
(1) Select an image format on Image Type area.
Bitmap: Windows bitmap
TIFF: TIFF (Tagged Image File Format)
JPEG: JPEG
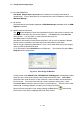
(2) Set Save Option if necessary.
Off: Save one image only.
All Save: Effective when opened from Captured Image window. Saves all images
selected in Captured Image window at a time.
File names [{Input File name} + _n (n: capture number)] are automatically
generated.
Data No. Save: Puts a data number, which is specified in Auto Data Display setting to the
end of file name when saving images.
This function is effective when saving plural captured images with one
saving operation.
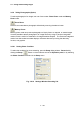
The Auto Increment shall be set for Data Number on Setup dialog
window - Record tab.
To enable auto Increment, set Data Number to ON, Auto Increment to
ON and put "-" plus number to the end of the data number as shown on
the following picture.