Spanish Section 73~143 Click Here PLASMA TELEVISION Operating Guide for P42T501, P42T501A P50T501, P50T501A and P55T551 IMPORTANT SAFETY INSTRUCTIONS ............................................................................................. 2-3 FIRST TIME USE ............................................................................................................................... 4-22 THE REMOTE CONTROL ................................................................................................
Important Safety Instructions SAFETY POINTS YOU SHOULD KNOW ABOUT YOUR HITACHI PLASMA TELEVISION Our reputation has been built on the quality, performance, and ease of service of HITACHI plasma televisions. Safety is also foremost in our minds in the design of these units. To help you operate these products properly, this section illustrates safety tips which will be of benefit to you.
Important Safety Instructions Power source This plasma television is designed to operate on 120 volts 60 Hz, AC current. Insert the power cord into a 120 volt 60 Hz outlet. The power cord is used as the disconnect device and shall remain readily operable. To prevent electric shock, do not use the plasma television’s (polarized) plug with an extension cord, receptacle, or other outlet unless the blades and ground terminal can be fully inserted to prevent blade exposure.
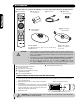
Accessories Check to make sure you have the following accessories before disposing of the packing material. 쐃 Remote Control 쐏 Power Cord 쐄 Wire Clamp (50" models only) First time use 쐇 Two “AA” size, 1.5V batteries 쐋 Table Top Stand (42” included) 쐋 Table Top Stand (50" included) For U.S. models: For optional accessories, please access our web site at: www.hitachi.us/tv CAUTION: Note: Please visit our website for optional accessories. 1. Ceiling mounting is not recommended.
How To Set Up Your New Hitachi Plasma Television To take measures to prevent the Plasma Television from tipping over and prevent possible injury it is important to mount the unit in a stable and flat surface. First time use Securing to a table-top 1. Using wood screws (two) fasten the set to the clamping screw holes on the rear of the Plasma TV stand as shown below. 2. Using commercially available wood screws, secure the set firmly in position. Wire 55” Wood screw two places Securing to a Wall 1.
How to set up your new HITACHI Plasma Television First time use AC CORD INSTALLATION INSTRUCTION The AC cord provided with your new Plasma Television needs to be installed correctly to avoid the AC cord from disconnecting when rotating the TV on its Table top stand. Located on the back of the TV are 2 plastic clamps to hold the AC cord. Please follow the instructions below. 쐃 Pass the AC cord through Clamp #1 and connect it to the TV. Pull on the clamp to tighten the AC cord to the TV.
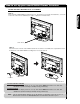
How to set up your new HITACHI Plasma Television SETTING FOR WALL MOUNTING ON 50" & 55" MODELS First time use STEP (1) : Please locate the STAND METAL on the back of the TV . This metal is use to hold the TV and the Base ; so it needs to remove 4 screws from the STAND base in order to separate the TV from the Base. STAND METAL STEP (2): Please remove the 4 screws of the STAND metal from the TV, now the TV STAND can be separated from the TV.
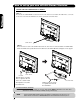
How to set up your new HITACHI Plasma Television SETTING FOR WALL MOUNTING ON 42" MODELS First time use STEP (1) : Please locate the STAND METAL on the back of the TV . This metal is use to hold the TV and the Base ; so it needs to remove 6 screws from the STAND base in order to separate the TV from the Base. STAND METAL STEP (2): Please remove the 2 screws of the STAND metal from the TV, then remove 4 screws that hold the TV STAND BASE; now the TV STAND can be separated from the TV.
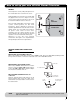
How to set up your new HITACHI Plasma Television VIEWING The best picture is seen by sitting directly in front of the TV and about 10 to 18 feet from the screen. If the TV’s audio output will be connected to a Hi-Fi system’s external speakers, the best audio performance will be obtained by placing the speakers equidistant from each side of the receiver cabinet and as close as possible to the height of the picture screen center.
Hook-up Cables and Connectors First time use Most video/audio connections between components can be made with shielded video and audio cables that have phono connectors. For best performance, video cables should use 75-Ohm coaxial shielded wire. Cables can be purchased from most stores that sell audio/video products. Below are illustrations and names of common connectors.
Quick Reference Remote Control Buttons and Functions In addition to controlling all of the functions on your HITACHI Plasma TV, the new remote control is designed to operate different types of devices, such as, DVD Players, CBL (Cable Boxes), set-top-boxes, satellite receivers, and VCRs. The remote control must be programmed to control the chosen device. Please see pages 23-38 for a complete description of all features and programming of the Remote Control.
Front Panel Controls First time use FRONT VIEW 햸 PUSH TO OPEN CONTROL DOOR 햺햻 FRONT PANEL CONTROLS PHOTO INPUT PUSH EJECT 햹 햴 햲 FRONT POWER button Press this button to turn the Plasma Television ON/OFF. It can also be turned ON/OFF by remote control. The “MAIN POWER” button must be at stand-by mode. 햳 MENU/SELECT button This button allows you to enter the MENU, making it possible to set TV features to your preference without using the remote.
Front Panel Controls 햺 Indicating Lamp Indicating Lamp Power Status Off OFF. Lights Red OFF. (Stand-by) Lights Blue On Lights Orange Off (Power Saving) Blinking Blue On First time use 햺 POWER light indicator To turn the TV ON, press the main power switch located on the lower right side of the TV. A red stand-by indicator lamp located on the lower right corner of the front bezel will illuminate. The Plasma TV is now ready for remote ON/OFF operation.
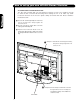
Rear Panel Connections First time use 햲 Antenna Input To switch between Cable and Air input, go to the Channel Manager option to change the signal source CABLE or AIR. 햲 햶 햳 Audio/Video Inputs 1, 2 and 3 By using the INPUTS button, the CURSOR PAD ( and ), and the SELECT button or CURSOR PAD of the remote control, you can select each video source. Use the audio and video inputs to connect external devices, such as VCRs, camcorders, laserdisc players, DVD players etc.
Connecting External Video Sources The FRONT panel jacks are provided as a convenience to allow you to easily connect HDMI or DVI signals from a DVD, Set Top Box , Video Game as shown in the following examples (When connecting DVI signal it will need to connect the audio output into the Front Audio Input jacks) : First time use A) Connecting HDMI signal. FRONT INPUT PANEL PHOTO INPUT PUSH EJECT Note : Special device cables will be according to the own device specifications.
Connecting External Video Sources The FRONT panel jacks are provided as a convenience to allow you to easily connect a camcorder , DVD, Video Game and a VCR as shown in the following examples: First time use FRONT INPUT PANEL PHOTO INPUT PUSH EJECT Note : For Monoaural devices, please connect Audio signal cable into L/Mono input jack . Note : Special device cables will be according to the own device specifications.
Rear Panel Connections Outside Antenna or Cable TV coaxial cable 2-Way signal splitter First time use VCR #1 VCR #2 ANT IN OUTPUT S-VIDEO V L R S-VIDEO V L R INPUT Optional Optional HDMI to HDMI HDMI OUTPUT DVI to HDMI DIGITAL OUTPUT Y OUTPUT PB/CB PR/CR L R Y PB PR L OUTPUT R AUDIO OUT HDMI DIGITAL OUTPUT CAPABILITY HDTV Set-Top Box DIGITAL OUTPUT CAPABILITY DVD Player NOTE: Cables are optional, except when specified.
Tips on Rear Panel Connections • S-VIDEO, Y-PBPR, or HDMI connections are provided for high performance laserdisc players, VCRs etc. that have this feature. Use these connections in place of the standard video connection if your device has this feature. First time use • If your device has only one audio output (mono sound), connect it to the left audio jack on (L/(MONO)) the Rear Panel.
Connecting External Video Sources CONNECTING A VIDEO AND STEREO AUDIO SOURCE TO INPUT1 ~ FRONT INPUT Cable or Air signal First time use 1. Connect the cable from the VIDEO OUT of the VCR or the laserdisc player to the INPUT (VIDEO) jack, as shown on the Rear Panel to the right. 2. Connect the cable from the AUDIO OUT R of the VCR or the laserdisc player to the INPUT (AUDIO/R) jack. 3. Connect the cable from the AUDIO OUT L of the VCR or the laserdisc player to the INPUT (AUDIO/L) jack. 4.
Connecting External Video Sources CONNECTING A COMPONENT SOURCE WITH HDMI OR DVI CAPABILITY TO HDMI 1, HDMI 2 OR HDMI FRONT First time use 1. Connect the HDMI or DVI to HDMI connection cable from the output of the HDTV set top box or DVD player to the HDMI input as shown on the Rear panel below. 2. With DVI output, connect the cable from the AUDIO OUT R of the HDTV set top box or DVD player to the INPUT (AUDIO/R) jack as shown on the Rear Panel below. 3.
Connecting External Audio/Video Devices CONNECTING A COMPONENT AND STEREO AUDIO SOURCE TO INPUT 2 or 3:Y-PBPR. Connect the cable from the Y OUT of the Laserdisc/DVD player or HDTV set top box to the INPUT (Y) jack, as shown on the Rear panel below. 2. Connect the cable from the PB/CB OUT or BY OUT of the Laserdisc/DVD player or HDTV set top box to the INPUT (PB) jack. 3. Connect the cable from the PR/CR OUT or RY OUT of the Laserdisc/DVD player or HDTV set top box to the INPUT (PR) jack. 4.
Connecting External Audio/Video Devices CONNECTING A VIDEO AND MONAURAL AUDIO SOURCE TO INPUT 1 ~ FRONT INPUT CABLE or Air signal First time use 1. Connect the cable from the VIDEO OUT of the VCR or the laserdisc player to the INPUT (VIDEO) jack, as shown on the Rear Panel on the right. 2. Connect the cable from the AUDIO OUT of the VCR or the laserdisc player to the INPUT (MONO)/L(AUDIO) jack. 3.
The Remote Control In addition to controlling all the functions on your HITACHI Plasma TV, the new remote control is designed to operate different types of VCRs, CATV (Cable TV) converters, set-top-box, satellite receiver, DVD players, and other audio/video equipment with one touch. Basic operation keys are grouped together in one area. To operate your Plasma TV, select TV by pressing the Source button of the Source Select on the remote.
How to Use the Remote to Control Your TV 쐃 POWER button Press this button to turn the TV set on or off when the remote is in TV mode. (See page 23 for instructions on how to set the remote control to TV mode). 쐃 쐇 쐋 쐏 The Remote Control 19 쐄 쐆 쐂 쐊 쐎 쐈 쐉 쐅 씋 씈 씉 씊 씋 씊 씌 씋 18 쐇 MODE Indicator Turns on or blinks three times to show remote control mode. 쐋 SOURCE SELECT button Press this button to select remote control mode. 쐏 PAUSE button Press the PAUSE button to freeze the picture.
How to Use the Remote to Control Your TV 쐂 ASPECT button Press this button to quickly change the picture format ASPECT ratio. Depending on the input signal format received, the picture format ratio allows you to adjust the images through the following options. 4:3 STANDARD Use this aspect mode to display conventional (4:3) images. Side panels (gray areas) are placed to the left and right of the image to preserve the original aspect ratio of the source.
How to Use the Remote to Control Your TV 쐆 MENU button The MENU button will start the On-Screen Display. 쐊 EXIT button This button will exit all On-Screen Displays. The Remote Control 쐎 INPUTS button When the remote control is in TV mode, press this button to access the INPUTS menu. Use the CURSOR and SELECT buttons to scroll and select the inputs that are being used. Pressing the INPUTS button repeatedly will also cycle through the Inputs menu items. Then press the SELECT button to select.
How to Use the Remote to Control Your TV PHOTO INPUT This feature is useful for viewing digital still pictures from your digital camera, MMC/SD memory cards using the Photo Input in the front panel of the TV. 1. Press the INPUTS button to cycle through the INPUTS selections until the PHOTO INPUT is selected. Press the SELECT button or CURSOR PAD . HDMI 1 HDMI-Front Photo Input Air / Cable Input 1 SEL Sel. Move Press the CURSOR PAD or to access the next or previous photo. Next 3.
How to Use the Remote to Control Your TV ROTATE Select this menu item to rotate selected photos either clockwise (CURSOR PAD ) and counterclockwise (CURSOR PAD ). Rotate The Remote Control SLIDESHOW Select this menu item to start a slideshow of the digital photos. While the Interval sub menu is highlighted, press the SELECT button to cycle through the interval time from 5, 10 and 30 seconds. Press the SELECT button to stop on a chosen picture of the slideshow.
How to Use the Remote to Control Your TV 씊 VOLUME (VOL), MUTE button Press the VOLUME button ( or ) until you obtain the desired sound level. Press the FAV CH button to switch to Favorite (FAV) channel mode. You will know you are in Favorite Channel mode when (FAV) is displayed and the displayed channel is GREEN. Press it again to return to your regular tuned channels.
Picture-In-Picture (PIP) Your HITACHI Plasma TV incorporates one Tuner technology designed for improved viewing enjoyment. This feature allows you to view Digital Channels and Video inputs on both the main picture and sub picture simultaneously, with separate control. Analog channels cannot be viewed in PIP mode. Please see table below for PIP availability. CABLE or Air signal To select between main picture and PIP sub picture, use the CURSOR PAD button the remote.
Picture-In-Picture (PIP) 햳 PAUSE button Press the PAUSE button repeatedly to toggle between FREEZE modes (Main Freeze, SPLIT and STROBE). This is convenient when trying to write down the address for a mail order company, recording statistics for a sporting event, etc. To return the picture to motion, press the EXIT button. 햳 Freeze The Remote Control Freeze SPLIT FREEZE Press the PAUSE button to freeze the picture you are currently viewing (only the right sub-picture will freeze).
The Remote Control for Cable Box Functions OPERATING THE PRECODED FUNCTION FOR YOUR CABLE BOX. 햲 This remote is designed to operate different types of cable boxes. You must first program the remote to match the remote system of your cable box (refer to pages 37-38 for pre-codes). The Remote Control 1. Turn ON your cable box. 햳 햳 햲 햲 2. To switch to Cable (CBL) pre-coded mode, use the SOURCE SELECT button on the remote control to position the LED light to the corresponding selection SAT/CBL.
The Remote Control for Set-Top-Box/Satellite Receiver Functions OPERATING THE PRECODED FUNCTION FOR YOUR SET-TOP-BOX/SATELLITE RECEIVER. 햲 This remote is designed to operate different types of set-top-box/satellite systems. You must first program the remote to match the remote system of your settop-box/satellite systems (refer to pages 37-38 for precodes). 햳 햳 1. Turn ON your set-top-box/satellite systems. 3. 4.
The Remote Control for DVD Functions OPERATING THE PRECODED FUNCTION FOR YOUR DVD PLAYER. 햲 This remote is designed to operate different types of DVD players. You must first program the remote to match the remote system of your DVD player (refer to pages 37-38 for pre-codes). 햲 The Remote Control 햳 1. Turn ON your DVD player. 햲 햳 2. 햳 햳 To switch to DVD pre-coded mode, use the SOURCE SELECT button on the remote control to position the LED light to the corresponding selection DVD. 3.
The Remote for VCR/PVR Functions OPERATING THE PRECODED FUNCTION FOR YOUR VCR/PVR (Personal Video Recorder). 햲 This remote is designed to operate different types of VCRs/PVRs. You must first program the remote to match the remote system of your VCR/PVR (refer to pages 37-38 for pre-codes). 햲 햳 1. Turn ON your VCR/PVR. 3. Hold down the SOURCE SELECT button on the remote and enter the four digit preset code that matches your VCR/PVR, as shown on pages 37-38. Release the SOURCE SELECT button.
How to Use the SOURCE SELECT Button INPUT ACCESS This optional feature allows the user of the remote control to setup it’s SOURCE SELECT button to access the specified input of the TV. Setup for this feature is applicable to the remote control’s normal mode only and only applies to the DVD, PVR/VCR and SAT/CBL modes. 1. Select the desired device mode (DVD, PVR/VCR, SAT/CBL) by using your SOURCE SELECT button to position the LED indicator to the corresponding selection.
Remote Control Codes Cable BRAND Codes ABC ........................ 0003,0008,0011 Americast ................ 0899 Amino ...................... 1602 Bell South ............... 0899 Clearmaster ............ 0883 ClearMax ................ 0883 Coolmax ................. 0883 Digeo ...................... 1187 Director ................... 0476 General Instrument.. 0476,0810,0276,0003, 0011 GoldStar................... 0144 Hamlin ..................... 0009,0273 Hitachi ..................... 0011,1421 i3 Micro ..
Remote Control Codes DBS/PVR Combo BRAND Codes Hughes Network Systems 0739 Philips Samsung 0739 PVR BRAND ABS Alienware CyberPower Dell DirecTV Gateway Hewlett Packard Howard Computers HP 0739 Codes The Remote Control DVD BRAND Accurian Advent Aiwa Akai Alco Allegro Amphion Media Works AMW Apex Digital 0739 1972 1972 1972 1972 0739 1972 1972 1972 1972 1972 1972 1972 1972 0616 0618,0739 0880 Go Vision GoldStar GPX Greenhill Harman/Kardon Hitachi Hiteker iLo Initial Insignia Integra JBL Jensen JSI
On-Screen Display 1. Press MENU on the remote control to display the different features on your HITACHI Plasma TV. 2. Use the CURSOR PAD (buttons , , and ) and highlight a different feature of the On-Screen Display menu. Press the SELECT button to select. 3. Press EXIT on the remote control to quickly exit from a menu. This part of the screen shows which selections are available.
On-Screen Display Video Picture Mode Contrast Brightness Color Tint Sharpness Color Temperature Black Enhancement Contrast Mode Noise Reduction Select between 3 pictures modes; Day Dynamic, Day Normal and Night. Adjust contrast. Adjust brightness. Adjust color. Adjust tint. Adjust sharpness. Set this to High for less intense color with more blue, set to Medium for natural color, set to Standard for standard colors. Enhance picture brightness in light scenes.
Video Video Video Audio Select VIDEO to adjust picture settings and improve picture quality. You can independently customize each of the Video Inputs to your preference to increase viewing performance and pleasure depending upon the video program being viewed. If RESET is selected, only the selected input will reset to initial conditions. Channel Manager Locks Timers Setup Move Picture Mode Use this function to choose from automatic picture settings to optimize your TV’s performance.
Video Color Temperature Set this to High for cooler color with more blue, set to Medium for more natural color, set to Standard for accurate color . Black Enhancement Use this function to enhance the shadow detail in dark scenes using the settings off, low, middle and high. NOTE: 1. If CONTRAST is selected, you are adjusting CONTRAST. The additional menu items BRIGHTNESS, COLOR, TINT, and SHARPNESS can be selected and adjusted in the same manner. 2.
Video Aspect Use this function to select the Picture Format Aspect Ratio. Auto Aspect Automatically adjust the Aspect Ratio depending on the input signal to fill the screen. Video Aspect OR Auto Aspect Mode Vertical Position Move SEL : : On 16:9 Standard1 0 Return Mode M anually select the Aspect Ratio. Vertical Position This function allows you to select when aspect style is either 4:3 EXPANDED/ZOOM1/ZOOM2 or 16:9 ZOOM. Vertical position can be changed with these modes.
Audio Audio Video Audio Channel Manager Select AUDIO to adjust the TV to your preference and to improve the sound quality. Locks Timers Setup 1. 2. 3. Press CURSOR PAD or to select menu item. Press CURSOR PAD or to adjust the function. Press EXIT to quit the MENU, or select AUDIO to return to the main menu. Move SEL Select Audio NOTE: If TREBLE is selected you are adjusting treble. The additional menu items BASS and BALANCE can be selected and adjusted in the same manner.
Audio Audio Source Multi-Channel Television Sound will allow you to select STEREO (a stereo broadcast), MONO (monaural sound) used when receiving a weak stereo broadcast or SECOND AUDIO PROG (SAP) which may be a secondary language, weather report, etc. Internal Speakers This function is useful when setting up the external speakers. ON TV as Center OFF Select this feature if using the internal speakers only. Select this feature when setting up external speakers from a separate stereo system.
Channel Manager Channel Manager Video Audio Select CHANNEL MANAGER to set your Antenna options, run Auto Channel Scan, Check Signal Meter and Set Channel List. Channel Manager Locks Timers Setup Move 1. SEL Select Press CURSOR PAD , buttons to highlight function. 2. Press the SELECT button or CURSOR PAD to select. Channel Manager Signal Meter OR Auto Channel Scan Channel List Move Signal Meter Select SIGNAL METER when using an indoor or outdoor antenna.
Channel Manager Channel List This function allows you to review which channels are labeled (ID), which have been added to CHANNEL MEMORY (SCAN), which are protected by LOCK and which are your FAVORITE (FAV) CHANNELS. 1. Channel Manager Signal Meter Auto Channel Scan Channel List Move SEL Select Use the CURSOR PAD to navigate the Channel List. 2. Press the SELECT button to select ON or OFF on the SCAN and LOCK columns. 3. To select LOCK column, input the access code. (Default access code: 0000) 4.
Locks Locks Video Audio This function will block out the picture and sound of the selected channel or video input. Channel Manager Locks Timers Setup Move SEL Select The code to enter the Locks feature is a four digit access code number. The factory preset code is 0000. Use the NUMBER buttons to enter the access code. 1. 2. Use the CURSOR PAD , to highlight the desired function in the LOCKS menu. OR Please Enter Access Code Press the SELECT button to select.
Locks Movie Ratings Use Movie Ratings to prevent viewing of any movie that you feel may be inappropriate due to its content. Locks Change Access Code Engage Lock Movie Ratings TV Ratings Canadian Ratings (Eng) 1. Use the CURSOR PAD , to select the MOVIE RATING category that you want to block. 2. Canadian Ratings (Frn) Region 5 Move Press SELECT to block the MOVIE RATING that you have selected.
Locks TV Ratings Use TV RATINGS to prevent the viewing of any TV program that you feel may be inappropriate due to its content. Locks Change Access Code Engage Lock Movie Ratings TV Ratings Canadian Ratings (Eng) Canadian Ratings (Frn) 1. Use the CURSOR PAD , to select the TV RATING category that you want to block. 2. Region 5 Move SEL Select Press SELECT to block the TV RATING that you have selected. Locks TV Ratings 3.
Locks Canadian Ratings (Eng) Use CANADIAN RATINGS (ENG) to block any type of movie and television program in Canada that you feel might be inappropriate in its content. Locks Change Access Code Engage Lock Movie Ratings TV Ratings Canadian Ratings (Eng) 1. 2. 3. Use the CURSOR PAD , to select the CANADIAN RATINGS (ENG) category that you want to block. Press SELECT to block the CANADIAN RATINGS (ENG) that you have selected.
Locks Canadian Ratings (Frn) Use CANADIAN RATINGS (FRN) to block Canadian French programs according to various program ratings that you feel might be inappropriate in its content. Locks Change Access Code Engage Lock Movie Ratings TV Ratings Canadian Ratings (Eng) 1. 2. 3. Use the CURSOR PAD , to select the CANADIAN RATINGS (FRN) category that you want to block. Press SELECT to block the CANADIAN RATINGS (FRN) that you have selected.
Locks Region 5 Use Region 5 Ratings to prevent viewing of any movie or program that you feel may be inappropriate due to its content. This feature will operate only for ATSC Digital Signal. In order to set the Region 5 Ratings the ATSC Digital channel received must include Region 5 Ratings data To see if the channel has Region 5 Ratings, press the INFO key on the R/C. See fig. (1) for reference. Once the TV has received Region 5 Ratings data, the Region 5 option in the lock menu will display the data table.
Timers Timers Video Audio Channel Manager Select TIMERS to set your Clock, Sleep Timer, Event Timer and Day/Night Timer. Locks Timers Setup 1. Use the CURSOR buttons or to highlight the function to be adjusted. 2. Press the SELECT button to select. Set The Clock The Clock must be adjusted before you can use the SET EVENT TIMER or DAY/NIGHT TIMER feature.
Timers Set Sleep Timer Select this feature to set your SLEEP TIMER from 30 minutes to 3 hours (30 minute increments). 1. Timers Press the CURSOR PAD repeatedly to set your Timer from 0:00, 0:30, 1:00, 1:30, 2:00, 2:30 and 3:00. Set The Clock 10 : 25 AM PST Set Sleep Timer 0:00 Set Day/Night Timer Not Set Set Event Timer Not Set Move SEL Select NOTE: The Sleep Timer info will show for 1 minute before the TV turns off.
Timers Set Event Timer This function will automatically operate the Plasma TV viewing reservation of a program. If the clock is not set, you can not use this function and the screen at right will appear. The message on the screen will disappear after 3 seconds, then the screen automatically goes to the clock setup mode (see page 54). 1. 2. 4. Use the CURSOR PAD , or to highlight and select FINISH TIME HOUR/MINUTE. 5. Use the CURSOR PAD , or to highlight and select FINISH TIME AM/PM. 8. 9.
Setup Setup Video Audio Channel Manager Select SETUP when setting your TV up for the first time. Locks Timers Setup 1. Use the CURSOR PAD or to select the sub-menu of your choice. 2. Press the SELECT button to select. Move SEL Select Setup Setup The Menu Options OR Set The Screen Saver Set The Inputs Set The Closed Captions Set The Quick Start Options Reset The Software Move Set The Menu Options Setup the Language and background of the Menu OSD.
Setup Set The Menu Background This function allows you to choose from two menu backgrounds. 1. Setup Setup The Menu Options Set The Language : Set The Menu Background : Use the CURSOR PAD or to highlight SET THE MENU BACKGROUND (SHADED OR SOLID) of your choice. Use the CURSOR PAD or to select shaded or solid. Move SEL English Shaded Return 2. Select SOLID for a black background (no picture can be seen behind menu screen), select SHADED and a light background is visible. 3.
Setup Set The Inputs Use this feature to give a name to any of the video inputs. Setup Setup The Menu Options Set The Screen Saver 1. Set The Inputs Press the CURSOR PAD , to highlight the video inputs. Set The Closed Captions Set The Quick Start Options Reset The Software 2. Press the CURSOR PAD , to select your choices. Move Select SEL Note: The inputs labeled Gray out (Skip) or Hide (Skip) are disabled in the INPUTS selection.
Setup Set The Closed Captions Closed Captions are the dialogue, narration, and/or sound effects of a television program or home video which are displayed on the TV screen. Your local TV program guide denotes these programs as or . Setup Setup The Menu Options Set The Screen Saver Set The Inputs Set The Closed Captions Set The Quick Start Options 1. Use the CURSOR PAD , , and to highlight and select the function to change. 2.
Setup Set The Quick Start Options This feature will select QUICK START UP options. Set this feature to ON to have the TV tune channels (both Analog and Digital) quickly when first turning the TV on. Set this feature to OFF to save electricity. Selecting ON for the QUICK START UP feature will activate the TV tuners circuits when the TV is in “standby mode” which is commonly referred to as “off”. This will allow you to quickly tune to channels when first turning the TV on.
Equipment Care and Troubleshooting DO DO NOT Dust the screen and cabinet with a soft cloth. Do not clean your screen with strong cleaners, polishes or a chemically treated cloth. Clean the screen with a soft cloth moistened in warm water and dry with a soft cloth. A mild soap may be used if the screen is extremely dirty. Place your Plasma Television away from extreme heat, humidity, and extremely dusty places.
Reception Problems IGNITION NOISE: Black spots or horizontal streaks may appear, picture may flutter or drift. Usually caused by interference from automobile ignition systems, neon lamps, electrical drills, and other electrical appliances. GHOSTS: Ghosts are caused by the television signal following two paths. One is the direct path and the other is reflected from tall buildings, hills or some other objects. Changing the direction or position of the antenna may improve reception.
Troubleshooting 1. Plasma Television Troubleshooting No. 1 2 3 Useful Information 4 64 Items Notes Buzzing sound from Plasma A buzzing sound may be heard when the plasma television is turned on in a very quiet room. This is due to the plasma panel drive circuit when it is functioning. The buzzing display panel. sound is normal and is not a malfunction.
Useful Info AGENCY REGULATORY INFORMATION Federal Communications Commission Notice This equipment has been tested and found to comply with the limits for a Class B digital device, pursuant to Part 15 of the FCC Rules. These limits are designed to provide reasonable protection against harmful interference in a residential installation.
Features and Specifications Features: • • • • • • • • • • • New Easy-to-Use On-Screen Menu Control (3 Language) Region 5 (Downloadable V-Chip) Preprogrammed Remote Control Power Management: ON/OFF via signal detection Picture Enhancement Input Signal Identification HDMI (High Definition Multimedia Interface)(High Bandwidth Digital Content Protection V1.
Set Dimensions 42 Inch Models (Includes Table Top Stand) Weight (lbs./kg): 80.4/36.5 Useful Information Rear View, Use as Reference for Wall Mount Bracket C A B Inches 42 2-3/4 2-3/4 mm 1067.00 70.5 70.5 Units D E F G H I J K 30-21/32 28-1/16 21-31/32 17-31/32 15-11/32 36-7/16 20-23/32 4-23/32 779.15 713.00 558.32 456.15 390.00 926 526.60 119.50 L 3-9/16 90.80 M 1-1/8 28.70 N O P Q R S T 15-9/32 8-19/32 24-13/16 8-19/32 9-7/8 12-1/8 6-1/16 388.38 251.00 308.
Set Dimensions Useful Information 50 Inch Models (Includes Table Top Stand) Weight (lbs./kg): 116.7/53 Rear View, Use as Reference for Wall Mount Bracket Units Inches mm 68 A B C D E F G H I J K L M N O P Q R S T 12 24-13/16 12 11-3/4 12-1/8 8-7/16 305.00 298.00 308.00 214.50 48-13/16 2-9/16 2-9/16 34-11/16 32-5/16 27-17/32 19-29/32 17-17/32 43-23/32 24-13/16 5-1/2 3-25/32 1-1/4 16-5/8 1240 65.00 880.85 96.00 31.50 422.08 65.00 820.50 699.12 505.85 445.
Set Dimensions 55 Inch Models (Not Includes Table Top Stand) Weight (lbs./kg): 133.3/60.5 Useful Information Rear View, Use as Reference for Wall Mount Bracket A B C Inches 55-1/2 3-15/32 mm 1410.00 88.00 Units D E 3-15/32 35-5/8 19-3/16 88.00 904.50 F G 48-19/32 27-1/4 485.50 1234.00 692.00 H I J 5-1/32 3-25/32 1-1/4 127.50 96.00 31.50 K L M N 15-11/32 24-13/16 15-11/32 4-15/16 390.00 630.00 390.00 125.
Hitachi Service Hotline To locate an authorized HITACHI service facility in the continental U.S.A. and Canada, DIAL TOLL FREE 7 days a week, 24 hours a day 1-800-HITACHI (1-800-448-2244) Useful Information HITACHI AMERICA, LTD. HOME ELECTRONICS DIVISION HITACHI CANADA, LTD. HITACHI has made every effort to assure you hours of trouble free operation from your unit.
Service Information When you call HITACHI SERVICE HOTLINE they will require some information related to the TV MODEL NAME and SERIAL # in order to give you the proper support. This information is located on the back of the TV and also on the RIGHT SIDE of your TV set. Please follow the next steps to find this information and then provide to SERVICE. 쐃 Look on the right side of the TV. 쐇 Locate the LABEL where it shows the information related to MODEL NAME and SERIAL #.
Notes Service Hotline 72
End User License Agreement for HITACHI DTV Software END USER LICENSE AGREEMENT FOR HITACHI DTV SOFTWARE IMPORTANT – READ CAREFULLY: This End User License Agreement for HITACHI DTV Software (this “Agreement”) is a legal agreement between you (“you” or “your”), in your capacity as the owner of a HITACHI brand digital television (the “DTV”), and HITACHI America, Ltd., Home Electronics Division ("HITACHI").
End User License Agreement for Operating System Software OPERATING SYSTEM LICENSE INFORMATION This HITACHI TV incorporates certain open source operating system software distributed under the GNU GENERAL PUBLIC LICENSE Version 2 and GNU LESSER GENERAL PUBLIC LICENSE Version 2.1 as defined by the Free Software Foundation, Inc. The operating system software incorporated in this Hitachi TV is shown in the table below and the applicable license(s) are detailed on the following pages of this Owner’s Guide.
End User License Agreement for Operating System Software GNU GENERAL PUBLIC LICENSE Version 2, June 1991 Copyright © 1989, 1991 Free Software Foundation, Inc. 51 Franklin St, Fifth Floor, Boston, MA 02110-1301 USA Everyone is permited to copy and distribute verbatim copies of this lincense document, but changing is not allowed. Preamble The licenses for most software are designed to take away your freedom to share and change it.
End User License Agreement for Operating System Software In addition, mere aggregation of another work not based on the Program with the Program (or with a work based on the Program) on a volume of a storage or distribution medium does not bring the other work under the scope of this License. 3.
End User License Agreement for Operating System Software TO, THE IMPLIED WARRANTIES OF MERCHANTABILITY AND FITNESS FOR A PARTICULAR PURPOSE. THE ENTIRE RISK AS TO THE QUALITY AND PERFORMANCE OF THE PROGRAM IS WITH YOU. SHOULD THE PROGRAM PROVE DEFECTIVE, YOU ASSUME THE COST OF ALL NECESSARY SERVICING, REPAIR OR CORRECTION. 12.
End User License Agreement for Operating System Software GNU LESSER GENERAL PUBLIC LICENSE Version 2.1, February 1999 Copyright © 1991, 1999 Free Software Foundation, Inc. 51 Franklin St, Fifth Floor, Boston, MA 02110-1301 USA Everyone is permitted to copy and distribute verbatim copies of this license document, but changing it is not allowed. [This is the ¿UVW released version of the Lesser GPL. It also counts as the successor of the GNU Library Public License, version 2, hence the version number 2.1.
End User License Agreement for Operating System Software straightforwardly into another language. (Hereinafter, translation LV LQFOXGHG ZLWKRXW OLPLWDWLRQ LQ WKH WHUP PRGL¿FDWLRQ to exercise the right to control the distribution of derivative or collective works based on the Library. "Source code" for a work means the preferred form of the work for making PRGL¿FDWLRQV to it.
End User License Agreement for Operating System Software a work containing portions of the Library, and distribute that work under terms of your choice, provided that the terms permit PRGL¿FDtion of the work for the customer's own use and reverse HQJLQHHULQJ IRU GHEXJJLQJ VXFK PRGL¿FDWLRQV You must give prominent notice with each copy of the work that the Library is used in it and that the Library and its use are covered by this /LFHQVH You must supply a copy of this /LFHQVH If the work during execution
End User License Agreement for Operating System Software or among countries not thus excluded. In such case, this License incorporates the limitation as if written in the body of this License. 13. The Free Software Foundation may publish revised and/or new versions of the Lesser General Public License from time to time. Such new versions will be similar in spirit to the present version, but may differ in detail to address new problems or concerns. Each version is given a distinguishing version number.
Appendixes Appendix A: Picture Format for Each Input Source Aspect Specifications 웎 : Un-selectable Yes : Selectable Input Auto Aspect Aspect Signal Aspect Video ID 16:9 Standard 1 16:9 Standard 2 16:9 Zoom 4:3 Standard 4:3 Expanded 4:3 Zoom 1 4:3 Zoom 2 Yes Yes Yes Yes ANT Analog Video NTSC 웎 4x3 Yes 웎 Yes ANT YC B C R 480p 웎 16x9 Yes 웎 Yes 웎 Yes 웎 웎 480i 웎 4x3 웎 웎 웎 Yes Yes Yes Yes 웎 Digital Input 1 YP B P R 1080i/720p 웎 16x9 Yes Yes Yes 웎 Yes 웎
Appendixes Appendix A: Aspect Specifications (Continuation) HDMI 1 Input Auto As pect As pect S ignal As pect V ideo ID 16:9 Standard 1 16:9 Standard 2 16:9 Zoom 4:3 Standard 4:3 Ex panded 4:3 Zoom 1 4:3 Zoom 2 1080p/ 1080i/720p 웎 16x9 Ye s Y es Y es 웎 Ye s 웎 웎 480p Auto ON 16x 9 Y es Initial 웎 Ye s 웎 웎 웎 웎 Letter 웎 웎 웎 Ye s Ye s Y es Initial Y es 4x3 웎 웎 웎 Ye s Y es Initial Ye s Ye s No Info Y es 웎 Ye s Y es Ye s Ye s Y es 웎 Ye s 웎 웎 HDMI (DV
Index TV Ratings (Canadian - French) . . . . . . . . .52 Region 5 (Downloadable VChip) . . . . . . . .53 A Accessories, . . . . . . . . . . . . . . . . . . . . . . . . . .4 Antennas (Connecting), . . . . . . . . . . . . . . . . .9 Aspect Ratio, . . . . . . . . . . . . . . . . . . . . .25, 43 Audio Bass Boost . . . . . . . . . . . . . . . . . . . . . . . .44 Audio Settings . . . . . . . . . . . . . . . . . . . . . . .44 Audio Source . . . . . . . . . . . . . . . . . . . . . . . .45 Auto Noise Cancel . . . .
Notes 156
Notes 157
QR70203