Projector CP-X251 User's Manual – Operating Guide Thank you for purchasing this projector. WARNING ŹBefore using this product, please read the "User's Manual Safety Guide" and related manuals to ensure the proper use of this product. After reading them, store them in a safe place for future reference. About this manual Various symbols are used in this manual. The meanings of these symbols are described below.
Content Content About this manual. . . . . . . . . . 1 Content . . . . . . . . . . . . . . . . . . 2 Projector features. . . . . . . . . . 3 Preparations . . . . . . . . . . . . . . 3 About contents of package . . . . . . . .3 Fastening the lens cover . . . . . . . . . .3 Part names . . . . . . . . . . . . . . . 4 Projector . . . . . . . . . . . . . . . . . . . . . .4 Control buttons . . . . . . . . . . . . . . . . .6 Remote control . . . . . . . . . . . . . . . . .6 Setting up . . . . . . . . . . . . .
Projector features / Preparations Projector features This projector is used to project various computer signals as well as NTSC/PAL/ SECAM, Component (SD, HD) video signals onto a screen. It requires just a little space for installation and gets a large image from short distance. High Brightness Newly developed 200W UHB (Ultra High Brightness) lamp gives you a higher brightness image on a screen. The image can be still kept as bright and clean enough for use in bright rooms.
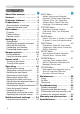
Part names Part names Projector Ì Control buttons ( 6) Lamp cover ( 51) (Lamp unit is inside.) Remote sensor ( 16) Speaker Zoom ring ( 19) Security bar ( 10) (Use for attaching a commercial anti-theft chain or wire.) Focus ring ( 19) Vent ( 7) Elevator button ( 9) Lens ( 17) Front-Right side Elevator foot ( 9) Lens cover ( 3) Filter cover ( 52) $LU ¿OWHU DQG LQWDNH YHQW are inside.
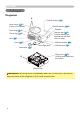
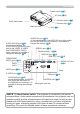
Part names Power switch ( 17) AC inlet ( 14) Elevator button ( 9) Ports (See below.) Elevator foot ( 9) Rear-Left side AUDIO IN3 L/R port ( 13) (In the default setting, the AUDIO IN3 L/R port is the audio port for the VIDEO, S-VIDEO and COMPONENT VIDEO ports, however it is possible to change the settings.
Part names Control buttons LAMP indicator ( 56, 57) TEMP indicator ( 56, 57) Cursor buttons Ÿ ź Ż Ź 24) POWER indicator ( 17) STANDBY/ON button ( 17) INPUT button ( 18) Remote control SEARCH button ( 19) STANDBY/ON button ( 17) RGB button ( 18) VIDEO RGB AUTO button ( 20) SEARCH VIDEO button ( 19) AUTO BLANK HOME PAGE UP VOLUME END PAGE DOWN MUTE ASPECT ASPECT button ( 19) HOME button ( 23) MAGNIFY ON button ( 21) OFF button ( 21) MAGNIFY ON PAGE UP button ( 23) VOLUME button ( 18)
Setting up Setting up WARNING ŹPlace the projector in a stable position horizontally. A fall or a turnover could cause an injury and/or damage to the projector. Then using GDPDJHG SURMHFWRU FRXOG UHVXOW LQ D ¿UH DQG RU DQ HOHFWULF VKRFN • Do not place the projector on an unstable, slant or vibrant surface such as a wobbly or inclined stand.
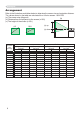
Setting up Arrangement Refer to the illustrations and tables below to determine the screen size and projection distance. The values shown in the table are calculated for a full size screen: 1024×768 (a) The screen size (diagonal) (b) (b) Distance from the projector to the screen (±10%) (c) The height of the screen (±10%) 4:3 (a) (c) up 16:9 (a) (c) down (a) Screen size [inch (m)] 4 : 3 screen (b) Projection distance (c) Screen height [m (inch)] [cm (inch)] min. max.
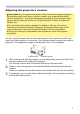
Setting up Adjusting the projector's elevator CAUTION Ź,I \RX SUHVV WKH HOHYDWRU EXWWRQ ZLWKRXW KROGLQJ WKH SURMHFWRU WKH SURMHFWRU PLJKW FUDVK GRZQ RYHUWXUQ VPDVK \RXU ¿QJHUV DQG SRVVLEO\ result in malfunction. To prevent damaging the projector and injuring yourself, always hold the projector whenever using the elevator buttons to adjust the elevator feet. ŹDo not incline the projector rightward or leftward. Also do not incline it backward or forward exceeding 30 degrees.
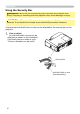
Setting up Using the Security Bar WARNING Ź'R QRW XVH WKH VHFXULW\ EDU WR SUHYHQW WKH SURMHFWRU IURP falling. Dropping or knocking over the projector may cause damage or injury. CAUTION Ź7KH VHFXULW\ EDU LV QRW D FRPSUHKHQVLYH WKHIW SUHYHQWLRQ measure. It is intended to be used as an extra theft prevention measure. A commercial anti-theft chain or wire can be attached to the security bar on the projector. to attach 1. How An anti-theft chain or wire can be attached as shown in the illustration.
Setting up Connecting your devices CAUTION Ź7XUQ RII DOO GHYLFHV SULRU WR FRQQHFWLQJ WKHP WR WKH SURMHFWRU Attempting to connect a live device to the projector may generate extremely loud noises or other abnormalities that may result in malfunction and/or damage to the device and/or projector. Ź8VH WKH DFFHVVRU\ FDEOH RU D GHVLJQDWHG W\SH FDEOH IRU WKH FRQQHFWLRQ Some cables have to be used with core set. A too long cable may cause a certain picture degradation.
Setting up Examples of connection with a computer * In the default setting, the AUDIO IN1 port is the audio port for the RGB IN1, and the AUDIO IN2 port is the audio port for the RGB IN2 ports. To change the settings, refer to the AUDIO item in the SETUP menu.
Setting up Examples of connection with a VCR/DVD player * In the default setting, the AUDIO IN3 L/R port is the audio port for the VIDEO, S-VIDEO and COMPONENT VIDEO ports. To change the settings, refer to the AUDIO item in the SETUP menu.
Setting up Connecting power supply WARNING ŹPlease use extra caution when connecting the power cord, as LQFRUUHFW RU IDXOW\ FRQQHFWLRQV PD\ UHVXOW LQ ¿UH DQG RU HOHFWULFDO VKRFN • Only use the power cord that came with the projector. If it is damaged, contact your dealer to newly get correct one. • Only plug the power cord into an outlet rated for use with the power cord's VSHFL¿HG YROWDJH UDQJH • Never modify the power cord. Never attempt to defeat the ground connection of the three-pronged plug.
Remote control Remote control Putting batteries WARNING ŹAlways handle the batteries with care and use them only as directed. Battery may explode if mistreated. Do not recharge, disassemble or GLVSRVH RI LQ ¿UH And also improper use may result in cracking or leakage, which could result in ¿UH LQMXU\ DQG RU SROOXWLRQ RI WKH VXUURXQGLQJ HQYLURQPHQW • %H VXUH WR XVH RQO\ WKH EDWWHULHV VSHFL¿HG 'R QRW XVH EDWWHULHV RI GLIIHUHQW types at the same time. Do not mix a new battery with used one.
Remote control Using the remote control CAUTION ŹBe careful in handling the remote control. • Do not drop or expose the remote control to physical impact. • Do not get the remote control wet or place it on wet objects. It may result in malfunction. • Remove the batteries from the remote control and store them in a safe place if you won’t be using the remote control for an extended period. • Replace the batteries whenever the remote control starts malfunctioning.
Power on/off Power on/off WARNING ŹWhen the power is on, a strong light is emitted. Do not look into the lens of projector. Also do not peep at the inside of projector through a hole. NOTE • Turn the power on/off in right order. Please power on the projector prior to the connected devices. Power off the projector later than the connected devices. Turning on the power 1. 0DNH VXUH WKDW WKH SRZHU FRUG LV ¿UPO\ DQG correctly connected to the projector and the outlet.
Operating Operating Adjusting the volume the VOLUME button on the remote control. 1. Press A dialog will appear on the screen to aid you in adjusting the volume. 2. 8VH WKH FXUVRU EXWWRQV Ÿ ź WR DGMXVW WKH YROXPH To close the dialog and complete the operation, press the VIDEO MAGNIFY ON 1. Press the MUTE button on the remote control. A dialog will appear on the screen indicating that you have muted the sound. To restore the sound, press the MUTE or VOLUME button.
Operating Selecting an input signal (continued) the VIDEO button on the remote control to select an 1. Press input for video signal. Each time you press the button, the projector switches its video input port as below.
Operating Using the automatic adjustment feature 1. Press the AUTO button on the remote control. VIDEO RGB SEARCH For an RGB signal The vertical position, the horizontal position, the horizontal phase and the horizontal size will be automatically adjusted. And the aspect ratio will be automatically set to default. Make sure that the application window is set to its maximum size prior to attempting to use this feature. A dark picture may still be incorrectly adjusted.
Operating Correcting the keystone distortions the KEYSTONE button on the 1. Press remote control. A dialog will appear on the MAGNIFY ON -';5610' #761 ':'%76' /#07#. OFF HOME PAGE UP VOLUME END PAGE DOWN MUTE screen to aid you in correcting the distortion. 8VH WKH FXUVRU EXWWRQV Ÿ ź WR VHOHFW $872 RU 0$18$/ RSHUDWLRQ DQG SUHVV WKH EXWWRQ Ź WR perform the following. 1) AUTO executes automatic vertical keystone correction.
Operating Freezing the screen the FREEZE button on the remote control. 1. Press The “FREEZE” indication will appear on the screen, and the MAGNIFY ON OFF HOME PAGE UP VOLUME END PAGE DOWN MUTE projector will enter the FREEZE mode. To exit the FREEZE mode and restore the screen to normal, press the FREEZE button again.
Operating Operating the computer screen CAUTION Ź0LVWDNHQ XVH RI WKH PRXVH NH\ERDUG FRQWURO FRXOG GDPDJH your equipment. • While using this function, please connect only with a computer. • Before connecting, read the manuals of the computer you will connect. NOTE • It may not be possible to control notebook PC, and other computers with built-in pointing device (e.g. track ball), using this remote control.
Multifunctional settings Multifunctional settings Using the menu function This projector has the following menus: PICTURE, IMAGE, INPUT, SETUP, SCREEN, OPTION, and EASY MENU. EASY MENU consists of functions often used, and the RWKHU PHQXV DUH FODVVL¿HG LQWR HDFK SXUSRVH (DFK RI WKHVH PHQXV LV RSHUDWHG XVLQJ the same methods. The basic operations of these menus are as follows.
EASY Menu '#5; /'07 =4)$ ? EASY Menu With the EASY MENU, items shown in the table below can be performed. 6HOHFW DQ LWHP XVLQJ WKH FXUVRU EXWWRQV Ÿ ź RQ WKH projector or remote control. Then perform it referring to the following table. Item ASPECT #52'%6 #761 -';5610' ':'%76' -';5610' 014/#. 2+%674' /1&' $4+)*60'55 %1064#56 %1.14 6+06 5*#420'55 014/#. 9*+52'4 014/#. /+4414 4'5'6 J (+.6'4 6+/' '0).+5* .
EASY Menu EASY Menu (continued) Item Description CONTRAST 8VLQJ WKH EXWWRQV Ż Ź DGMXVWV WKH FRQWUDVW See the item CONTRAST of section PICTURE menu ( 27). COLOR 8VLQJ WKH EXWWRQV Ż Ź DGMXVWV WKH VWUHQJWK RI ZKROH FRORU See the COLOR item in the PICTURE menu ( 28). TINT SHARPNESS WHISPER MIRROR RESET 8VLQJ WKH EXWWRQV Ż Ź DGMXVWV WKH WLQW See the TINT item in the PICTURE menu ( 28). 8VLQJ WKH EXWWRQV Ż Ź DGMXVWV WKH VKDUSQHVV See the SHARPNESS item in the PICTURE menu ( 28).
PICTURE Menu PICTURE Menu With the PICTURE menu, the items shown in the table below can be performed. 6HOHFW DQ LWHP XVLQJ WKH FXUVRU EXWWRQV Ÿ ź RQ WKH SURMHFWRU RU UHPRWH FRQWURO DQG SUHVV WKH FXUVRU EXWWRQ Ź on the projector or remote control, or the ENTER button on the remote control to execute the item. Then perform it referring to the following table. Item /'07 =4)$ ? 5'.'%6 $4+)*60'55 㧗 2+%674' +/#)' %1064#56 㧗 +0276 )#//# &'(#7.6 5'672 %1.
PICTURE Menu PICTURE Menu (continued) Item Description 8VLQJ WKH EXWWRQV Ÿ ź VZLWFKHV WKH PRGH RI FRORU WHPSHUDWXUH HIGH DEFAULT HIGH CUSTOM MID DEFAULT MID CUSTOM LOW DEFAULT LOW CUSTOM Hi-BRIGHT-1 DEFAULT Hi-BRIGHT-1 CUSTOM Hi-BRIGHT-2 DEFAULT Hi-BRIGHT-2 CUSTOM To adjust CUSTOM COLOR TEMP Selecting the CUSTOM and then pressing the ENTER : EXWWRQ Ź RU WKH (17(5 EXWWRQ displays a dialog OFFSET GAIN R G B R G B to aid you in adjusting the OFFSET and/or GAIN of the CUSTOM mode.
PICTURE Menu PICTURE Menu (continued) Item Description 6HOHFWLQJ D PRGH RI 0< 0(025< XVLQJ WKH EXWWRQV Ÿ ź DQG WKHQ SUHVVLQJ WKH EXWWRQ Ź RU WKH (17(5 EXWWRQ SHUIRUPV HDFK IXQFWLRQ LOAD1 Ù LOAD2 Ù LOAD3 Ù LOAD4 MY MEMORY SAVE4 ÙSAVE3 Ù SAVE2 Ù SAVE1 This projector has 4 numbered memories for adjustment data. Performing the LOAD1, LOAD2, LOAD3 or LOAD4 loads the data on the memory whose number corresponds to the command’s number, and adjusts the picture automatically depending on the data.
IMAGE Menu IMAGE Menu With the IMAGE menu, items shown in the table below can be performed. 6HOHFW DQ LWHP XVLQJ WKH FXUVRU EXWWRQV Ÿ ź RQ WKH SURMHFWRU RU UHPRWH FRQWURO DQG SUHVV WKH FXUVRU EXWWRQ Ź on the projector or remote control, or the ENTER button on the remote control to execute the item. Then perform it referring to the following table. Item /'07 =4)$ ? 5'.
IMAGE Menu IMAGE Menu (continued) Item H SIZE AUTO ADJUST EXECUTE Description 8VLQJ WKH EXWWRQV Ÿ ź DGMXVWV WKH KRUL]RQWDO VL]H Large Ù Small • This item can be selected only for an RGB signal. • When this adjustment is excessive, the picture may not be displayed correctly. In such a case, please reset the adjustment by pressing the RESET button on the remote control during this operation. Selecting this item performs the automatic adjustment feature.
INPUT Menu INPUT Menu With the INPUT menu, the items shown in the table below can be performed. 6HOHFW DQ LWHP XVLQJ WKH FXUVRU EXWWRQV Ÿ ź RQ WKH SURMHFWRU RU UHPRWH FRQWURO DQG SUHVV WKH FXUVRU EXWWRQ Ź on the projector or remote control, or the ENTER button on the remote control to execute the item. Then perform it referring to the following table. /'07 =4)$ ? 5'.'%6 2+%674' 241)4'55+8' 68 +/#)' 8+&'1 04 /+& %1.
INPUT Menu INPUT Menu (continued) Item Description COMPONENT 8VLQJ WKH EXWWRQV Ÿ ź VZLWFKHV WKH IXQFWLRQ RI &20321(17 VIDEO port. COMPONENT Ù SCART RGB When the SCART RGB is selected, the COMPONENT VIDEO port function as a port for a SCART RGB signal input and VIDEO port function as a port for SCART RGB sync input. A SCART adapter and SCART cable realize a SCART RGB input to the projector. For details, contact your dealer. VIDEO FORMAT Set the video format for the s-video port and video port.
INPUT Menu INPUT Menu (continued) Item Description The resolution for the RGB1 and RGB2 input signals can be set on this projector. ,Q WKH ,1387 PHQX VHOHFW 5(62/87,21 XVLQJ WKH Ÿ ź EXWWRQV DQG SUHVV WKH Ź EXWWRQ 4'51.76+10 The RESOLUTION menu will be displayed. (2) In the RESOLUTION menu select the UHVROXWLRQ \RX ZLVK WR GLVSOD\ XVLQJ WKH Ÿ ź buttons. Selecting AUTO will set a resolution appropriate to the input signal.
SETUP Menu SETUP Menu With the SETUP menu, the items shown in the table below can be performed. 6HOHFW DQ LWHP XVLQJ WKH FXUVRU EXWWRQV Ÿ ź RQ WKH SURMHFWRU RU UHPRWH FRQWURO DQG SUHVV WKH FXUVRU EXWWRQ Ź on the projector or remote control, or the ENTER button on the remote control to execute the item. Then perform it referring to the following table. /'07 =4)$ ? 2+%674' +/#)' +0276 5'672 5%4''0 126+10 '#5; /'07 5'.
SETUP Menu SETUP Menu (continued) Item Description 8VLQJ WKH EXWWRQV Ÿ ź VZLWFKHV WKH PRGH IRU PLUURU VWDWXV MIRROR NORMAL Ù H:INVERT Ù V:INVERT Ù + 9 ,19(57 If Transition Detector is TURN ON and MIRROR status is changed, Transition Detector Alarm ( 48) will be displayed when projector is restarted after the power switch is turned off. VOLUME AUDIO 36 8VLQJ WKH EXWWRQV Ÿ ź DGMXVWV WKH YROXPH High Ù Low #7&+1 Allocates the audio ports.
SCREEN Menu SCREEN Menu With the SCREEN menu, the items shown in the table below can be performed. 6HOHFW DQ LWHP XVLQJ WKH FXUVRU EXWWRQV Ÿ ź RQ WKH SURMHFWRU RU UHPRWH FRQWURO DQG SUHVV WKH FXUVRU EXWWRQ Ź on the projector or remote control, or the ENTER button on the remote control to execute the item. Then perform it referring to the following table. Item /'07 =4)$ ? 5'.'%6 2+%674' .#0)7#)' '0).+5* +/#)' /'07 215+6+10 $.#0- $.
SCREEN Menu SCREEN Menu (continued) Item Description 8VLQJ WKH EXWWRQV Ÿ ź VZLWFKHV WKH PRGH IRU WKH VWDUW XS VFUHHQ The start-up screen is a screen displayed when no signal or an unsuitable signal is detected. MyScreen Ù ORIGINAL Ù TURN OFF START UP MyScreen is a screen you can register as a desired screen.The ORIGINAL screen is the existing standard screen. When TURN OFF is selected, the BLACK screen is used.
SCREEN Menu SCREEN Menu (continued) Item Description MESSAGE 8VLQJ WKH EXWWRQV Ÿ ź WXUQV RQ RII WKH PHVVDJH IXQFWLRQ TURN ON Ù TURN OFF When the TURN ON is selected, the following message function works. “AUTO IN PROGRESS” while automatically adjusting ”NO INPUT IS DETECTED” ”SYNC IS OUT OF RANGE” "Searching….” while searching for the input ”Detecting….
OPTION Menu OPTION Menu With the OPTION menu, the items shown in the table below can be performed. 6HOHFW DQ LWHP XVLQJ WKH FXUVRU EXWWRQV Ÿ ź RQ WKH SURMHFWRU RU UHPRWH FRQWURO DQG SUHVV WKH FXUVRU EXWWRQ Ź RQ WKH SURMHFWRU or remote control, or the ENTER button on the remote control to execute the item, except for the items LAMP TIME and FILTER TIME. Then perform it referring to the following table. /'07 =4)$ ? 5'.
OPTION Menu OPTION Menu (continued) Item Description 8VLQJ WKH EXWWRQV Ÿ ź DGMXVWV WKH WLPH WR FRXQW GRZQ WR automatically turn the projector off. Long (max. 99 minutes) Ù Short (min. 0 minute = DISABLE) AUTO OFF AUTO OFF ENABLE AUTO OFF DISABLE 1 0 When the time is set to 0, the projector is not turned off automatically. When the time is set to 1 to 99, and when the passed time with nosignal or an unsuitable signal reaches at the set time, the projector lamp will be turned off.
OPTION Menu OPTION Menu (continued) Item Description Selecting this item displays the SERVICE menu. 6HOHFW DQ LWHP XVLQJ WKH EXWWRQV Ÿ ź DQG SUHVV WKH EXWWRQ Ź RU the ENTER button on the remote control to execute the item. FAN SPEED Ù AUTO ADJUST Ù GHOST Ù FILTER MESSAGE Ù KEY LOCK FACTORY RESET Ù INFORMATION Ù REMOTE FREQ. FAN SPEED 8VLQJ WKH EXWWRQV Ÿ ź VZLWFKHV WKH URWDWLRQ VSHHG RI WKH FRROLQJ fans. The HIGH is the mode for use at highlands etc.
OPTION Menu OPTION Menu (continued) Item Description REMOTE FREQ. 8VH WKH Ÿ ź EXWWRQ WR FKDQJH WKH 3URMHFWRU V UHPRWH VHQVRU setting ( 16). 1:NORMAL Ù 2:HIGH Items with a checkmark are on. The factory default setting is for both 1:NORMAL and 2:HIGH to be on. If the remote control does not function correctly set the this to either only 1 or only 2 as described in Remote Control Settings ( 16). Neither can be turned off at the same time.
OPTION Menu OPTION Menu (continued) Item Description This projector is equipped with security functions. User registration is required before using the security functions. Please contact your local dealer. 1. Using Security Features 1.1 Inputting the PASSWORD 8VH WKH Ÿ ź EXWWRQV RQ WKH 237,21 PHQX WR VHOHFW 6(&85,7< DQG SUHVV WKH Ź button. The ENTER PASSWORD box will be displayed. The factory default PASSWORD is 3046. This PASSWORD can be changed (1.2 Changing the PASSWORD).
OPTION Menu OPTION Menu (continued) Item Description 1.3 If you have forgotten your PASSWORD 1.3-1 Follow the procedure in 1.1-1 to display the ENTER PASSWORD BOX. 1.3-2 While the ENTER PASSWORD BOX is displayed, press and hold the RESET button on the remote control for about 3 seconds or SUHVV DQG KROG WKH ,1387 DQG Ź EXWWRQV RQ the projector for about 3 seconds. The 10 digit Inquiring Code will be displayed.
OPTION Menu OPTION Menu (continued) Item Description 2.2-4 Move the cursor to the right side of the CHECK 3$66:25' %2; DQG SUHVV WKH Ź EXWWRQ WR /[5ETGGP display the PASSWORD for about 20 seconds, %1/2.'6' please make note of the PASSWORD during this time. After the PASSWORD has displayed '06'4 ':+6 for about 20 seconds the screen will return to PASSWORD BOX the MyScreen PASSWORD on/off menu.
OPTION Menu OPTION Menu (continued) Item Description ,QSXW D SDUW 3,1 &RGH XVLQJ WKH Ÿ ź Ż Ź /RGB and INPUT buttons. 2+0 $1: +PRWV 2+0 %QFG A CONFIRMATION BOX will appear. Reenter the same PIN Code. This will complete the PIN Code 4)$ registration. PIN BOX NOTE: If there is no key input for about 55 seconds while the PIN BOX or the CONFIRMATION BOX are displayed the menu will close. If necessary repeat 2+0 $1: the process from 3.1-1.
OPTION Menu OPTION Menu (continued) Item Description 4. Using the Transition Detector Function While the Transition Detector function is ON, when power switch is started to supply to the projector, it might react as below. • Transition Detector alarm shown below might appear on screen, if the projector has been moved or re-installed. • Transition Detector alarm might appear on screen, if the MIRROR setting has been changed.
OPTION Menu OPTION Menu (continued) Item Description 4.3 Setting the Transition Detector off 4.3-1 Follow the procedure in 4.1-1 to display the Transition Detector on/off menu. 4.3-2 Select TURN OFF to display the ENTER PASSWORD BOX (large). Enter the registered PASSWORD and the screen will return to the Transition Detector on/off menu. If an incorrect PASSWORD is input the menu will close. If necessary repeat the process from 4.3-1. SECURITY 4.4 If you have forgotten your PASSWORD 4.
Maintenance Maintenance Lamp WARNING HIGH VOLTAGE HIGH TEMPERATURE HIGH PRESSURE ŹThe projector uses a high-pressure mercury glass lamp. The lamp can break with a loud bang, or burn out, if jolted or scratched, handled while hot, or worn over time. Note that each lamp has a different lifetime, and some may burst or burn out soon after you start using them.
Maintenance Lamp (continued) $ ODPS KDV D ¿QLWH SURGXFW OLIH 8VLQJ WKH ODPS IRU ORQJ SHULRGV RI WLPH FRXOG cause the pictures darker or the color tone poor. Note that each lamp has a different lifetime, and some may burst or burn out soon after you start using them. Preparation of a new lamp and early replacement are recommended. To prepare a new lamp, contact your dealer and tell the lamp type number. Type number = DT00757. the projector off, and unplug the power cord. Allow the lamp to cool for 1.
Maintenance $LU ÀOWHU WARNING ŹBefore caring, make sure the power switch is off and the SRZHU FDEOH LV QRW SOXJJHG LQ WKHQ DOORZ WKH SURMHFWRU WR FRRO VXI¿FLHQWO\ 7KH care in a high temperature state of the projector could cause an electric shock, a burn and/or malfunction to the projector. Ź8VH RQO\ WKH DLU ¿OWHU RI WKH VSHFL¿HG W\SH 'R QRW XVH WKH SURMHFWRU ZLWK WKH DLU ¿OWHU DQG WKH ¿OWHU FRYHU UHPRYHG ,W FRXOG UHVXOW LQ D ¿UH DQG RU PDOIXQFWLRQ to the projector.
Maintenance $LU ¿OWHU FRQWLQXHG $SSO\ D YDFXXP FOHDQHU WR WKH DLU ¿OWHU DQG WKH ¿OWHU FRYHU 3OHDVH UHSODFH WKH DLU ¿OWHU ZKHQ LW LV GDPDJHG RU WRR VRLOHG 5HSODFH WKH DLU ¿OWHU LQ LWV RULJLQDO SRVLWLRQ 6HFXUH WKH DLU ¿OWHU LQ SODFH E\ pressing each of the six locations. Make sure there is no dust or dirt remaining after the cover is in place.
Maintenance Other care WARNING Ź%HIRUH FDULQJ PDNH VXUH WKH SRZHU VZLWFK LV RII DQG WKH SRZHU FDEOH LV QRW SOXJJHG LQ DQG WKHQ DOORZ WKH SURMHFWRU WR FRRO VXI¿FLHQWO\ The care in a high temperature state of the projector could cause a burn and/or malfunction to the projector. Ź1HYHU WU\ WR FDUH IRU WKH LQVLGH RI WKH SURMHFWRU SHUVRQDOO\ 'RLQJ LV VR dangerous.
Troubleshooting Troubleshooting Related messages When the unit's power is on, messages such as those shown below may be displayed. When any such message is displayed on the screen, please follow the instructions described below. If the same message is displayed after the remedy, or if a message other than the following appears, please contact your dealer or service company.
Troubleshooting Regarding the indicator lamps /LJKWLQJ DQG ÀDVKLQJ RI WKH 32:(5 LQGLFDWRU WKH /$03 LQGLFDWRU DQG WKH 7(03 indicator have the meanings as described in the table below. Please follow the instructions within the table. If the same indication is displayed after the remedy, or if an indication other than the following is displayed, please contact your dealer or service company.
Troubleshooting Regarding the indicator lamps (continued) POWER LAMP TEMP indicator indicator indicator Description The cooling fan is not operating. Blinking In Red or Lighting In Red Turned off Blinking In Red Please turn the power off, and allow the projector to cool down at least 20 minutes. After the projector has VXI¿FLHQWO\ FRROHG GRZQ SOHDVH PDNH FRQ¿UPDWLRQ that no foreign matter has become caught in the fan, etc., and then turn the power on again.
Troubleshooting Phenomena that may be easy to be mistaken for machine defects WARNING ŹNever use the projector if abnormal operations such as smoke, strange odor, excessive sound, damaged casing or elements or cables, penetration of liquids or foreign matter, etc. should occur. In such cases, immediately turn off the power switch and then disconnect the power plug from the power outlet. After making sure that the smoke or odor has stopped, contact your dealer or service company.
Troubleshooting Phenomena that may be easy to be mistaken for machine defects (continued) Phenomenon Cases not involving a machine defect The signal cables are not correctly connected. Correctly connect the audio cables. Reference page 12,13 The MUTE function is working. Sound does not come out. Restore the sound pressing the MUTE or VOLUME button on the remote control. 18 The volume is adjusted to an extremely low level.
Troubleshooting Phenomena that may be easy to be mistaken for machine defects (continued) Phenomenon Cases not involving a machine defect The brightness and/or contrast are adjusted to an extremely low level. Adjust BRIGHTNESS and/or CONTRAST settings to a higher level using the menu function. Pictures appear dark. Reference page 25, 26 The WHISPER function is working. Select NORMAL for the WHISPER item in the SETUP menu. The lamp is approaching the end of its product lifetime.
Warranty And After-Service Warranty and after-service ,I D SUREOHP RFFXUV ZLWK WKH HTXLSPHQW ¿UVW UHIHU WR WKH ³7URXEOHVKRRWLQJ´ DQG UXQ through the suggested checks. If this does not resolve the problem, please contact your dealer or service company. They will tell you what warranty condition is applied. 6SHFLÀFDWLRQV 6SHFL¿FDWLRQV NOTE 7KHVH VSHFL¿FDWLRQV DUH VXEMHFW WR FKDQJH ZLWKRXW QRWLFH 6SHFL¿FDWLRQ Item Product name Liquid Crystal panel Liquid crystal projector Panel size 1.6 cm (0.
6SHFLÀFDWLRQV 249 mm 6SHFL¿FDWLRQV FRQWLQXHG 62 100 mm 86 mm 306 mm