Projector PJ-LC9 User’s Manual - Operating Guide Thank you for purchasing this projector. Please read this user’s manual thoroughly to ensure the proper use of this product. Manuel d'utilisation - Guide d'utilisation Merci d’avoir acheté ce projecteur. Veuillez lire ce manuel d’utilisation entièrement, pour vous assurer que vous utiliserez correctement ce produit. Bedienungsanleitung - Benutzerhandbuch Herzlichen Glückwunsch zum Kauf dieses Projektors.
ENGLISH User's Manual - additional The display image from some video consoles may be unstable when initially connected. In the event of this, wait for the image from the video console to change and then press the AUTO button on the projector remote control to stabilise the image. FRANÇAIS Manuel d'utilisation - Supplémentaire L'image affichée à partir de certaines consoles de jeux peut paraître instable au moment du branchement.
Projector ENGLISH User’s Manual – Operating Guide Thank you for purchasing this projector. WARNING ►Before using this product, please read the "User's Manual Safety Guide" and related manuals to ensure the proper use of this product. After reading them, store them in a safe place for future reference. NOTE • The information in this manual is subject to change without notice. • The manufacturer assumes no responsibility for any errors that may appear in this manual.
Content Content Before use ..................................................................... 4 Projector features....................................................................................4 About this manual ...................................................................................4 About contents of package .....................................................................5 Part names..............................................................................................
Multifunctional settings ............................................. 28 Using the menu function .......................................................................28 EASY MENU .........................................................................................31 Aspect / Zoom / Keystone / Mode / Bright / Contrast / Color / Tint ............... 31 Sharpness / Whisper / Mirror / Reset / Filter time ........................................ 32 Language / Go to advanced menu ..........................
Before use Before use Projector features This projector is used to project various computer signals as well as NTSC/PAL/ SECAM video signals onto a screen. It requires just a little space for installation and gets a large image from short distance. High Brightness Newly developed 165W UHB (Ultra high Brightness) lamp gives you a higher brightness image on a screen. The image can be still kept as bright and clean enough for use in bright rooms.
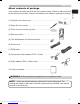
Before use Your projector should come with the items shown below. Check to make sure that all the items are included. Contact immediately your dealer if anything is missing. (1) Projector with Lens cover ............................................................. (2) Strap (for Lens cover) .................................................................. (3) Filter cover (for bottom-up use) ....................................................
Before use Part names Projector Focus ring (24) Vent (10) Please do not block and cover the vents. Remote sensor (18) Speaker Lens (19, 52) Elevator button (12) Front-Right side Lens cover (8, 19) Elevator foot (12) Lamp cover (47, 48, 49) Lamp unit is inside. A lamp has a finite product life. Preparation of a new lamp and early replacement are recommended. Filter cover (9, 50) Air filter and intake vent are inside. Please take care of the air filter to normal ventilate.
Before use Control buttons LAMP indicator (54, 55) LAMP TEMP indicator (54, 55) POWER indicator (19, 20, 54, 55) ENGLISH TEMP POWER INPUT INPUT button (22) Cursor buttons ▲,▼,◄,► (28) MENU STANDBY/ON button (19, 20) STANDBY/ON Remote control STANDBY/ON button (19, 20) SEARCH button (22) RGB button (22) AUTO button (24) VIDEO button (22) ASPECT button (23) VIDEO ASPECT RGB SEARCH AUTO MAGNIFY MAGNIFY ON button (26) OFF button (26) VOLUME ON MUTE OFF FREEZE KEYSTONE FRE
Preparations Preparations Fastening the lens cover To avoid losing the lens cover, please fasten the projector using the strap. turn over the projector, 1. Slowly so that the bottom is facing up. Strap ring Projector (Bottom side) the strap to the strap 2. Fix ring of the projector. Strap (1) Strap (2) Strap ring the strap to the strap 3. Fix ring of the lens cover. Lens cover Strap ring Strap (1) Strap (2) Strap ring Strap ring the lens cover to 4.
Preparations When the projector is installed bottom up, please use the accessory filter cover for bottom-up use. It is higher than usual filter cover, to keep the space for intake ventilation. Please change the filter cover in the following procedure. all the connectors 1. Disconnect and adapters that were Filter cover’s knob connected to the projector’s ports. Then slowly turn the projector so that the lens-side is facing up. While the projector is placed lens-side up, hold the projector. the filter cover.
Preparations Arrangement Please select the arrangement way depending on your use or the environment. When put on a table When suspended from the ceiling (a) (a) (c) (b) (c) (b) WARNING ►Place the projector in a stable position horizontally. A fall or a turnover could cause an injury and/or damage to the projector. Then using damaged projector could result in a fire and/or an electric shock. • Do not place the projector on an unstable, slant or vibrant surface such as a wobbly or inclined stand.
Preparations ENGLISH Refer to the illustrations and tables below to determine the screen size and projection distance. The values shown in the table are calculated (±3%) for a full size screen: 854x480. For 16:9 screens (a) (a) Screen size inch (m) 40 (1.0) 50 (1.3) 60 (1.5) 70 (1.8) 80 (2.0) 90 (2.3) 100 (2.5) 120 (3.0) 150 (3.8) 200 (5.1) (b) Projection distance m (inch) 1.5 (57) 1.8 (72) 2.2 (87) 2.6 (101) 2.9 (116) 3.3 (130) 3.7 (145) 4.4 (174) 5.5 (218) 7.
Preparations Adjusting the projector’s elevator You can use the elevator feet to make adjustments if the surface on which you need to set the projector is uneven or if you otherwise need to adjust the angle of projection. The adjustment range of the elevator feet is 0 to 9 degrees. Elevator feet Elevator button and hold in the elevator buttons while holding the projector. The 1. Press elevator buttons and the elevator feet are on the both sides.
Preparations Connecting your devices Examples of connection with a VCR/DVD player ENGLISH Audio cable Video cable Audio out Video out K Audio cable S-Video cable Audio out S-Video out K Audio cable Component video cable Audio out Component video out K NOTE • Secure the screws on the connectors and tighten. • For an audio cable with 2 RCA connectors to 2 RCA connectors, use the accessory audio adapter.
Preparations Examples of connection with a computer Audio cable RS-232C cable Audio out RGB out RS-232C RGB cable K CAUTION ►Turn off all devices prior to connecting them to the projector. Attempting to connect a live device to the projector may generate extremely loud noises or other abnormalities that may result in malfunction and/or damage to the device and/or projector. ►Use the accessory cable or a designated-type cable for the connection. Some cables have to be used with core set.
Preparations Resolution (H x V) H. frequency (kHz) V. frequency (Hz) 720 x 400 640 x 480 640 x 480 640 x 480 640 x 480 848 x 480 800 x 600 800 x 600 800 x 600 800 x 600 800 x 600 832 x 624 1024 x 768 1024 x 768 1024 x 768 1024 x 768 37.9 31.5 37.9 37.5 43.3 31.0 35.2 37.9 48.1 46.9 53.7 49.7 48.4 56.5 60.0 68.7 85.0 59.9 72.8 75.0 85.0 60.0 56.3 60.3 72.2 75.0 85.1 74.6 60.0 70.1 75.0 85.
Preparations Connecting power supply Before connecting, make sure that the power switch is the OFF position (pressed the side marked “O”). the connector of the power cord to the AC inlet of the 1. Connect projector. Power switch AC inlet Connector of the power cord 2. Firmly plug the power cord's plug into the outlet. WARNING ►Please use extra caution when connecting the power cord as incorrect or faulty connections may result in fire and/or electrical shock.
Preparations To use the remote control, please load the batteries. Whenever the remote control starts to malfunction, replace the batteries. If you will not use the remote control for an extended period, remove the batteries from the remote control and store them in a safe place. the battery cover. Slide back and remove the 1. Remove battery cover in the direction of the arrow. old batteries out and/or put new batteries in. When 2.
Preparations Using the remote control The remote control works with the projector’s remote sensor. • The range of the remote sensor is 3 meters with a 60-degree range approx. 3 meters (30-degrees to the left and right of the 30º 30º remote sensor). • Also a remote signal reflected in the screen etc. may be available. If it is difficult to send a remote signal to the sensor directly, please try to use reflected signal.
Power on/off Power on/off LAMP VIDEO ASPECT RGB TEMP SEARCH AUTO MAGNIFY POWER BLANK ENGLISH Turning on the power POWER indicator VOLUME ON INPUT MUTE OFF FREEZE KEYSTONE - ZOOM + MENU POSITION STANDBY/ON button MENU ENTER ESC RESET STANDBY/ON Power switch sure that the power cord is firmly and correctly connected to the 1. Make projector and the outlet. the lens cover, and set the power 2. Open switch to the ON position. POWER 3.
Power on/off Turning off the power the STANDBY/ON button on the projector or 1. Press the remote control. Power off? The message "Power off?" will appear on the screen for approximately 5 seconds. 2. 3. POWER Press the STANDBY/ON button on the projector or the remote control again while the message appears. The projector lamp will go off, and the POWER indicator will begin blinking in orange. Then the POWER indicator will stop blinking and light in steady orange when the lamp cooling is complete.
Operating Operating 1. Press the VOLUME button on the remote control. A dialog will appear on the screen to aid you in adjusting the volume. VIDEO RGB ASPECT SEARCH VIDEO BLANK AUTO MAGNIFY RGB SEARCH VOLUME ON MUTE OFF FREEZE ASPECT BLANK AUTO KEYSTONE - ZOOM MENU POSITION MAGNIFY + VOLUME ON ENTER MUTE RESET ESC the cursor buttons ▲/▼ to adjust the volume. 2. Use To close the dialog and complete the operation, press OFF FREEZE KEYSTONE - ZOOM the VOLUME button again.
Operating Selecting an input signal 1. LAMP TEMP POWER Press the INPUT button on the projector. Each time you press the button, the projector switches its input port as below. INPUT MENU RGB S-VIDEO VIDEO the RGB button on the remote control to select 1. Press the RGB port.
Operating Selecting an aspect ratio For a 16:9 signal VIDEO ASPECT RGB ENGLISH the ASPECT button on the remote control. Each time you press the 1. Press button, the projector switches the modes for aspect ratio in turn.
VIDEO Operating Adjusting the zoom (magnifying power) 1. 2. BLANK AUTO MAGNIFY VOLUME ON MUTE OFF VIDEO Press the ZOOM +/- button on the remote control. A dialog will appear on the screen to aid you in adjusting the zoom. Use the ZOOM buttons +/- to adjust the zoom. To close the dialog and complete this operation, do not perform operation for a few seconds.
VIDEO RGB ASPECT SEARCH BLANK AUTO Operating MAGNIFY VOLUME ON Adjusting the position 1. 2. MUTE OFF FREEZE VIDEO RGB KEYSTONE SEARCH Press the POSITION button on the remote control. The “POSITION” indication will appear on the screen. Use the cursor buttons ▲/▼/◄/► to adjust the picture position. When you want to reset the operation, press the RESET button on the remote control during the operation. To complete this operation, press the POSITION button again.
Operating Using the partial magnify feature the ON button of MAGNIFY on the remote control. 1. Press The “MAGNIFY” indication will appear on the screen VIDEO SEARCH RGB ASPECT VIDEO BLANK AUTO SEARCH RGB ASPECT BLANK AUTO MAGNIFY MAGNIFY VOLUME VOLUME ON ON MUTE OFF (although the indication will disappear after several seconds with no operation), and the projector will enter the MAGNIFY mode. Use the cursor buttons ▲/▼ to adjust the zoom level.
Operating Temporarily blanking the screen RGB SEARCH AUTO MAGNIFY BLANK VOLUME MUTE OFF VIDEO FREEZE RGB SEARCH KEYSTONE - ZOOM + ASPECT AUTO BLANK MENU POSITION ENTER ESC MAGNIFY RESET VOLUME ON MUTE OFF FREEZE KEYSTONE - ZOOM + MENU POSITION ● The projector automatically returns to the input signal screen when the input signal is changed, or when one of the projector’s buttons or the remote control buttons are pressed. ENTER ESC RESET 27 Downloaded from www.
Multifunctional settings Multifunctional settings Using the menu function This projector has the following menus: PICTURE, IMAGE, INPUT, SETUP, SCREEN, OPTION and EASY MENU. Each of these menus is operated using the same methods. The basic operations of these menus are as follows. VIDEO RGB ASPECT SEARCH AUTO MAGNIFY BLANK VOLUME ON NOTE • Regardless of description of this manual, these functions may not work correctly with some input.
Multifunctional settings (2) Advanced MENU → One of Advanced menus (ex. SETUP menu) PICTURE IMAGE INPUT SETUP SCREEN OPTION EASY MENU MENU [RGB] :SELECT BRIGHT +0 CONTRAST +0 GAMMA DEFAULT 1 COLOR TEMP HIGH COLOR +0 TINT +0 SHARPNESS +0 PROGRESSIVE TURN OFF MY MEMORY SAVE 1 ▼ Advanced MENU (PICTURE is pointed at.
Multifunctional settings operate 4. To Please follow of the mention concerned in each. In general, (1) In the EASY MENU, use the cursor buttons ◄/► to operate. (2) In the Advanced MENU, use the cursor buttons ▲/▼. return to the previous menu 5. To Press the cursor button ◄ or the ESC button. (1) One of Advanced Menus (ex.
Multifunctional settings EASY MENU EASY MENU ASPECT ZOOM KEYSTONE MODE BRIGHT CONTRAST COLOR TINT SHARPNESS WHISPER MIRROR RESET FILTER TIME LANGUAGE 4:3 +0 +0 NORMAL +0 +0 +0 +0 +3 NORMAL NORMAL EXECUTE 0h ENGLISH Go To Advance Menu... Item ASPECT ZOOM KEYSTONE Description Using the buttons ◄/► switches the mode for aspect ratio. See the ASPECT item in the IMAGE menu. (36) Using the buttons ◄/► adjusts the zoom. See the ZOOM item in the SETUP menu.
Multifunctional settings EASY MENU (continued) Item SHARPNESS WHISPER MIRROR Description Using the buttons ◄/► adjusts the sharpness. See the SHARPNESS item in the PICTURE menu. (34) Using the buttons ◄/► turns off/on the whisper mode. See the WHISPER item in the SETUP menu. (40) Using the buttons ◄/► switches the mode for mirror status. See the MIRROR item in the SETUP menu. (40) RESET Performing this item resets all of the items of EASY MENU except FILTER TIME and LANGUAGE.
Multifunctional settings PICTURE menu Item BRIGHT CONTRAST MENU [RGB] PICTURE IMAGE INPUT SETUP SCREEN OPTION EASY MENU :SELECT BRIGHT +0 CONTRAST +0 GAMMA DEFAULT 1 HIGH COLOR TEMP COLOR +0 TINT +0 SHARPNESS +0 PROGRESSIVE TURN OFF MY MEMORY SAVE 1 Description Using the buttons ▲/▼ adjusts the brightness. : Using the buttons ▲/▼ adjusts the contrast. : Light Dark Strong Weak Using the buttons ▲/▼ switches the GAMMA mode.
Multifunctional settings PICTURE menu (continued) Item Description Using the buttons ▲/▼ switches the mode of color temperature. HIGH MIDDLE COLOR TEMP [RGB] HIGH MIDDLE LOW CUSTOM OFFSET R G B :SELECT GAIN R G B CUSTOM LOW COLOR TEMP +0 +0 +0 +0 +0 +0 To adjust CUSTOM Selecting the CUSTOM and then pressing the ENTER : button ► or the ENTER button displays a dialog OFFSET GAIN R G B R G B to aid you in adjusting the OFFSET and/or GAIN of the CUSTOM mode.
Multifunctional settings PICTURE menu (continued) Description ENGLISH Item Using the buttons ▲/▼ switches the progress mode. TV FILM TURN OFF PROGRESSIVE • This function is performed only for an interlaced signal of a VIDEO input, an S-VIDEO input or a component video input of 525i (480i) or 625i (576i) signal. • When the TV or FILM is selected, the screen image will be sharp. The FILM mode can also be used for the 2-3 Pull-Down conversion system (not be used for the 2-2 Pull-Down system).
Multifunctional settings IMAGE menu With the IMAGE menu, the items shown in the table below can be performed. Choose an item using the cursor buttons ▲/▼ on the projector or remote control, and press the cursor button ► on the projector or remote control, or the ENTER button on the remote control to execute the item. Then perform it referring to the following table.
Multifunctional settings Item Description OVER SCAN Using the buttons ▲/▼ adjusts the over-scan ratio. Large (It reduces picture) Small (It magnifies picture) • This item can be chosen only for a video signal. • When this adjustment is too large, certain degradation may appear at the frame area of the picture. In such a case, please adjust small. • The number displayed on the menu during this adjustment is just for your reference, and might not be exact display ratio.
Multifunctional settings IMAGE menu (continued) Item AUTO ADJUST EXECUTE Description Choosing this item performs the automatic adjustment feature. For an RGB signal The vertical position, the horizontal position, the clock phase and the horizontal size will be automatically adjusted. And the aspect ratio will be automatically selected. Make sure that the application window is set to its maximum size prior to attempting to use this feature. A dark picture may still be incorrectly adjusted.
Multifunctional settings INPUT menu Item MENU [RGB] PICTURE IMAGE INPUT SETUP SCREEN OPTION EASY MENU :SELECT COLOR SPACE AUTO VIDEO FORMAT AUTO FRAME LOCK TURN OFF INFORMATION Description Using the buttons ▲/▼ switches the mode for color space. AUTO RGB SMPTE240 REC709 REC601 COLOR SPACE • This item can be chosen only for an RGB signal or a component video signal. • The AUTO mode automatically selects the optimum mode. • The AUTO operation may not work well at some signals.
Multifunctional settings SETUP menu With the SETUP menu, the items shown in the table below can be performed. Choose an item using the cursor buttons ▲/▼ on the projector or remote control, and press the cursor button ► on the projector or remote control, or the ENTER button on the remote control to execute the item. Then perform it referring to the following table.
Multifunctional settings SCREEN menu Item MENU [RGB] PICTURE IMAGE INPUT SETUP SCREEN OPTION EASY MENU :SELECT LANGUAGE MENU POSITION OSD BRIGHT BLANK START UP MyScreen MyScreen Lock MESSAGE ENGLISH 5 BLACK ORIGINAL EXECUTE TURN OFF TURN ON Description Using the buttons ▲/▼ switches the OSD (On Screen Display) language.
Multifunctional settings SCREEN menu (continued) Item Description Using the buttons ▲/▼ switches the mode for the start up screen. The start up screen is a screen displayed when no signal or an unsuitable signal is detected. MyScreen ORIGINAL TURN OFF START UP MyScreen is a screen you can register as a desired screen. The ORIGINAL screen is the existing standard screen. When the TURN OFF is selected, the BLACK screen is used.
Multifunctional settings Item Description MyScreen Lock Using the buttons ▲/▼ turns on/off the MyScreen lock function. TURN ON TURN OFF When the TURN ON is selected, the item MyScreen is locked. Use this function for protecting the current MyScreen. MESSAGE Using the buttons ▲/▼ turns on/off the message function. TURN ON TURN OFF When the TURN ON is selected, the following message function works.
Multifunctional settings OPTION menu With the OPTION menu, the items shown in the table below can be performed. Choose an item using the cursor buttons ▲/▼ on the projector or remote control, and press the cursor button ► on the projector or remote control, or the ENTER button on the remote control to execute the item. Then perform it referring to the following table.
Multifunctional settings OPTION menu (continued) FILTER TIME Description The filter time is the time counted after the last resetting. It is shown in the OPTION menu as the usage time of the air filter. Performing this item resets the time. Pressing the RESET button on the remote control or the button ► on the projector displays a dialog to make sure. To perform reset, point at RESET using the button ▲. FILTER TIME RESET CANCEL 0h.
Multifunctional settings OPTION menu (continued) Item (continued) Description GHOST 1. Choose a color element of ghost using the buttons ◄/►. 2. Adjust the chosen element using the buttons ▲/▼ to disappear ghost. R G +0 +0 +0 B GHOST FILTER MESSAGE Using the ▲/▼ button to set the timer for the interval to show the message for cleaning up the air filter. FILTER MESSAGE 50h 100h 200h 300h TURN OFF 50h 100h 200h 300h TURN OFF SERVICE Selecting TURN OFF displays a dialog.
Maintenance Maintenance WARNING HIGH VOLTAGE HIGH TEMPERATURE HIGH PRESSURE ►The projector uses a high-pressure mercury glass lamp. The lamp can break with a loud bang, or burn out, if jolted or scratched, handled while hot, or worn over time. Note that each lamp has a different lifetime, and some may burst or burn out soon after you start using them.
Maintenance A lamp has a finite product life. Using the lamp for long periods of time could cause the pictures darker or the color tone poor. Note that each lamp has a different lifetime, and some may burst or burn out soon after you start using them. Preparation of a new lamp and early replacement are recommended. To prepare a new lamp, contact your dealer and tell the lamp type number. Type number = DT00707 the projector off, and unplug the power cord. Allow the lamp to cool for 1.
Maintenance cover on the projector, and push the center point of the two claws to fix the lamp cover. Then retighten firmly the screw of the lamp cover. Center point of claws ENGLISH interlocking the 2 tabs of the lamp 7. While cover to the projector, position the lamp Tabs reposition and reconnect the projector, to return as before. (12~16) 8. Please Then turn the projector on. (19) the lamp time using the LAMP TIME function in the OPTION menu. 9.
Maintenance Air filter If the air filter becomes clogged by dust or the like, internal temperatures rise and could cause a fire, a burn and/or malfunction to the projector. When the indicators or a message prompts you to clean the air filter, clean the air filter as soon as possible. Please check and clean the air filter periodically, even if there is no message. Please replace the air filter when it is damaged or too soiled. Preparation of a new air filter is recommended.
Maintenance (1) Set an air filter into place. Push the points of “PUSH” mark. (Usual filter cover) “PUSH” mark (Filter cover for bottom-up use) (2) Interlocking the tabs, snap the cover into place. Tabs Tabs reposition and reconnect the projector, to return as before. (12~16) 7. Please Then turn the projector on. (19) the filter time using the FILTER TIME function in the OPTION menu. 8. Reset (45) (1) Press the MENU button to display a menu.
Maintenance Inside of the projector In order to ensure the safe use of your projector, please have it cleaned and inspected by your dealer about once every year. Caring for the lens If the lens is flawed, soiled or fogged, it could cause deterioration of display quality. Please take care of the lens, being cautious of handling. the projector off, and unplug the power cord. Allow the projector to cool 1. Turn sufficiently. making sure that the projector is cool adequately, lightly wipe the lens 2.
Troubleshooting Troubleshooting When the unit's power is on, messages such as those shown below may be displayed. When any such message is displayed on the screen, please follow the instructions described below. If the same message is displayed after the remedy, or if a message other than the following appears, please contact your dealer or service company. Although these messages will be automatically disappeared around several minutes, it will be reappeared every time the power is turned on.
Troubleshooting Regarding the indicator lamps Lighting and flashing of the POWER indicator, the LAMP indicator, and the TEMP indicator have the meanings as described in the table below. Please follow the instructions within the table. If the same indication is displayed after the remedy, or if an indication other than the following is displayed, please contact your dealer or service company.
Troubleshooting POWER LAMP TEMP indicator indicator indicator Blinking In Red or Lighting In Red Blinking In Red or Lighting In Red Lighting In Green Lighting In Green Turned off Turned off Description Blinking In Red The cooling fan is not operating. Please turn the power off, and allow the projector to cool down at least 20 minutes. After the projector has sufficiently cooled down, please make confirmation that no foreign matter has become caught in the fan, etc., and then turn the power on again.
Troubleshooting Phenomena that may easily be taken as machine defects requesting repair, please check in accordance with the following chart. 1. Before This operation sometimes resolves your problem. If the situation cannot be corrected, projector’s microprocessor may need to be reset. Please push the restart 2. The switch by using a pin or similar. (20) setting may be wrong. Please use the FACTORY RESET function of 3.
Troubleshooting Phenomenon Pictures are displayed, but no sounds are heard. Sounds are heard, but no pictures are displayed. Colors have a faded- out appearance, or Color tone is poor. Cases not involving a machine defect The signal cables are not correctly connected. Correctly connect the connection cables. Reference page 13, 14 The volume is adjusted to an extremely low level. Adjust the VOLUME to a higher level. 21 The sound is muted. Press the MUTE button to restore the sound.
Warranty and after-service / Specifications Warranty and after-service If a problem occurs with the equipment, first refer to the “Troubleshooting” (53~57) and run through the suggested checks. If this does not resolve the problem, please contact your dealer or service company. They will tell you what warranty condition is applied. Specifications Item Specification Product name Liquid crystal projector Liquid Panel size Crystal Drive system panel Pixels 1.4 cm (0.55 type) TFT active matrix Lens F=1.
Specifications 202 ENGLISH Dimension diagram 83 73 69 33.5 285 [unit: mm] 59 Downloaded from www.Manualslib.
Hitachi America, Ltd. Digital Media Div. Hitachi Plaza 2000 Sierra Point Parkway Brisbane, CA 94005-1835 USA Tel: +1 -800-225-1741 Fax: +1 -650-244-7776 ► http://www.hitachi.us/digitalmedia Hitachi Canada, Ltd. 6740 Campobello Road, Mississauga Ontario L5N2L8 CANADA Tel: +1 -905-821-4545 Fax: +1 -905-821-1101 ► http://www.hitachi.ca Hitachi Europe Ltd. Whitebrook Park, Lower Cookham Road Maidenhead SL6 8YA, Berkshire UK Tel: +44 1628 585000 Fax: +44 1628 643404 ► http://www.hitachidigitalmedia.