INDOOR UNIT/OUTDOOR UNIT MODEL RAS-60YHA/RAC-60YHA OUTDOOR UNIT INDOOR UNIT RAC-60YHA RAS-60YHA Page 1~26 Instruction manual To obtain the best performance and ensure years of trouble free use, please read this instruction manual completely.
SAFETY PRECAUTION ● ● ● Please read the “Safety Precaution” carefully before operating the unit to ensure correct usage of the unit. Pay special attention to signs of “ ! Warning” and “ ! Caution”. The “Warning” section contains matters which, if not observed strictly, may cause death or serious injury. The “Caution” section contains matters which may result in serious consequences if not observed properly. Please observe all instructions strictly to ensure safety.
● The product shall be operated under the manufacturer specification and not for any other intended use. ● ● When operating the unit with burning equipments, regularly ventilate the room to avoid oxygen insufficiency. ● ● ! C A U T I O N Please switch off the unit and turn off the circuit breaker during cleaning, the high-speed fan inside the unit may cause danger. Turn off the circuit breaker if the unit is not to be operated for a long period.
NAMES AND FUNCTIONS OF EACH PART INDOOR UNIT Air filter To prevent dust from coming into the indoor unit. (Refer page 21) Front panel Indoor unit indicators Light indicator showing the operating condition. (Refer page 5) Horizontal deflector (Air Outlet) (Refer page 16) ● Vertical deflector Remote controller Send out operation signal to the indoor unit. So as to operate the whole unit. (Refer page 6) OUTDOOR UNIT Drain pipe Condensed water drain to outside.
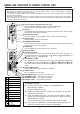
FILTER LAMP When the device is operated for a total of about 200 hours, the FILTER lamp lights to indicate that it is time to clean the filter. The lamp goes out when the “ (AUTO SWING)” button is pressed while the device is on “STANDBY MODE”. HITACHI OPERATION LAMP This lamp lights during operation. The OPERATION LAMP flashes in the following cases during heating. (1) During preheating For about 2–3 minutes after starting up.
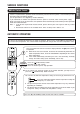
NAMES AND FUNCTIONS OF REMOTE CONTROL UNIT REMOTE CONTROLLER ● This controls the operation of the indoor unit. The range of control is about 7 meters. If indoor lighting is controlled electronically, the range of control may be shorter. This unit can be fixed on a wall using the fixture provided. Before fixing it, make sure the indoor unit can be controlled from the remote controller. ● Handle the remote controller with care. Dropping it or getting it wet may compromise its signal transmission capability.
■ Auto Restart Control ● ● If there is a power failure, operation will be automatically restarted when the power is resumed with previous operation mode and airflow direction. (As the operation is not stopped by remote controller.) If you intend not to continue the operation when the power is resumed, switch off the power supply. When you switch on the circuit breaker, the operation will be automatically restarted with previous operation mode and airflow direction. Note: 1.
HEATING OPERATION ● ● Use the device for heating when the outdoor temperature is under 21°C. When it is too warm (over 21°C), the heating function may not work in order to protect the device. In order to keep reliability of the device, please use this device above –15°C of the outdoor temperature. ˚C 1 2 RESET Press the FUNCTION selector so that the display indicates (HEAT). Set the desired FAN SPEED with the (FAN SPEED) button (the display indicates the setting).
Use the device for dehumidifying when the room temperature is over 16°C. When it is under 15°C, the dehumidifying function will not work. 1 ˚C Press the FUNCTION selector so that the display indicates (DEHUMIDIFY). The FAN SPEED is set at LOW automatically. The FAN SPEED button does not work. Set the desired room temperature with the TEMPERATURE button (the display indicates the setting). 2 RESET The range of 20-26˚C is recommended as the room temperature for dehumidifying.
COOLING OPERATION Use the device for cooling when the outdoor temperature is 21-43°C. If in doors humidity is very high (80%), some dew may form on the air outlet grille of the indoor unit. ˚C 1 Press the FUNCTION selector so that the display indicates (COOL). Set the desired FAN SPEED with the (the display indicates the setting). RESET 2 (FAN SPEED) button (AUTO): The FAN SPEED is HI at first and varies to MED or LOW automatically when the preset temperature has been reached.
You can use the device simply as an air circulator. Use this function to dry the interior of the indoor unit at the end of summer. 1 2 RESET FAN SPEED (AUTO) START STOP ● ● ● For the cooling operation Press the (FAN SPEED) button. Press the (START/STOP) button. Fan operation starts with a beep. Press the button again to stop operation. .....
HOW TO SET THE TIMER 1 Set the current month and Time, Day, Month TIME, DAY, MONTH (current time, day, month) day with the TIMER control button. After you change the batteries; M D M D OFF TIMER RESET ON TIMER 1 OFF-Timer Press the (OFF-TIMER) button. The (OFF) mark blinks on the display. RESERVE CANCEL Start AM STOP You can set the device to turn off at the present time. ON-Timer Stop ● Start The device will turn on at the designated times.
ENGLISH 3 Set the current time with the 4 Press the 2 Press the (TIME) button. (TIME) button again. The time indication starts lighting instead of flashing. TIMER control button. ● The time indication will disappear automatically in 10 second. PM AM PM ● To check the current time setting, PM press the The setting of the current time is now complete. Example: The current time is 1:30 p.m. 2 Set the turn-off time with the TIMER control button. PM (TIME) button twice.
HOW TO SET THE SLEEP TIMER Set the current time at first if it is not set before (see the pages for setting the current time). Press the (SLEEP) button, and the display changes as shown below. Mode Indication 41 Sleep timer H SLEEP hour 42 hours 4 3 hours Sleep timer off 1 47 hours Sleep Timer: The device will continue working for the designated number of hours and then turn off. Point the signal window of the remote controller toward the indoor unit, and press the SLEEP button.
1 Adjustment of the conditioned air in the upward and downward directions. The horizontal air deflector is automatically set to the proper angle suitable for each operation. The deflector can be swung up and down continuously and also set to the desired angle using the “ (AUTO SWING)” button. ● If the “ (AUTO SWING)” button is pressed once, the horizontal air deflector swings up and down. If the button is pressed again, the deflector stops in its current position.
HOW TO EXCHANGE THE BATTERIES IN THE REMOTE CONTROLLER 1 Remove the cover as shown in the figure and take out the old batteries. = 2 Install the new batteries. The direction of the batteries should match the marks in the case. ! CAUTION 1. Do not use new and old batteries, or different kinds of batteries together. 2. Take out the batteries when you do not use the remote controller for 2 or 3 months.
Suitable Room Temperature Install curtain or blinds ! Warning It is possible to reduce heat entering the room through windows. Freezing temperature is bad for health and a waste of electric power. Ventilation Effective Usage Of Timer At night, please use the “OFF or ON timer operation mode”, together with your wake up time in the morning. This will enable you to enjoy a comfortable room temperature. Please use the timer effectively. ! Caution Do not close the room for a long period of time.
FOR USER’S INFORMATION The Air Conditioner And The Heat Source In The Room ! Caution If the amount of heat in the room is above the cooling capability of the air conditioner (for example: more people entering the room, using heating equipments and etc.), the preset room temperature cannot be achieved. Not Operating For A Long Time When the indoor unit is not to be used for a long period of time, please switch off the power from the mains.
! CAUTION Cleaning and maintenance must be carried out only by qualified service personal. Before cleaning, stop operation and switch off the power supply. 1 Open the front panel. ● Pull up the front panel by holding it at both sides with both hands. 2 Remove the filter. ● Push upward to release the claws and pull out the filter. 3 Attaching the Nano Titanium filters to the filter.
MAINTENANCE ! CAUTION Cleaning and maintenance must be carried out only by qualified service personal. Before cleaning, stop operation and switch off the power supply. 1. AIR FILTER Clean the air filter, as it removes dust inside the room. In case the air filter is full of dust, the air flow will decrease and the cooling capacity will be reduced. Further, noise may occur. Be sure to clean the filter following the procedure below.
ENGLISH 2. Washable Front Panel ● Remove the front panel and wash with clean water. Wash it with a soft sponge. After using neutral detergent, wash thoroughly with clean water. ● When front panel is not removed, wipe it with a soft dry cloth. Wipe the remote controller thoroughly with a soft dry cloth. ● Wipe the water thoroughly. If water remains at indicators or signal receiver of indoor unit, it causes trouble. Method of removing the front panel.
! CAUTION Cleaning and maintenance must be carried out only by qualified service personal. Before cleaning, stop operation and switch off the power supply. 3. MAINTENANCE AT BEGINNING OF LONG OFF PERIOD ● Run the unit by setting the operation mode to (COOL), the temperature to 32°C and the fan speed to HI for about half a day on a fine day, and dry the whole of the unit. ● Switch off the power plug.
WHEN ASKING FOR SERVICE, CHECK THE FOLLOWING POINTS.