HITACHI Video Deck VT-FX6500A Owner's Manual Your Complete Guide to Videocassette Viewing and Recording Using these quality features: n Hi-Fi system n Rotary 4-head Record/Playback System n Bilingual on-screen menu display selectable in English or Spanish n Infrared remote control n Real time tape counter n 181 channel capability PLL frequency synthesizer tuner with direct station call n Digital Display n Auto power on and off system n Auto counter reset n Auto rewind when the end of a tape is reached n Di
TABLE OF CONTENTS IMPORTANT SAFEGUARDS .......................................................................................... 4 PRECAUTIONS ................................................................................................................. 6 LOCATION .................................................................................................................... 6 POWER SUPPLY ...........................................................................................................
HINTS FOR TIMER RECORDING ............................................................................ 38 TO CHECK THE AUTOMATIC TIMER PROGRAM. .............................................. 38 TO CORRECT OR CANCEL AN AUTOMATIC TIMER PROGRAM .................... 38 TO STOP A STARTED AUTOMATIC TIMER PROGRAM..................................... 39 COPYING A VIDEO TAPE............................................................................................. 40 TO MONITOR THE RECORDING.......................
IMPORTANT SAFEGUARDS WARNING! TO REDUCE THE RISK OF ELECTRIC SHOCK, DO NOT EXPOSE THIS APPLIANCE TO RAIN OR MOISTURE. CAUTION: TO REDUCE THE RISK OF ELECTRIC SHOCK, DO NOT REMOVE COVER (OR BACK). NO USER-SERVICEABLE PARTS INSIDE. REFER SERVICING TO QUALIFIED SERVICE PERSONNEL. The caution marking is located on the rear of the cabinet.
Antenna ground diagram. 14. Lightning-For added protection for this video product during a lightning storm, or when it is left unattended and unused for long periods of time, unplug it from the wall outlet and disconnect the antenna or cable system. This will prevent damage to the video product due to lightning and powerline surges. 15.
PRECAUTIONS LOCATION For safe operation and satisfactory performance of your VCR, keep the following in mind when selecting a place for its installation: • Shield it from direct sunlight and keep it away from sources of intense heat. • Avoid dusty or humid places. • Avoid places with insufficient ventilation for proper heat dissipation. Do not block the ventilation holes on the sides of the VCR. • Install unit in a horizontal position. • Avoid locations subject to strong vibration.
FEATURES • Hi-Fi system- The Hi-Fi stereo recording system offers you excellent sound quality with a dynamic range of 80dB, frequency response from 20Hz to 20kHz, and 0.005% wow and flutter •Rotary 4-head Record/Playback System- Rotary 4-heads to ensure excellent picture quality and special effects playback. • Bilingual on-screen menu display selectable in English or Spanish • Infrared remote control • Real time tape counter- This shows the elapsed recording or playback time in hours, minutes, and seconds.
VIDEO CASSETTE TAPE INFORMATION 7 This VCR will operate with any cassette that has the VHS mark. For best results, we recommend the use of high-quality tapes. Do not use poor quality or damaged tapes. PRECAUTIONS • Avoid moisture. Moisture condensation may occur on the tape if it is moved from a cold place to a warm place or vice versa. Before using a tape with these conditions, to avoid damage of the tape and your VCR, wait until the tape has warmed to room temperature and the moisture has evaporated.
OPERATING CONTROLS AND FUNCTIONS NOTE: • We do not recommend the use of universal remote controls. Not all of the functions may be controlled with a universal remote control. If you decide to use a universal remote control with this unit, please be aware that the code number given may not operate this unit. In this case, please call the manufacturer of the universal remote control. -VCR FRONT PANEL -REMOTE CONTROL 1. Cassette Compartment 2.
+100 button- When selecting cable channels which are higher than 99, press this button first, then press the last two digits. (To select channel 125, first press "+100" button then press "2" and "5"). (only on the remote control) ENTER- For details, see pages 34-35. (only on the remote control) 12. TAPE SPEED button- Press to choose the desired recording speed : SP/SLP. (only on the remote control) 13. MENU button- Press to display the menu on the TV screen. Press to exit the menu on the TV screen.
PREPARATION FOR USE ANTENNA/CABLE CONNECTIONS For some of the most common types of connections, please follow the drawings below. Use only one connection. For any further complex connections, please contact your local dealer or other qualified persons. (You may need additional accessories which are not supplied). 1 Disconnect the antenna or cable from your TV. 2 Connect the antenna or cable to the ANT. IN (Top jack) of your VCR.
Fig. 3: VHF/UHF Separate Antenna You can record one channel while viewing another. The same goes for Automatic Timer Recording and IRT. For details, please refer to "Recording" on page 27. Fig. 4: Cable Box and Satellite Box You can ONLY record and view the SAME channel when using this connection. There are no exceptions. The same goes for Automatic Timer Recording and IRT. Note: Channel memory programming is NOT needed when using this connection. RECORDING HINTS 1 ) Be sure to check that the "PWR.
Some customers with cable boxes may record one channel and view another, with either one of the connections below. Satellite systems: Neither one of these connection will work. For satellite owner wishing to record one channel and view another, please contact the manufacture of the satellite system. Fig. 5: You can record a scrambled channel while viewing another. RECORDING HINTS 1 ) Be sure to check that the "PWR." and the "VCR" indicators are both on. 2) Turn on the TV and Cable Box.
SETTING THE CH3/CH4 SWITCH If your TV does not have A/V terminals: When the VCR is in the Playback mode or when the VCR is in the VCR position, your TV will receive signals from the VCR on either channel 3 or 4. To use the VCR with your TV, set the selector switch to CH3 or CH4 (which is located in the back of your VCR), whichever is not used for normal broadcasts in your area. Then set your TV to the same channel.
INSTALLING THE BATTERIES 1 ) Open the battery compartment cover by pressing the cover on the remote unit in the direction of the arrow. 2) Insert 2 "AA" penlight batteries into the battery compartment in the direction indicated by the polarity (+/-) markings. 3) Replace the cover. SET UP FOR USE You can program the tuner to scan only the channels you receive in your area. You must use the remote control for this procedure.
4 Select 'ENGLISH" or "ESPANOL" Select "ENGLISH" or "ESPANOL"=Spanish by using the PLAY/ or STOP/ button. Then, press the F.FWD/ button. NOTE: This function effects only the language on the screen menu and not the audio source. LANGUAGE SELECT → ENGLISH ESPANOL [ON] 5 Begin Channel preset Press the F.FWD/ button once. The tuner scans and memorizes all active channels in your area. • The VCR distinguishes between standard TV channels and cable channels.
CLOCK SET UP Set the clock accurately for proper automatic timer recording. • If the Public Broadcasting Station (PBS) is available in your area, the VCR set the clock automatically by using it at "CHANNEL SET UP" on page 14. (Auto Clock Setting feature) Once the clock is set by this feature, the VCR will get automatically the current time from your local PBS channel, using a new service called Extended Data Service (EDS) whenever turning the VCR off, at 12:00AM and 12:00PM.
4 Select the PBS channel First, press the PLAY/ or STOP/ button to point to "MANUAL". Then, press the F.FWD/ button. or STOP/ button to select the PBS channel. Next, press the number buttons or PLAY/ • If you leave it set to "AUTO" when the clock is not set yet, the VCR read your local PBS channel once time every 10 minutes until the VCR get the current time. AUTO CLOCK AUTO →MANUAL [ON] CH -- 5 The VCR begin to get the current time Press the F.FWD/ button. "AUTO CLOCK" flashes on the TV screen.
If [ON] appears beside "MANUAL", press the F.FWD/ button. or STOP/ button to point to "MANUAL". • If it is not, press the PLAY/ Then, press the F.FWD/ button twice. • When you press the F.FWD/ • Press the REW/ button during steps [4] to [8], you may move forward to the next step. button to go back one step from the current step during steps [5] to [9]. CLOCK SET AUTO CLOCK → MANUAL [ON] D.S.
4 Select the month Press the PLAY/ or STOP/ (Example: March → 03) Then, press the F.FWD/ button until the desired month appears. button. CLOCK SET MONTH DAY YEAR 03 /-- ---HOUR MINUTE AM/PM -- : -- 5 Select the day Press the PLAY/ button until the desired day appears. (Example: 20th → 20) or STOP/ Then, press the F.FWD/ -- button. CLOCK SET MONTH DAY YEAR 03/20 ---HOUR MINUTE AM/PM -- : -- 6 Select the year Press the PLAY/ (Example: 2000) or STOP/ Then, press the F.
8 Select the minute Press the PLAY/ or STOP/ (Example: 40) Then, press the F.FWD/ button repeatedly until your desired minute appears. button. CLOCK SET MONTH DAY 03/01 YEAR HOUR MINUTE MON2000 AM/PM 05 : 40 -- 9 Select "AM" or "PM" Press the PLAY/ or STOP/ (Example: PM) button to point to "AM" or "PM" CLOCK SET MONTH DAY 03/01 YEAR MON1999 HOUR MINUTE AM/PM 05 : 40 PM AM →PM 10 Start the clock Press the RESET/EXIT or F.FWD/ button.
Press the PLAY/ or STOP/ button to point to "CLOCK SET". Then, press the F.FWD/ button. MENU TIMER PROGRAMMING AUTO REPEAT [OFF] PICTURE SELECT CHANNEL SET UP → CLOCK SET LANGUAGE SELECT 3 Set the "D.S.T." (Daylight-Savings Time) to [ON] Press the PLAY/ [ON] appears. or STOP/ button to point to "D.S.T.". Then, press the F.FWD/ button so that CLOCK SET AUTO CLOCK MANUAL → D.S.T.
Press the number buttons or the PLAY/ CH30) or STOP/ button until your desired channel number appears. (Example: MANUAL SET UP CHANNEL 30 (TV) ADD 5 Delete it from memory Press the F.FWD/ or REW/ button so that "DELETE" flashes on the TV screen. • To delete another channel, repeat steps [4] and [5] • If you press F.FWD/ or REW/ button again, the channel is memorized again.
If you want to change the language on the TV screen, follow the steps below: Note: This function effects only the language on the screen menu and not the audio source. • Use the remote control for this procedure. 1) Press the MENU button until the main menu appears. 2) Press the PLAY/ or STOP/ button to point to "LANGUAGE SELECT". Then, press the F.FWD/ button. 3) Select "ENGLISH" or "ESPANOL"= Spanish by using the PLAY/ 4) Press the RESET/EXIT button to return to TV mode. or STOP/ button.
MTS (Multi-Channel Television Sound) SYSTEM You can record or listen to a program in MTS stereo, by using a stereo amplifier and speakers. Connect your VCR to your stereo amplifier using the following diagram. CHECKING THE SELECTED MTS MODE When you play a VHS tape, or receive a broadcast on the VCR tuner channel you are watching, the status shown below will appear when you press the DISPLAY button on the remote control.
TO SELECT THE HIFI MODE 1 Select main menu Press the MENU button until the MENU 2 appears. MENU 2 AUDIO OUT TV STEREO SAP [ON] 2 Select "AUDIO OUT" Press the PLAY/ or STOP/ button to point to "AUDIO OUT". Then, press the F.FWD/ or STOP/ button to point to "HIFI". button. 3 Select "HIFI" Press the PLAY/ AUDIO OUT HIFI [ON] MONO 4 To return to TV mode Press the RESET/EXIT button. NOTES: • Normally, "HIFI" should be selected for playback with HIFI sound.
PLAYBACK NORMAL PLAYBACK • Be sure to check that the "PWR." and the "VCR" indicators are both on. • Turn on the TV and set the TV to channel 3 or 4. Now set the CH3/CH4 switch on the back of the VCR to match the channel selected on the TV. 1 Insert a prerecorded tape Counter mode appears at 0:00:00 on the TV screen. If the erase-protection tab has been removed, the VCR will start playback automatically. 2 To begin playback Press the PLAY button.
TRACKING ADJUSTMENT • Tracking adjustment will be set automatically (Digital Tracking function) when you start playback. However when playing pre-recorded tapes or tapes recorded on units other than your own, noise lines (black and white streaks) may appear on the playback picture. If this occurs, you can adjust the tracking control manually by pressing CHANNEL or button on the VCR until the streaks disappear. To return to the DTR function, stop the tape once and start playback again.
AUTO REPEAT PLAYBACK The VCR has the auto repeat function that allows you to repeat a tape indefinitely without touching the PLAY button. Make sure to insert a prerecorded tape. 1 Select main menu Press MENU button until the main menu appears. MENU → TIMER PROGRAMMING AUTO REPEAT [OFF] PICTURE SELECT CHANNEL SET UP CLOCK SET LANGUAGE SELECT 2 Select "AUTO REPEAT" Press the PLAY/ or STOP/ button to point to "AUTO REPEAT". 3 Begin Auto repeat playback Press the F.
1 Select "INDEX SEARCH" Press the INDEX SEARCH button on the remote control. 2 Enter your desired number Press the PLAY/ or STOP/ to skip appears. (Example: "03" for 3 programs) or INDEX SEARCH button until the number of programs that you want INDEX SEARCH 03 • The Index Search mode will be cancelled if the procedures are not activated in 30 seconds. 3 Begin Index Search Press the REW or F.FWD button. The VCR begins rewinding or fast forwarding to the beginning of desired program.
TIME SEARCH The Time Search function makes it possible to quickly advance the tape to your desired position simply by entering the exact amount of playback time you want to skip. Example: To watch a program after 2 hours and 50 minutes from the present position, in either direction. 1 Select "TIME SEARCH" Press the TIME SEARCH button on the remote control.. 2 Enter your desired time Press the PLAY/ or STOP/ button until your desired time appears.
RECORDING · Please refer to the connection you are using, through pages 10, 11, or 12 on "ANTENNA/CABLE CONNECTIONS" before continuing. • Be sure to check that the "PWR." and the "VCR" indicators are both on. • Turn on the TV and set the TV to channel 3 or 4. Now set the CH3/CH4 switch on the back of the VCR to match the channel selected on the TV. . • Insert a cassette tape with its erase prevention tab in place.
SKIPPING UNWANTED SCENES DURING RECORDING Press the PAUSE button on the remote control to temporarily stop recording. Press the PAUSE or REC button to resume recording. Press the PAUSE or REC button to resume recording. PAUSE nnnnn NOTE: When the VCR is in the Pause mode, you may view the time remaining with n marks on the TV screen. Each n mark represents one minute. After five minutes, the VCR will automatically switch to the Stop mode to prevent tape damage.
2 Select the tape speed Press the TAPE SPEED button on the remote control to select the desired tape speed (SP/SLP). 3 Begin IRT Press the REC/IRT button on the VCR as many times as needed. The recording length will be determined by the number of times you press the REC/IRT button. Each additional push will increase the recording time by 30 minutes. It can be set for up to 8 hours.
TIMER RECORDING AUTOMATIC TIMER RECORDING You may set the VCR to start and end a recording while you are away. You can set seven programs to record on specific days, daily or weekly within a 1 year period. In the example below, the timer is being set to record: DATE: May 4th, 2000 SETTING TIME: from 7:30PM to 8:30PM CHANNEL: CH16 TAPE SPEED: SP PROGRAM NO: No. 1 · Please refer to the connection you are using, through pages 10, 11, or 12 on "ANTENNA/CABLE CONNECTIONS" before continuing.
2 Select your desired program number (1-7) Program number which is not set up flashes. Press the PLAY/ or STOP/ button until your desired program number appears. (Example: 1) Then, press the F.FWD/ button. PROGRAM NUMBER 1 DATE -- / -START TIME -- / -- -END TIME -- / -- -CHANNEL -REC SPEED -- 3 Select once, daily, or weekly recording For once recording: Press the PLAY/ or STOP/ button to point to "ONCE", and then press the F.FWD/ button.
ONE TIME PROGRAM PROGRAM NUMBER 1 DATE 05/04 THUR START TIME 07: -- -END TIME -- : -- -CHANNEL -REC SPEED -- 6 Set the start minute Press the PLAY/ or STOP/ Then, press the F.FWD/ Next, press the PLAY/ F.FWD/ button until the desired minute appears. (Example: 30) button. or STOP/ button to point to "AM" or "PM". (Example: PM) Then, press the button.
REC SPEED 10 Set the tape speed Press the PLAY/ or STOP/ -- button until the desired tape speed appears. (Example: SP) ONE TIME PROGRAM PROGRAM NUMBER 1 DATE 05/04 THU START TIME 07: 30 PM END TIME 08: 30 PM CHANNEL 16 REC SPEED SP →SP SLP 11 Finish setting the program Press the F.FWD/ button. Program 1 is now completed. • To set another program, repeat steps [2] to [11]. • Press the RESET/EXIT button to return to original mode. 12 Set the timer Press the POWER button to turn off.
NOTE: If some empty program numbers exist, the lower program number appears on the TV screen by pressing the REW/ button. In this case, you can enter the new program. Press the F.FWD/ button during program number flashes, then continue with the step [3] in the "AUTOMATIC TIMER RECORDING" section. 4) Press the F.FWD/ button.
COPYING A VIDEO TAPE You can make copies of video tapes made by friends or relatives for your enjoyment. Warning: Unauthorized recordings of copyrighted video tapes may be an infringement of copyright laws. Connect the editing (recording) VCR (this unit), source (playing) VCR (another VCR) and your TV using the following diagram. NOTE: • You can use the audio and video input jacks on the front panel of the editing (recording) VCR instead of using the jacks on the back.
ON SCREEN DISPLAY NOTE: VCR power and the "VCR" indicator must be on. • To check the Count, Clock and Channel number, press the DISPLAY button on the remote control. Each time you press the DISPLAY button , TV screen will change as shown below. • It is normal for the status display (STOP, PLAY etc.) and the tape speed display (SP, LP, (playback only), or SLP) to disappear after 5 seconds. DIGITAL DISPLAY. 1. PWR. (power) indicator- Lights up when the power is turned on. 2.
CONTROLLING YOUR TV OR CABLE CONVERTER WITH THE VCR'S REMOTE This Hitachi remote control can be used with your TV as well as the VCR, as long as your TV comes with a remote control. This feature comes in handy--you don't have to juggle two remotes. The remote control is compatible with the fifteen makers of TV's listed below--but don't be alarmed if yours is not on our list. You may still be able to program the remote for your TV.
REMOTE CONTROL OF THE TV PROGRAMMING THE REMOTE CONTROL OF THE TV 1 Turn on the TV Turn on the TV (any channel is okay). 2 Program the remote control Aim the VCR's remote control at your TV set. Hold down the TV button (not the VCR/TV button) while you press the number corresponding to your brand of television as shown in the chart. For example; If you have an RCA television, press the TV and 0 at the same time.
TROUBLESHOOTING GUIDE If you have followed the instructions contained in this manual and have difficulty in operating your VCR, locate the PROBLEM in the left column below. Check the corresponding CORRECTIVE ACTION columns to remedy the problem. PROBLEM CORRECTIVE ACTION No power. • Make sure the AC cord is connected to an AC outlet. • Make sure the power is turned on. Timer recording is not possible. • Make sure the timer recording is set correctly. • Make sure the power is off.
TECHNICAL SPECIFICATIONS Format: Video Signal System: Record/Playback System: VHS NTSC color EIA standard Video: 4 heads Audio: VHS Hi-Fi stereo record/playback system Tape Speed: 33.35mm/s (SP), 16.67mm/s (LP)(Playback Only), 11.12mm/s (SLP) RF Input: UHF/VHF 75 ohm Tuner: 181 channel tuning ability *(125 cable channels) Type: Auto programming frequency synthesis Power Input: AC120V 60Hz Power Consumption: 14 W nominal Cabinet Size: 14-1/4" (W) x 3-5/8" (H) x 8-3/4" (D) 36.0cm (W) x 9.2cm (H) x 22.
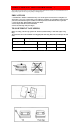
CABLE CHANNEL DESIGNATIONS If you subscribe to cable TV, the channels are displayed as 1-125. Cable companies often designate channels with letters or letter-number combinations. Please check with your local cable company. The following is a chart of common cable channel designations. DECLARATION OF CONFORMITY with FCC Rules for Electromagnetic Compatibility Products: Video Deck Models: VT-FX6500A Trade Name: HITACHI This device complies with part 15 of FCC Rules.