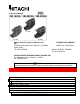
Instruction Manual VM-1800A / VM-2800A / VM-3800A Hitachi Home Electronics (America), Inc. INC. 3890 Steve Reynolds Blvd., Norcross, GA 30093 Pointe Claire, Tel. 404-279-5600 HITACHI (HSC) CANADA 3300 Trans Canada Hwy., Quebec, H9R1B1, CANADA Tel. 514-697-9150 HITACHI SALES CORPORATION OF HAWAII, INC. 3219 Koapaka Street, Honolulu, HI 96819 Tel. 808-836-3621 video camcorder.
WHEN USING WITH THE CAR BATTERY (By using optional car battery cord Hitachi VMCC70A)................................................................................................................................................. 13 CHECKING THE BATTERY .................................................................................................................. 14 CHARGING A BATTERY ......................................................................................................................
CAUTIONS CAMCORDER TO VCR DUBBING....................................................................................................... 51 FLYING ERASE HEAD .......................................................................................................................... 52 ATTACHING THE OPTIONAL TELE OR WIDE CONVERTER LENS ............................................. 52 USING THE BUILT-IN CAMERA LIGHT (For VM-2800A/3800A)....................................................
CAUTIONS CAUTION: TO PREVENT ELECTRIC SHOCK, MATCH WIDE BLADE OF PLUG TO WIDE SLOT, FULLY INSERT. "This digital apparatus does not exceed the Class B limits for radio emissions from digital apparatus as set out in the interference-causing equipment standard entitled " Digital Apparatus", ICES-003 of the Department of Communications." Warning: This device complies with Part 15 of the FCC rules.
PRECAUTIONS PRECAUTIONS Any problems that occur as a result of any of the following conditions will not be covered by our warranty. Be careful that no water, dust, or sand enters the camcorder. When you are not using the camcorder, switch off the power and attach the lens cap. When you shoot at a scene which contains an extremely bright object such as the the sun or a light source, a bright vertical bar may appear in the picture.
IMPORTANT SAFEGUARDS This instruction manual shows the illustrations for the VM-3800A. * This video camcorder with this marking incorporates high-quality picture technology and is compatible with any video cassette recorder bearing mark. the ACCESSORIES Check to make sure you have the following components and accessories (besides the camcorder unit itself) before disposing of the packing material. 1. Lead-acid rechargeable battery VM-BP66 for VM-1800A/VM-2800A VM-BP67 for VM-3800A 2. AC adaptor/charger 3.
IMPORTANT SAFEGUARDS your video product, safety is a major factor in the design of every instrument. But, safety is your responsibility too. This page lists important information that will help to assure your enjoyment and proper use of a Video Camcorder and accessory equipment. Please read it carefully before operating your video product and keep it in a handy place for future reference.
IMPORTANT SAFEGUARDS likely to be walked on or pinched by items placed upon or against them, paying particular attention to cords at plugs, convenience receptacles, and the point where they exit from the appliance. 8 Ventilation -- Slots and openings in the cabinet are provided for ventilation to ensure reliable operation of the video product and to protect it from overheating. These openings must not be blocked or covered.
IMPORTANT SAFEGUARDS in wire to an antenna discharge unit, size of grounding conductors, location of antennadischarge unit, connection to grounding electrodes, and requirements for the grounding electrode. See example below: EXAMPLE OF ANTENNA GROUNDING 13 Power Lines -- An outside antenna system should not be located in the vicinity of overhead power lines or other electric light or power circuits, or where it can fall into such power lines or circuits.
IMPORTANT SAFETY INSTRUCTIONS FOR AC ADAPTER/CHARGER SERVICE 17 Servicing -- Do not attempt to service this video product yourself as opening or removing covers may expose you to dangerous voltage or other hazards. Refer all servicing to qualified service personnel. 18 Conditions Requiring Service -- Unplug this video product from the wall outlet and refer servicing to qualified service personnel under the following conditions. a. When the power-supply cord or plug is damaged b.
ELECTRONIC VIEWFINDER when disconnecting charger. 8. Make sure cord is located so that it will not be stepped on, tripped over, or otherwise subjected to damage or stress. 9. Do not operate charger with damaged cord or plug--replace them immediately. 10. An extension cord should not be used unless absolutely necessary. Use of improper extension cord could result in a risk of fire and electric shock. If extension cord must be used, make sure: A.
POWER SOURCES 2. Turn the eyepiece. You can adjust the position and angle of the viewfinder so you can see through it easily. Cautions: Do not force the viewfinder to rotate completely around. This will damage the viewfinder and/or camcorder. When pulling the viewfinder out or returning it to its original position, hold the viewfinder by the swivel selection. Do not hold the diopter control side.
POWER SOURCES To attach, align the mark " " of the battery with that of the camcorder so that the battery fits into the groves, and slide the battery downward, as illustrated. To remove the battery: Push and hold "Battery" release lever, then slide the battery to the upside and remove. WHEN USING WITH THE AC ADAPTER/CHARGER (Provided) 1. Plug the AC adaptor/charger power cord into AC electrical outlet. 2. Connect one end of the DC cord (provided) to the "DC IN 9.6V" of the AC adaptor/charger.
CHECKING THE BATTERY 1. Connect the small plug of the car battery cord to the "DC IN 9.6V" jack of the camcorder. 2. Connect the other end of the car battery cord to the car's cigarette lighter socket. NOTES: The car battery cord is designed to be used only with automobiles having a 12-volt negative ground system. To prevent fire or shock hazard or damage to your camcorder, please use only the specified car battery cord.
CHARGING A BATTERY CHARGING A BATTERY 2 1. Plug the AC adaptor/charger power cord into AC electrical outlet. 2. Attach the battery to the AC adaptor/charger. Align the mark " " on the battery with that of AC adaptor/charger and push the battery flush with the AC adaptor/charger and slide it in the direction of arrow. NOTE: You must remove the DC cord from the AC adaptor/charger to charge the battery. If the DC cord is connected, "CHARGE" light will not light. 3.
MAKING A SAMPLE RECORDING The battery may be damaged if operated at temperatures above 122ºF (50ºC). Operation time will decrease at extremely low temperatures. 7. After repeated chargings and use, the operation time will gradually decrease. When operation time becomes too short to be useful, it is time to replace the battery. 8. If "CHARGE" and "POWER" lights on the AC adaptor/charger start flashing, remove the battery and then reattach it.
MAKING A SAMPLE RECORDING 4. Press and hold the small button on "POWER" switch, and then slide it to the "CAM" position. The "POWER" indicator will light and the camcorder will enter record/pause mode automatically. NOTES: If the erase prevention tab on the cassette is removed, the "TAPE" indication in the viewfinder flasher for several seconds and the camcorder will not enter record/pause mode. See page 43 for "EYEPIECE ADJUSTMENT". 5. Now, press "REC/PAUSE" button to start shooting the picture.
MAKING A SAMPLE RECORDING 7. After recording, press and hold the small button on the "POWER" switch, and then slide it to "VIDEO". The camcorder will now be in the stop mode. 8. Press "REW" button. The tape will be rewound to the beginning 9. Press "PLAY" button. The picture you just recorded will be seen through the viewfinder. NOTE: If you connect the camcorder to your TV, you can see the picture played back on your TV. Refer to "VIEWING THE PICTURE PLAYED BACK ON YOUR TV" on page 38. 10.
AUTOMATIC REWIND 12. Always remove the power source from the camcorder after use. NOTE: If you have a cassette tape that has already been partially recorded on and you want to record the remaining blank section, see "QUICK EDIT" on page 27. AUTOMATIC REWIND When the tape reaches its end during playback, it automatically rewinds to the beginning and stops. IDENTIFICATION AND OPERATION OF CONTROLS Diagram of camera Diopter Control (for VM-2800A/3800A) Use this control to focus the viewfinder.
IDENTIFICATION AND OPERATION OF CONTROLS off automatically or manually in the record and record/pause modes depending on the position of "LIGHT" switch. Turn the camera light off after use. NOTE: The camera light turns on only in the record and record/pause modes. Microphone Sensitive to sounds coming from the direction in which the camera is pointed. 3 "FOCUS" Control (AUTO/MAN) Button (only for VM-3800A) Press these buttons simultaneously to select manual or automatic focus.
IDENTIFICATION AND OPERATION OF CONTROLS the switch is set to "OUT", the "AUDIO" and "VIDEO" jacks can be used as output jacks, and when the switch is set to "IN", they can be used as input jacks. "RF DC OUT" Jack Connect the RF converter unit (optional) to this jack. 5 "AUDIO/VIDEO" Jacks These can be used as input or output jacks depending on the position of "AV OUT/IN" switch.
IDENTIFICATION AND OPERATION OF CONTROLS Press this button to create and record personalized titles on you r videos with the camcorder's built-in titler. (See "TITLE RECORDING" on page 29.) "DATE / TIME" Button Press this button to display the date and time in the viewfinder. Whenever the date and time appear in the viewfinder, they will be recorded on the tape. "RESET" Button When the linear time counter is displayed in the viewfinder, pressing this button resets the counter to "0000".
IDENTIFICATION AND OPERATION OF CONTROLS "STOP/EJECT" Button The "STOP/EJECT" button is used to stop playback, rewind, and fast forward operations. The "STOP/EJECT" button has no effect during record operation. This button is used in the stop mode to open the cassette holder. "F.FWD" Button Press this button during stop or rewind mode, and fast-forwarding starts. " " appears in the viewfinder.
DATE/TIME SETTING Graphics in the Electronic Viewfinder "BRIGHT', "COLOR" and "TINT" controls (for VM-2800A/3800A) Use to adjust the picture color in the viewfinder. See page 43. "REC/PAUSE" Button This button is used to control the camcorder. When this button is pressed with the camcorder set to the recording mode, the tape runs to start recording. "REC" appears in the viewfinder.
DATE/TIME SETTING NOTES: The backup battery should be charged every two months. If it is not charged periodically, it will be over-discharged and its life will be shortened. A cassette cannot be loaded or ejected when setting the date and time. 1. Press and hold the small button on "POWER" switch, and then slide it to "CAM" position. 2. Press "DATE/TIME" button. Date and time appear in the viewfinder and "1" flashes. 3. Press "F.FWD" button to select correct month. Hold button down to advance rapidly.
AUTOMATIC DATE RECORDING 8. After setting AM or PM, press "DATE/TIME" button to change the display and start the internal clock. It is recommended that you press "DATE/TIME" button to match the time signal. 9. Press "DATE/TIME" button after setting the clock. The display will change as follows each time the button is pressed. NOTE: The date/time graphics will be recorded whenever they appear in the viewfinder. To correct date/time information after starting the date/time 1.
PROGRAM AE (Auto Exposure) If the date changes while recording continues over 10 seconds, the date is recorded for 10 seconds when recording is restarted after the camcorder has been set to the standby mode. Press "DATE/TIME" button until " " and the date appear in the viewfinder before you begin to record. The date will be recorded whenever it appears in the viewfinder.
MANUAL FOCUS (Only for VM-3800A) The range of the object with which auto focus can be used. On "T" side: about 3.3 feet (1m) from the lens surface to infinity. On "W" side: about 0.4 inches (1 cm) from the lens surface to infinity. The auto focus will not work under the following conditions. 1. Objects not in the center of the viewfinder. 2. Objects at far and near positions at the same time. 3. Objects lit by a spotlight or neon signs, etc. 4. Objects behind glass with water droplets or dust on it.
POWER ZOOM NOTE: To return to auto focus press the FOCUS control (AUTO/MAN) buttons and "FOCUS" disappears from the viewfinder. POWER ZOOM Press power zoom switch on the "W" side, and the picture gradually widens. Press the power zoom switch on the "T" side, and the picture gradually becomes telescopic. The zooming speed is slow when the power zoom switch is pressed lightly, and the zooming speed is fast when the switch is pressed strongly.
DIGITAL ZOOM The digital zoom increases the magnification of the power zoom by 2 times. You must place the subject you wish to magnify at the center of the viewfinder. Press and hold the power zoom T control until you find the picture you want. You control the zoom with the power zoom T and W controls. When "ZOOM" is not displayed in the viewfinder, normal zoom functions resume. NOTE: When the digital zoom is used, the more the image is magnified, the rougher the picture becomes.
INSTANT ZOOM (Only for VM-3800A) NOTES: When digital zoom is used, the more the image is magnified, the coarser the picture becomes. Also even slight shaking of the camcorder is conspicuous. When "16:9" is displayed in the viewfinder, the picture format is switched from 4:3 to 16:9. See "16:9 MODE" on page 25. INSTANT ZOOM (Only for VM-3800A) The instant zoom feature activates the digital zoom to magnify the subject 1.5 regardless of zooming engaged by the power zoom T and W controls. Press the INST.
MACRO MACRO 6 Allows you to shoot objects as close as 0.4 inches (1 cm) from the lens tip. Press and hold "W" side of power zoom switch. An object is auto focused. NOTES: Determine the size of the object by moving the camera backward and forward. Be careful as the lighting may tend to be insufficient when shooting in the above conditions. FADE IN / FADE OUT Use the fade feature to add a professional touch to your recordings. Use the FADE button to select one of the three fade options.
FADE IN / FADE OUT upper left corner of the viewfinder. Wipe fade: The picture opens gradually from the center of a black screen or closes into the center to a black screen. " " appears in the upper left corner of the viewfinder. Zoom fade: Fades in while zooming from a white screen or fades out while zooming to a white screen. " " appears in the upper left corner of the viewfinder. Fading In 1. Use the FADE button to select a fade option before recording. 2.
INDEX SIGNAL RECORDING INDEX SIGNAL RECORDING 7 Indexing your tapes while recording makes it easy to find desired program segments when you play back the tape in a VCR that has a compatible indexing feature called the "VHS Index Search System". See your VCR's instruction manual for index playback instructions. "INDEX" signals are recorded when the following operations are performed. When power is turned on about 4 hours after it is switched off and then recording is started.
INSTANT REVIEW tape at that position. INSTANT REVIEW 1. In record/pause (stand-by) mode, press "REVIEW" button, and the last few seconds of the recorded scene is played back in the reverse direction and then played back in the forward direction. 2. When the tape reaches the end of the scene you have just recorded, the camcorder returns to the record/pause (stand-by) mode. Recording starts again when the "REC/PAUSE" button is pressed again.
DISPLAY BUTTON DISPLAY BUTTON Each time the "DISPLAY" button is pressed, the display in the viewfinder switches as follows. When the tape counter with memory is displayed in the viewfinder, the same display appears on the screen of the connected TV/monitor receiver. REMAINING TAPE The tape remaining display shows the remaining tape that can be used for recording and playback, using seven dashes. This feature is handy when recording since it lets you know how long you can record on the loaded tape.
TITLE RECORDING disappear. " " is displayed for 10 seconds after the tape starts to run. NOTE: When the remaining recording tape time becomes less than about five minutes, "TAPE END" flashes in the viewfinder. TITLE RECORDING You can easily create and record personalized titles on your videos with the camcorder's built-in titler. The titler will store 2 different title pages in memory. Once a title is stored, it can be displayed and recorded at any time.
TITLE RECORDING 3. Press "SHIFT" button repeatedly to move the flashing cursor to the place you want to begin your title. 4. Select the first character for your title by pressing the "-" or "+" button repeatedly until the desired character appears. NOTE: Each title can contain up to two lines of 16 characters each. A chart showing the characters contained in the titler is located on page 30. 5.
TITLE RECORDING Recording titles on a tape in the camcorder 1. Slide "POWER" switch to "VIDEO". 2. Locate the position on the tape that you wish to record the title. 3. Set "POWER" switch to "CAM". 4. Press "TITLE" button to display the title graphics. 5. Press "PAGE" button until the title you wish to record appears in the viewfinder. 6. Press "REC/PAUSE" button to start the title recording. 7. Press "TITLE" button to remove the title graphics from the viewfinder. The camcorder will now record as normal.
USING THE WIRELESS REMOTE CONTROL (Only for VM-3800A) ABCDEFGHIJKLMNOPQRSTUVWXYZ0123456789?'./,-;:< > ! (blank) USING THE WIRELESS REMOTE CONTROL (Only for VM-3800A) Use the wireless remote control to operate the camcorder from a distance. (1) TV Control Buttons Used for controlling the TV. POWER: Turns the TV on and off. AVX: Used for recording picture and sound from an auxiliary input. VOLUME: Increase ( ) or decrease ( ) the volume.
USING THE WIRELESS REMOTE CONTROL (Only for VM-3800A) 2. Press the PLAY button and hold it for about two seconds. 3. Insert the battery with the positive (+) terminal facing up. 4. Replace the battery holder with battery in the remote control making sure that it is fully inserted. WARNING: KEEP THE BATTERY AWAY FROM CHILDREN AND PETS. IF SWALLOWED CONSULT A PHYSICIAN IMMEDIATELY FOR EMERGENCY TREATMENT.
CONTROLLING YOUR TV WITH THE CAMCORDER'S REMOTE CONTROL (Only for VM-3800A) The wireless remote control may not function in strong light such as direct sunlight or very bright artificial lighting. Clear a path from the wireless remote control to the infrared ray receive. The wireless remote control won't work if an obstacle blocks the infrared rays. The remote control code of this camcorder is Hitachi code 8VCRs that have "CAM" mode button.VCR2.
RECORDING TV PROGRAMS Zenith VOL( ) Sony ZOOM.(W) Magnavox REW Sanyo PLAY Goldstar1 F.FWD Toshiba AV DUB Goldstar 2 STOP NEC PAUSE (START/STOP) RCA DISPLAY Panasonic TITLE ON/OFF Mitsubishi ZOOM.(T) JVC COUNTER RESET Sharp REVIEW Controlling the TV Once programmed, the camcorder's remote control is ready to control the TV. Press the button of the TV function that you want. Be aware that not all of your TV's functions may work even though the remote control is correctly programmed.
AUDIO DUBBING 1. Connect the audio/video cable to "AUDIO OUT" and "VIDEO OUT" of your TV and VCR. 2. Connect the other end to "AUDIO" and "VIDEO" of camcorder. 3. Insert the cassette. NOTE: Power source must be connected to the camcorder. 4. Set "AV OUT/IN" switch to "IN" position. 5. Press and hold the small button on "POWER" switch, and then slide it to "CAM" position. The "POWER" indicator will light. 6. Turn on your TV or VCR and tune it to the channel you wish to record. 7.
AUDIO DUBBING The audio dubbing feature lets you record new audio (sound) on a previously recorded tape without erasing the original video. When you audio dub a tape, the previous audio is erased and replaced with new sound. NOTES: Sound from the built-in microphone and the AUDIO jack can be dubbed. When dubbing audio from the built-in microphone, set "AV OUT/IN" switch to "OUT" and do not connect the "AUDIO" jack. When dubbing audio from the "AUDIO" jack, set the "AV OUT/IN" switch to "IN". 1.
AUDIO AND VIDEO DUBBING AUDIO AND VIDEO DUBBING 9 The audio and video dubbing feature lets you record new audio (sound) and video (pictures) simultaneously on a previously recorded tape. When you audio and video dub a tape, the previous audio and video are erased and replaced with the new sound and pictures. The replacement audio and video can be the sound and picture taken by the camera or from a video source connected to "AUDIO" and "VIDEO" jacks on the camcorder.
AUDIO AND VIDEO DUBBING 5. Press "RESET" button to set the counter reading to "0000". 6. Press "DISPLAY" button so counter memory "M" appears. 7. Press "REW" button to rewind the tape to the approximate position from which you want to start dubbing. 8. Press "PLAY" button, and when the exact position to start dubbing is reached, press "REC/PAUSE" button. 9. Press "DUBBING AUDIO/VIDEO" and "PLAY" buttons simultaneously twice.
VIEWING THE PICTURE PLAYED BACK ON YOUR TV VIEWING THE PICTURE PLAYED BACK ON YOUR TV To play back a tape recorded on your camcorder and view it on your TV receiver, you must connect the camcorder to the TV receiver using either audio/video cable (supplied only with VM-3800A) or RF converter unit (optional). You also may play back the tape recorded by your camcorder on any other VHS video cassette recorder. The camcorder records and plays back in VHS standard speed (SP).
VIEWING THE PICTURE PLAYED BACK ON YOUR TV own, black and white streaks may appear on your TV screen. If this occurs, press "TRACKING" control (W or T) until the streaks disappear. When the cassette is ejected, the tracking is reset to normal. Example 2: If you have a VHS VCR, 1. Insert the recorded tape into your VCR. 2. Press "PLAY" button of your VCR. NOTE: When noise appears in the played back picture, adjust "TRACKING" control on the VCR so there is no noise.
STILL NOTE: If you want to watch a TV program with camcorder connected as illustrated, slide "POWER" switch of the camcorder to "OFF". STILL When "REC/PAUSE" button is pressed during playback, a still picture can be seen. To start again press "REC/PAUSE" button and playback will be resumed. NOTE: There will be some noise (interference) in the still picture. FORWARD AND REVERSE SEARCH When you press "F.
MEMORY MEMORY When the tape counter with memory indication appears in the viewfinder, a tape that is being rewound automatically stops when the counter reads approximately "0000". This is useful if there is a section of tape you want to review immediately after recording or if you want to return to the same point several times in a row. 1. Press "DISPLAY" button. (The indicator "M" appears beside the tape counter.) 2. Start playing or recording a tape. 3.
FLYING ERASE HEAD If you wish to exchange or copy some of your friend's favorite home recordings, the following instructions can be used to connect camcorder to VCR for this purpose. 1. Connect the audio/video cable to "AUDIO" and "VIDEO" of your camcorder. 2. Connect the other ends to "AUDIO IN", "VIDEO IN" of your VCR as shown in the diagram above. 3. Set "AV OUT/IN" switch to "OUT" position. 4. Play the tape on the camcorder and record it on the VCR.
USING THE BUILT-IN CAMERA LIGHT (For VM-2800A/3800A) 2. Remove both caps of the telephoto or wide angle lens. 3. Screw the lens into the threads on the front of camcorder lens assembly. USING THE BUILT-IN CAMERA LIGHT (For VM-2800A/3800A) Use the built-in camera light it you wish to shoot objects in dark places.
USING THE BUILT-IN CAMERA LIGHT (For VM-2800A/3800A) 3. After use, set the "LIGHT" switch to "OFF" or set the "POWER" switch of the camcorder to "OFF" position. CAUTION: During operation and/or after use of the camera light, the front surface and lamp of the camera light will be very hot. To avoid burns or hair damage, do not touch them with your hand. When the camera light is on, do not allow water to drop on the light.
EYEPIECE ADJUSTMENT NOTES: Do not touch the lamp directly with your fingers. It may shorten its service life. When the lamp is replaced, or when the front case of the camera light is removed, make sure the front case is attached to the camera light properly. Consult your nearest service center to replace the lamp. EYEPIECE ADJUSTMENT To use the electronic viewfinder without eyeglasses on, adjust the diopter control for optimum focus adjustment.
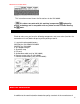
HOW TO ATTACH THE SHOULDER STRAP HOW TO ATTACH THE SHOULDER STRAP Attach the shoulder strap (provided), as illustrated. TROUBLESHOOTING Your camcorder is a highly sophisticated instrument. It has been carefully checked and adjusted at the factory under the most rigid quality control and inspection systems. However, should problems develop, check the following points and take the necessary corrective measures.
TROUBLESHOOTING CAMERA RECORDING Symptom Check Point & Correction Picture does not appear in the Remove the lens cap. viewfinder. `Slide the power switch to “CAMERA” Disconnect the AV input cable from the camera/recorder. The camera/recorder cannot go into Check the record protect tab on the the recording mode, even when the cassette. start/stop button is pressed. Make sure that the “FOCUS M” does not appear in the viewfinder. If it is displayed, press “Focus” select button to erase it.
CLEANING THE INSIDE OF THE ELECTRONIC VIEWFINDER "OUT" position. Adjust the tracking using "TRACKING" control Interference on playback picture. (power zoom switch). When you see the playback picture on your TV, adjust fine tuning knob on television set to obtain best picture. The pre-recorded tape is EP or LP recording. This camera/recorder is for use in SP recording only. Picture bends at the top of the TV screen. TV receiver is older type. It needs to be modified to work properly with camera/recorder.
HEAD CLEANING If dust or foreign matter adheres inside the viewfinder, clean it by using the following procedure. 1. Rotate and remove eye cup. 2. Clean the picture tube face and lens. To prevent scratching, use a soft non abrasive cloth, swab or lens cleaning paper. 3. Align the reference mark and rotate the eye cup in the direction of arrow. HEAD CLEANING Picture playback may become blurred or be interrupted. This does not mean that the recorded program has been erased.
HOTLINE Power requirements Power consumption Dimensions: Weight Operating temp. Storage temp. 9.6V DC VM-1800A: 7W (nominal) VM-2800A: 8W (nominal) VM-3800A: 8W (nominal) 4-3/8"(W) x 8-1/16" (H) x 12-1/4" (D) 111(W) x 205(H) x 311(D) mm 4.4 lbs (2.0 kg) 32°F ~ 104°F (0°C ~ 40°C) -4°F ~140°F (-20°C ~ 60°C) Video Recorder Section Format VHS Record/playback system Two video record/playback heads plus a flying erase head Video signal EIA standard NTSC color Tape speed 33.35 mm/sec. Video input 1.
ACCESSORY TO ADD MORE EXCITEMENT purchase and/or delivery receipts to the Hitachi Authorized Service Facility and service will be rendered in accordance with the terms of the limited warranty as stated on your warranty card or operating guide. Should you have any questions regarding in-warranty service, operation or technical assistance, please contact: Hitachi Home Electronics (America), Inc. 3890 Steve Reynolds Blvd Norcross, GA 30093 Tel 404-279-5600 Hitachi Sales Corporation of Hawaii 3219 Koapaka St.
ACCESSORY TO ADD MORE EXCITEMENT To place your order by mail, detach and mail the completed order form with credit card information, money order, or check in U.S. currency (payable to HITACHI HOME ELECTRONICS (AMERICA) INC.) to the following address: HITACHI HOME ELECTRONICS (AMERICA) INC. PARTS DIVISION 401 WEST ARTESIA BLVD. COMPTON, CA 90220 Order Form LIMITED WARRANTY Hitachi Home Electronics (America), Inc.
HITACHI WARRANTY CARD (USA Back) Honolulu, HI 96819 Tel: 808-836-3621 HITACHI WARRANTY CARD (USA Back) Warranty Limitations The Limited Warranty provided by Hitachi does not cover: A. Cabinet (exterior finish items), Battery Packs, Accessories, Head Cleanings, Video Tape Damage, or TV Set Modifications. B.
HITACHI WARRANTY CARD (Front) CANADA ONLY Model No. Serial No. Date of Purchase Dealer Name Dealer Address City State Zip HITACHI HITACHI WARRANTY CARD (Front) CANADA ONLY NOT VALID IN U. S. A. HITACHI VIDEO PRODUCTS GOLD CARD WARRANTY * See inside for the GOLD CARD advantages and how to get it. HITACHI EXCEPTIONAL PERFORMANCE HITACHI (HSC) CANADA INC.
HITACHI CANADA WARRANTY CARD (Back) accessories such as cables, batteries, etc. E - THIS PROTECTION PLAN DOES NOT COVER: (1) Damage caused by incorrect use or negligence, unauthorized alteration, improper storage or repairs done by an unauthorized service depot; (2) Damage caused by fire, flood, lightning, acts of God or other events beyond the control of Hitachi; (3) External parts such as the cabinet, knobs, remote control case, antenna, cords, etc....
HITACHI CANADA WARRANTY CARD (Back) NOTE: The GOLD CARD becomes the proof of your warranty. it assures you of a personalized quality service and it is accepted by our authorized service centres everywhere in Canada. However, to receive your exclusive Hitachi GOLD CARD, you must include a copy of your bill of sale with the return portion of this warranty registration card. "GOLD" WARRANTY PERIOD Video Tape Recorder, Tuner, Timer, 1 year parts and labour.
HITACHI CANADA WARRANTY CARD (Back) 12. Original installation (set-up) and all normal maintenance needed such as CLEANING OF VIDEO HEADS. 13. The replacement of the video camera pickup element if the pickup element has been OVER EXPOSED to an intense source of light. 14. Products sold in Canada by any organization other than HITACHI (HSC) CANADA INC.
HITACHI CANADA WARRANTY CARD (Back) 9 Audio and Video Dubbing on these 3 camcorders is done simultaneously! The camera cannot perform an audio dub independenly of a video dub and vice versa.