SAFTEY PRECAUTIONS -1- 777 Instruction Manual Video Camcorder VM-7500LA/VM-8500LA HITACHI HOME ELECTRONICS (AMERICA), INC. 1855 Donroch Court, San Diego, California 92173 Tel. 770-279-5600 HITACHI (HSC) CANADA INC. 6740 Campobello Road Mississauga, Ontario L5N 2L8 CANADA Tel. 905-821-4545 video camcorder. For maximum pleasure and convenience please read these Thank you for choosing the simple instructions before operating your camcorder. QR31031 ©Hitachi, Ltd.
SAFTEY PRECAUTIONS -2TABLE OF CONTENTS SAFTEY PRECAUTIONS .....................................................................................................................................................3 PRECAUTIONS......................................................................................................................................................................4 FEATURES .................................................................................................................
SAFTEY PRECAUTIONS -3- SAFTEY PRECAUTIONS WARNING: TO PREVENT FIRE OR ELECTRIC SHOCK, DO NOT EXPOSE THIS APPLIANCE TO RAIN OR MOISTURE. CAUTION: TO REDUCE RISK OF ELECTRIC SHOCK, DO NOT REMOVE COVER (OR BACK). NO USER - SERVICEABLE PARTS INSIDE. REFER SERVICING TO QUALIFIED SERVICE PERSONNEL. This symbol warns the user that uninsulated voltage within the unit may have sufficient magnitude to cause electric shock. Therefore, it is dangerous to make any kind of contact with any inside part of this unit.
PRECAUTIONS -4- PRECAUTIONS Any problems that occur as a result of any of the following conditions will not be covered by our warranty. Be careful that no water, dust, or sand enters the camcorder. When you are not using the camcorder, switch off the power and attach the lens cap. When you shoot at a scene which contains an extremely bright object such as the the sun or a light source, a bright vertical bar may appear in the picture.
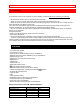
IMPORTANT SAFEGUARDS -5- Flying Erase Head No Yes • This instruction manual shows the illustrations for the VM-8500LA. This video camcorder with this marking incorporates high-quality picture technology and is * mark. compatible with any video cassette recorder bearing the With this camcorder you can view the picture being recorded or the playback picture whether on the LCD monitor or in the viewfinder.
IMPORTANT SAFEGUARDS -6- 2 Retain Instruction -- The safety and operating instructions should be retained for future reference. 3 Heed Warnings -- Comply with all warnings on the video product and in the operating instructions. 4 Polarized Plug -- This video product is equipped with a polarized alternating-current line plug (a plug having one blade wider than the other). This plug will fit into the power outlet only one way. This is a safety feature.
IMPORTANT SAFEGUARDS -7- 12 Outdoor Antenna Grounding -- If an outside antenna or cable system is connected to the video product, be sure the antenna or cable system is grounded so as to provide some protection against voltage surges and built-up static charges. Section 810 of the National Electrical Code, ANSI/NFPA No.
IMPORTANT SAFETY INSTRUCTIONS FOR AC ADAPTOR/CHARGER -8- c. If the video product has been exposed to rain or water. d. If the video product does not operate normally by following the operating instructions. Adjust only those controls that are covered by the operating instructions. Improper adjustment of other controls may result in damage and will often require extensive work by a qualified technician to restore the video product to its normal operation. e.
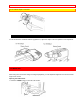
ELECTRONIC VIEWFINDER (EVF) -9- Article 820-40 of the NEC that provides guidelines for proper grounding and, in particular, specifies that the cable ground shall be connected to the grounding system of the building, as close to the point of cable entry as practical". ELECTRONIC VIEWFINDER (EVF) Set the viewfinder to the position shown in the figure when carrying the camcorder or storing it in the carrying case. Turn the viewfinder to the position shown below when shooting pictures. 1.
LCD MONITOR - 10 - Do not hold the diopter control side. EYEPIECE ADJUSTMENT To use the electronic viewfinder without eyeglasses on, adjust the diopter control for optimum focus adjustment. LCD MONITOR When using the LCD monitor during recording and playback, you can adjust the brightness of its screen and the angle of the monitor. Opening the LCD monitor 1. Press the "OPEN" button to open the LCD monitor.
LCD MONITOR - 11 - NOTE: Opening or closing the LCD monitor switches the picture to appear on the LCD monitor or in the viewfinder. Adjusting the brightness of the LCD screen NOTE: Even when the picture on the LCD monitor is adjusted, the recorded video will not change. 1. Connect the power source. (See pages 10 and 11.) Press the red button on the CAM/OFF/VIDEO switch as you slide it to CAM or VIDEO. 2. Use the bright control on the side of the LCD monitor to adjust the brightness of the LCD screen.
ACTIVE SCREEN - 12 - clearly. If the LCD screen becomes dirty, use a soft cloth to wipe off the dirt. • If the camcorder is used in a cold place and becomes to cold, the LCD screen will be dim for a while after the power is turned on. When the temperature inside the camcorder rises, the brightness of the picture will become normal. • Do not hold by the LCD monitor as this could cause a malfunction. • Open the LCD monitor by 90° before changing its direction.
ACTIVE SCREEN - 13 - WHEN USING WITH THE AC ADAPTOR/CHARGER (Provided) 1. Plug the AC adaptor/charger power cord into AC electrical outlet. 2. Connect one end of the DC cord (provided) to the "DC IN 9.6V" jack of the camcorder. Connect the other end of the DC cord to the "DC OUTPUT" of the AC adaptor/charger. NOTES: • The AC adaptor/charger cannot charge the battery and operate the camcorder at the same time.
CHARGING THE BATTERY - 14 - CHECKING THE BATTERY When the " " indication appears in the viewfinder and flashes while the camcorder is being operated with a battery (provided), it indicates that the battery charge is low. Charge it or replace it with a charged battery. Press the "DISPLAY" button. The remaining battery power level will appear in the viewfinder. " is displayed. After several minutes, the symbol will change to " ". When the battery is fully charged, " " and start blinking.
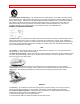
CHARGING THE BATTERY - 15 - 2. Attach the battery to the AC adaptor/charger. Align the mark " " on the battery with that of AC adaptor/charger and push the battery flush with the AC adaptor/charger and slide it in the direction of arrow. NOTE: You must remove the DC cord from the AC adaptor/charger to charge the battery. If the DC cord is connected, the "CHARGE" light will not light. 3.
INSERTING AND REMOVING CASSETTES - 16 - INSERTING AND REMOVING CASSETTES A power source must be connected before inserting or removing cassettes. Once connected, cassettes can be inserted or removed whether the CAM/OFF/VIDEO switch is on or off. Inserting a cassette 1. Connect the POWER SOURCE. (See pages 10 and 11.) 2. Press "STOP/EJECT". The cassette door will open automatically. 3. Insert the cassette so the transparent window is toward you and the arrow toward the cassette holder.
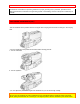
IDENTIFICATION AND OPERATION OF CONTROLS - 17 - IDENTIFICATION AND OPERATION OF CONTROLS Click here for diagram. Electronic Viewfinder (EVF) Displays what the camcorder lens sees. The electronic viewfinder also functions as a convenient monitor during playback of recorded material. For VM-8500LA Diopter Control Use this control to focus the viewfinder. Speaker You can listen to the recorded sound.
IDENTIFICATION AND OPERATION OF CONTROLS - 18 - NOTE: When you fade scenes in and out, the sound will also fade in and out with the picture. (See page 32.) "LIGHT" Switch (only for VM-8500LA) When this switch is set to "AUTO", the camera light turns on or off automatically according to the brightness of the object. When the switch is set to "ON", the camera light turns on. Set the switch to "OFF" to turn the light off manually.
IDENTIFICATION AND OPERATION OF CONTROLS - 19 - When the tape counter is displayed in the viewfinder, pressing this button resets the counter to "0000". "DISPLAY" Button If this button is pressed, the tape counter, remaining battery power level, etc. appear in the viewfinder and the tape's 0000M position is stored in memory. If the camcorder is connected to a TV/monitor receiver, the same display as that in the viewfinder appears on the screen. (See "DISPLAY BUTTON" and "MEMORY" on page 27.
IDENTIFICATION AND OPERATION OF CONTROLS - 20 - NOTE: When the camcorder is in record/ pause (stand-by) mode, pressing and holding this button will play the tape at normal speed. Click here for diagram. "BATTERY EJECT" Lever Releases the battery attached to the video camcorder. Cassette Holder Press "STOP/EJECT" in the stop mode to open the cassette holder. Be aware of the cassette direction when inserting. NOTE: Power source must be connected to open the cassette holder. "DC IN 9.
IDENTIFICATION AND OPERATION OF CONTROLS - 21 - "REC/PAUSE" Button This button is used to control the camcorder. When this button is pressed with the camcorder set to the recording mode, the tape runs to start recording. "REC" appears in the viewfinder. When this button is pressed again, " " appears instead of "REC" and the tape stops and the camcorder enters the record/ pause (stand-by) mode. NOTE: This button may be also used to display a still picture during playback mode.
MAKING A SAMPLE CAMERA RECORDING - 22 - MAKING A SAMPLE CAMERA RECORDING 1. Connect the power source. (See pages 10 and 11.) 2. Insert the cassette. (See page 13.) 3. Unfold the extension shoulder pad. When recording while viewing the LCD monitor, fit the extension shoulder pad on your shoulder; the LCD screen will be easy to see. 4. Open the LCD monitor if you want to view the picture being recorded on the LCD monitor. If you want to view the picture in the viewfinder, leave the monitor close.
MAKING A SAMPLE CAMERA RECORDING - 23 - • See page 8 for "EYEPIECE ADJUSTMENT". 6. Now, press "REC/PAUSE" to start shooting the picture. The "REC" indication appears in the viewfinder or on the LCD monitor and you are now recording the picture you see through the viewfinder or LCD monitor. 7. Press "REC/PAUSE" to stop recording. Press the button again to resume recording.
PLAYBACK - 24 - 1. In record/pause (stand-by) mode, tap "REW/ REVIEW", and the last few seconds of the recorded scene is played back in the reverse direction and then played back in the forward direction. 2. When the tape reaches the end of the scene you have just recorded, the camcorder returns to the record/pause (stand-by) mode. Recording starts again when "REC/PAUSE" is pressed again.
PLAYBACK - 25 - NOTES: • Decrease the sound volume od the camcorder when you play back a recording by connecting the camcorder to your TV. If the volume of the camcorder is set to maximum, the played back picture may be distorted. Make sure that the volume is not set to maximum during recording as it could distort the played back picture. • When the LCD monitor is turned on and left as it is, the monitor becomes warm, but this does not indicate a fault.
DATE/TIME SETTING - 26 - When you press "F.FWD" or "REW/REVIEW" during playback, the tape will be played back at a speed about 3 times faster than the normal playback speed, and you can easily locate a certain spot on the tape. Press "PLAY" to return to normal playback mode or press "STOP/EJECT" to stop tape movement. NOTE: There will be some noise (interference) in the forward or reverse search pictures while visually scanning.
DATE/TIME SETTING - 27 - 1. Press and hold the small button on "CAM/OFF/ VIDEO", and then slide it to "CAM" position. 2. Press "DATE/TIME". Date and time appear in the viewfinder and "'1" flashes. 12:00 AM 1/ 1/1999 3. Press "F.FWD" to select correct month. Hold button down to advance rapidly. If you go past the month you want to set, press "REW/REVIEW". When the correct month appears, press "STOP/EJECT". 12:00 AM 11/ 1/1999 4. Press "F.FWD" to select correct date. Hold button down to advance rapidly.
DATE RECORDING - 28 - 12:00 AM 11/ 5/1999 6. Press "F.FWD" or "REW/REVIEW" as many times as may be required to select correct hour, and then press "STOP/EJECT". 7. Repeat step 6 to select minute and AM/PM. 10:30 AM 11/ 5/1999 8. After setting AM or PM, press "DATE/TIME" to change the display and start the internal clock. It is recommended that you press "DATE/TIME" to match the time signal. NOTE: After the date and time are set, " AUTO" appears and the camcorder enters the automatic date recording mode.
DATE RECORDING - 29 - " AUTO" and date - Automatic date recording This option records the date automatically once a day at the beginning of recording for 10 seconds. AUTO 11/ 5/1999 NOTES: • The camcorder records the same date when; -the cassette is replaced. -you select " AUTO" and date display again. -the recording is less than 10 seconds long. • If the date changes while recording continues over 10 seconds, the new date is recorded for about 10 seconds the next time you make a recording.
AUTO FOCUS - 30 - 11/ 5/1999 No display - No date recording The camcorder does not record the date. Date and time - Date and time recording The camcorder records the date and time with the picture all the time. 10:30 AM 11/ 5/1999 3. Press "REC/PAUSE". Recording will start. NOTES: • When " started. • When " started.
AUTO FOCUS Good - 31 - No good The range of object with which auto focus can be used • On "T" side: about 2.6 feet (80 cm) from the lens surface to infinity. • On "W" side: about 3/8 inch (1 cm) from the lens surface to infinity. The auto focus will not work under the following conditions. 1. Objects not in the center of the viewfinder. 2. Objects at far and near positions at the same time. 3. Objects lit by a spotlight or neon signs, etc. 4. Objects behind glass with water droplets or dust on it.
DISPLAY BUTTON - 32 - DISPLAY BUTTON When "DISPLAY" is pressed, the information on the shutter speed, tape remaining, remaining battery level, etc. is displayed. When "DISPLAY" is pressed so the display appears in the viewfinder or on the LCD monitor, the same display appears on the screen of the connected TV/monitor receiver.
REMAINING TAPE - 33 - NOTE: Counter changes to 0000M when cassette is ejected. MEMORY When the tape counter with memory indication appears in the viewfinder or on the LCD monitor, a tape that is being rewound automatically stops when the counter reads approximately "0000M". This is useful if there is a section of tape you want to review immediately after recording or if you want to return to the same point several times in a row. 1. Press "DISPLAY". The tape counter and memory indicator "M" appear. 2.
REMAINING TAPE - 34 - When "DISPLAY" is pressed so the display appears in the viewfinder or on the LCD screen, the tape remaining display shows the remaining length of tape that can be used for recording and playback, using seven dashes. This feature is handy when recording since it lets you know how long you can record on the loaded tape. Insert a cassette in the camcorder and start recording or playback; 10 seconds later, the remaining tape will be " is displayed for 10 seconds displayed.
DIGITAL ZOOM - 35 - DIGITAL ZOOM The digital zoom increases the magnification of the power zoom by 4.5 times. You must place the subject you wish to magnify at the center of the viewfinder or LCD monitor. Press and hold the power zoom T control until you find the picture you want. You control the zoom with the power zoom T and W controls. When "DISPLAY" is pressed and the display appears in the viewfinder, "ZOOM" is displayed to signal to you that the camcorder is in the digital zoom area.
DIGITAL EFFECTS RECORDING - 36 - Allows you to shoot objects as close as 3/8 inch (1 cm) from the lens tip. Press and hold "W" side of power zoom switch. An object is auto focused. NOTES: • Determine the size of the object by moving the camera backward and forward. • Be careful as the lighting tends to be insufficient when shooting in the above conditions. INSTANT ZOOM The instant zoom feature activates the digital zoom to magnify the subject 1.
DIGITAL EFFECTS RECORDING - 37 - The digital processor in this camcorder allows you to record pictures and add special effects; 16x9 recording mode, a negative image (negative/positive recording), 240 times digital zoom feature (with instant zoom), a symmetric image, obtained by placing a mirror at the center of the screen (half-mirror recording), and an image in mosaic (mosaic recording).
DIGITAL EFFECTS RECORDING Mosaic Mode - 38 - Half-Mirror Mode ACTIVATING DIGITAL EFFECTS RECORDING 1. Press the camcorder in the record pause mode. 2. Press "DISPLAY" and repeatedly press "DIGITAL EFFECT" to select the digital effects record mode you want. "16x9": 16x9 Mode This picture format can be switched from 4:3 (the picture format of an ordinary TV set) to 16x9. The top and bottom of the picture in the viewfinder or on the LCD monitor become black bars.
FADE IN/FADE OUT - 39 - 3. Press "REC/PAUSE" to start recording. • To release digital effects recording, press "DIGITAL EFFECT" repeatedly in the record pause mode until the normal mode is restored. FADE IN/FADE OUT Use the fade feature to add a professional touch to your recordings. Use "DIGITAL FADE" to select the fade options. You can select the seven fade modes--the white fade, black fade, yellow, blue or green wipe fade, zoom fade and black-and-white fade.
FADE IN/FADE OUT - 40 - • Zoom fade: Fades in while zooming from a white screen or fades out while zooming to a white screen. When "DISPLAY" is pressed and the display appears in the viewfinder or LCD monitor, " corner of the viewfinder or LCD monitor. " appears in the upper left • Black-and-White fade: fades in from a black-and-white screen or fades out to a black-and-white screen.
INDEX SIGNAL RECORDING - 41 - • While you zoom to a distant subject. • While you approach a small subject. • While you walk around. • While you record from inside a moving vehicle. 1. Press "STABLE PIX" . When "DISPLAY" is pressed, the display will appear in the viewfinder or on the LCD monitor, along with STABLE PIX icon " ". 2. Press "REC/PAUSE" to start recording. When STABLE PIX is engaged the viewfinder or LCD image shakes with a slight delay.
TITLE RECORDING - 42 - NOTE: When "DISPLAY" is pressed and "INDEX" is displayed in the viewfinder or on the LCD monitor, an "INDEX" signal is recorded when recording is started, and when the "INDEX" signal has been recorded, "INDEX" disappears. QUICK EDIT (Edit Search) The quick edit feature allows you to search for the end of previously recorded material, or find a particular spot on your tape, to begin your editing, or record new material. Quick edit is used while the camcorder is in the record.
TITLE RECORDING - 43 - Creating a title 1. Attach a power source to the camcorder and slide "CAM/OFF/VIDEO" to either "CAM" or "VIDEO" position. 2. Press "TITLE". The flashing cursor will appear in the viewfinder. 3. Press "SHIFT" button repeatedly to move the flashing cursor to the place you want to begin your title. 4. Select the first character for your title by pressing "-" or "+" repeatedly until the desired character appears. L NOTE: A title contains two lines of up to 16 characters per line.
TITLE RECORDING - 44 - LUCKY BOY NOTE: Character may flash, however it will be recorded correctly without flashing. 7. After creating the title, press "TITLE" to remove the title graphics from the viewfinder or LCD monitor. Now title graphics is stored in memory. NOTE: As long as the correct current time can be displayed, the title is held in memory. Correcting errors during title storage 1. Press "SHIFT" repeatedly until the character to be corrected will flash. 2.
AUDIO DUBBING (only for VM-8500LA) - 45 - 4. Press "TITLE" to erase the display from the viewfinder. Chart of characters available in the titler ABCDEFGHIJKLMN0PQR STUVWXYZ0123456789 ? ' . / , - ; : < >! AUDIO DUBBING (only for VM-8500LA) The audio dubbing feature lets you record new audio (sound) on a previously recorded tape without erasing the original video (picture). When you audio dub a tape, the previous audio is erased and replaced with new sound.
AUDIO AND VIDEO DUBBING (only for VM-8500LA) - 46 - 3. Play the tape and press "REC/PAUSE" where you want to dub audio. • The camcorder enters the still play mode. 4. Press "DUBBING AUDIO/VIDEO" and "PLAY" at the same time. • "A.DUB II" appears in the viewfinder or on the LCD monitor. NOTE: If "DUBBING AUDIO/VIDEO" and "PLAY" are pressed twice, audio and video dubbing will start. In this case, press "STOP/EJECT" to release the dubbing mode. 5. Press "REC/PAUSE" to start audio dubbing. 6.
RECORDING TV PROGRAMS (only for VM-8500LA) - 47 - 1. Insert a recorded tape. Be sure that the record safety tab is not missing. 2. Place "CAM/OFF/VIDEO" in "VIDEO" position. 3. Press "DISPLAY" to display the tape counter. 4. Press "PLAY" and then "REW/REVIEW" or "F.FWD" to search to the approximate position of the tape on which you want to dub sound and picture. 5. Press "PLAY" again to search the exact position where you wish to stop dubbing and then press "REC/PAUSE" at the exact position. 6.
VIEWING THE PICTURE PLAYED BACK ON YOUR TV - 48 - 1. Connect the audio/video cable (not supplied) to "AUDIO OUT" and "VIDEO OUT" of your TV or VCR. 2. Connect the other end to "AUDIO" and "VIDEO" of camcorder. 3. Insert the cassette. NOTE: Power source must be connected to the camcorder. 4. Set "AV OUT/IN" to "IN" position. 5. Press and hold the small button on "CAM/OFF/VIDEO", and then slide it to "CAM" position. 6. Turn on your TV or VCR and tune it to the channel you wish to record. 7.
VIEWING THE PICTURE PLAYED BACK ON YOUR TV - 49 - To play back a tape recorded on your camcorder and view it on your TV receiver, you must connect the camcorder to the TV receiver using either audio/video cable (not supplied) or RF converter unit (optional). You also may play back the tape recorded by your camcorder on any other VHS video cassette recorder. The camcorder records and plays back in VHS standard speed (SP).
CAMCORDER TO VCR DUBBING - 50 - NOTE for VM-8500LA: Make sure that the "AV OUT/IN" is in the "OUT" position. 1. Disconnect the VHF antenna leads from the rear of the TV receiver. NOTE: Leave the UHF antenna leads connected to the TV. 2. Connect the VHF antenna lead to "IN FROM ANT" on the RF converter unit. If the cable is round (75 ohm), it will connect directly to the "IN FROM ANT".
USING THE BUILT-IN CAMERA LIGHT (Only for VM-7400A) - 51 - If you wish to exchange or copy some of your friend's favorite home recordings, the following instructions can be used to connect camcorder to VCR for this purpose. NOTE for VM-8500LA: Make sure that the "AV OUT/IN" is in the "OUT" position. 1. Connect the audio/video cable to "AUDIO" and "VIDEO" of your camcorder. 2. Connect the other ends to "AUDIO IN", "VIDEO IN" of your VCR as shown in diagram above. 3.
USING THE BUILT-IN CAMERA LIGHT (Only for VM-7400A) - 52 - When "LIGHT" is set to "AUTO", the camera light turns on automatically when the camcorder is pointed at objects in a dark place and turns off when it is pointed at objects in a bright place. CAUTION: The power consumption of the built-in camera light is about a half that of the camcorder. Therefore, if the camera light is turned on when a fully charged battery pack is attached, the operating time of the battery falls to about a half.
ATTACHING THE OPTIONAL TELE OR WIDE CONVERTER LENS - 53 - To replace the front case, pass the lamp through the hole of the reflection plate then attach the upper hooks to the camera light, and then attach the lower hook to the camera light. NOTES: • Do not touch the lamp directly with your fingers. It may shorten its service life. • When the lamp is replaced, or when the front case of the camera light is removed, make sure the front case is attached to the camera light properly.
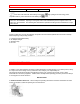
TROUBLESHOOTING - 54 - HOW TO ATTACH THE SHOULDER STRAP Attach the shoulder strap (provided), as illustrated. TROUBLESHOOTING Your camcorder is a highly sophisticated instrument. It has been carefully checked and adjusted at the factory under the most rigid quality control and inspection systems. However, should problems develop, check the following points and take necessary corrective measures. INSERTING OR REMOVING THE CASSETTE Symptom Cassette holder cannot be opened when you press "STOP/EJECT".
TROUBLESHOOTING - 55 - Check Point & Correction Symptom Picture does not appear in the viewfinder. * Remove the lens cap. * Set "CAM/OFF/VIDEO" to "CAM" position. The camcorder can not go into the * The cassette has had the erase prevention tab removed. Stick a recording mode, even when piece of cellophane tape over the erase prevention hole or select a "REC/PAUSE" is pressed. different cassette. * Set "CAM/OFF/VIDEO" to "CAM" position. Picture is out of focus.
CLEANING THE INSIDE OF THE ELECTRONIC VIEWFINDER CLEANING THE INSIDE OF THE ELECTRONIC VIEWFINDER If dust or foreign matter adheres inside the viewfinder, clean it by using the following procedure. For VM-7500LA: 1. Push the tab and hold it, then open the cover. 2. Clean the picture tube face and lens. To prevent scratching, use a soft non abrasive cloth, swab or lens cleaning paper. 3. Close the cover. For VM-8500LA: 1. Rotate and remove eye cup 2. Clean the picture tube face and lens.
HEAD CLEANING - 57 - 3. Align the (•) mark on the eye cup with the (-) mark on the viewfinder, and then rotate the eye cup in the direction of the arrow until a click is heard. HEAD CLEANING • Picture playback may become blurred or be interrupted. This does not mean that the recorded program has been erased. • Dirt accumulated on the head after long periods of use causes this problem. In this case, head cleaning requiring highly technical care is necessary.
For U.S.A. only General Power requirements Power consumption Dimensions Weight Operating temperature Storage temperature - 58 - 9.6V DC 7.5W (nominal) 4-3/4" (W) x 8-3/8" (H) x13-1/8" (D) 121 (W) x 213 (H) x 334 (D) mm 4.7 lbs (2.
ACCESSORIES ADD EXCITEMENT - 59 - contact: Hitachi Home Electronics (America), Inc. 1855 Dornoch Court, San Diego, California 92173 Tel 619-661-3441 ACCESSORIES ADD EXCITEMENT We know that once you discover how much your VM-7500LA/VM-8500LA can add to your life you will want to use these accessories for even more excitement. Converter lenses and car cords are just a few of the matching accessories available to you from Hitachi. Hitachi takes you to wherever your imagination leads.