
Operating Instructions


2
ENGLISH
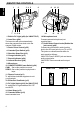
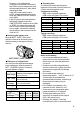
IDENTIFYING CONTROLS
18. LCD Brightness Controls (p9)
19. 2.5-inch LCD Monitor (p9)
20. Speaker (p9)
21. Power Supply Attachment Section
(p16)
22. Clock Battery Compartment (p8)
23. Sub Power Switch (p24)
STANDBY: Pressing the Start/Stop button
will start recording.
LOCK: The camera/recorder will not
enter the record mode even if
the Start/Stop button is
pressed.
24. Start/Stop Button (p24, 28)
This works as a recording Start/Stop
button in the CAM mode and as a playback
pause button in the VIDEO mode.
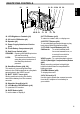
25. BATT. EJECT Lever (p14)
Sliding, and then holding, this switch,
remove the battery from the camera/
recorder.
26. Shoulder Strap Slot (p12)
27. LCD Monitor OPEN Button (p14)
To open the LCD monitor.
28. DATE Button (p29)
To set the date or display it.
29. TITLE Button (p43)
To select or create a title, or display one.
30. EFFECT Button (p34)
To record digitally processed image or play
back picture with digital effect added.
31. FOCUS Control Buttons (p26, 32)
CAM mode: To switch between auto
focus and manual focus, or
to control focus while in
manual focus mode.
VIDEO mode: To control playback volume.
32. BLC (Backlight Compensation) Button
(p40)
When recording a subject in bright light,
hold this button down to compensate for
lighting on tape.
33. MENU Button (p20)
To display the menu.
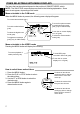
34. DC IN Jack (p17)
Use this jack to power the camera/recorder
from the AC adapter or from battery in
your vehicle.
19 20 21 23 24 25 262218
27
32 343328 29 30 31