
Operating Instructions


DATE/TIME SETTING
The date and time can be recorded on your tapes to act as a handy reference when
viewing them at a later time. Use the following procedure to set up this display for the
current date and time.
Make sure that the current time is displayed correctly before you start recording.
NOTE: Be sure to insert the clock battery before setting the date and time. Although the
date and time can be set without the clock battery inserted, they will disappear when the
battery providing power to the camera/recorder is removed.
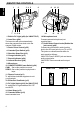
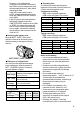
1. Slide the CAM/OFF/VIDEO switch to
“CAM ” .
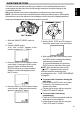
2. Press the DATE button.
“0:00” and “1/1/2000 ” appears on the
monitor screen and “1 ” flashes.
3. Press the PLAY or STOP button to select
correct date. Pressing the PLAY button
gives you higher numbers while the
STOP button gives you lower numbers.
When the correct date appears, press
the FF button.
4. Press the PLAY or STOP button to select
correct month. When the correct month
appears, press the FF button.
5. Use the PLAY, STOP and FF buttons to
select the correct year, hour and minute.
6. After setting to the correct minute, press
the DATE button to change the display
and start the internal clock.
It is recommended that you press the
DATE button to match the time signal.
NOTE: After the date and time are set,
“ AUTO ” appears and the camera/
recorder enters the automatic date
recording mode. See “DATE RECORDING ”
on page 30.
1.
2.
1.
2.
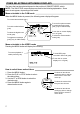
To correct date/ time after starting the
date/ time
Hold down the DATE button for at least
3 seconds: The flashing cursor will
appear at the date.
Correct the incorrect digit by using the
PLAY, STOP and FF buttons.
To correct date/ time during
programming
Press the FF button repeatedly until the
digit that is incorrect flashes.
Correct the incorrect digit by using the
PLAY, STOP and FF buttons.
4
ENGLISH