
Operation Manual


Hitachi video recorder VT-FX140EUKN
Dear Hitachi Customer,
Congratulations on your choice of a Hitachi video
recorder. Welcome to our company-wide commit-
ment to your complete statisfaction and viewing
enjoyment. Before using your Hitachi video recorder
for the first time, we suggest that you spend a few
minutes reading these setup instructions.
Even if you have never used a video recorder before,
you can probably get your video recorder connected
and preset quickly by following this quick set-up guide.
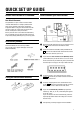
Accessories provided
Check and identify the accessories provided.
If any are missing or appear damaged, contact your
dealer immediately.
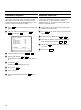
Fitting the remote control batteries
How to connect your video recorder
1 Unplug the aerial cable from your TV set and insert it into
the 2 socket at the back of the video recorder.
2 Insert one end of the aerial (RF) cable provided into the
3 socket on the video recorder and the other end into
the aerial input socket on your TV set.
3 If your television does not have a scart (AV-Euro) socket
(shown below) or if you do not want to use a scart cable
for the connection to your television, please proceed with
the next chapter ’Tuning your TV to your video recorder’.
4 Insert the plug of a scart cable into the scart socket
AV1 EXT1 at the back of your video recorder. Connect the
other plug to the TV set.
5 Insert the small plug of the mains cable into the mains
socket 4 at the back of the video recorder. Insert the
other end of the mains cable into the wall socket.
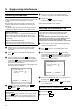
6 If your TV set automatically switches to programme
number e.g.: ’EXT’, ’0’, or ’AV’, a welcoming text appears
on the TV screen.
If your TV set does not switch automatically, select the
required programme number manually (see instruction
manual TV set).
7 Subsequently, read the paragraph ’Initial Installation’.
QUICK SET UP GUIDE
1