Introduction VHS Video Deck -1- VT-M181A Owner's Manual Your Complete Guide to Videocassette Viewing and Recording Using these quality features: Up to 8 delayed recording programs Auto tracking for improved picture in playback Cable-compatible frequency synthesizer quartz tuner Remote control for use with your VCR, TV and cable converter All basic playback functions on the VCR On-screen graphic programming guide Front Audio and Video Jacks Auto Head Cleaning Hitachi Home Electronics (America), Inc.
Introduction -2- TABLE OF CONTENTS Introduction................................................................................................................................................ 3 FOR YOUR SAFETY ........................................................................................................................... 3 Getting Started..........................................................................................................................................
Introduction -3- Programming Priorities ...................................................................................................................... 32 Advanced Operations (Remote Control of TV).................................................................................. 33 Controlling Your TV with the VCR's Remote .............................................................................. 33 Programming the Remote Control .................................................................
Introduction -4- to make any kind of contact with any inside part of this unit. This symbol alerts the user that important literature concerning the operation and maintenance of this unit has been included. Therefore, it should be read carefully in order to avoid any problems. CAUTION: T O REDUCE THE RISK OF ELECTRIC SHOCK, DO NOT REMOVE COVER (OR BACK). N O USER-SERVICEABLE PARTS INSIDE. R EFER SERVICING TO QUALIFIED SERVICE PERSONNEL. WARNING: Many television programs and films are copyrighted.
Getting Started -5- "Must read" sections containing important cautions for your family's safety as well as the basic facts you need to use the VCR. These sections are highlighted like this in the table of contents: Information on the advanced features of your Hitachi VCR. We hope you'll take time to learn about these functions since we've designed them for you. But you can use the VCR without reading these sections.
Getting Started -6- line plug (a plug having one blade wider than the other). This plug will fit into the power outlet only one way. This is a safety feature. If you are unable to insert the plug fully into the outlet, try reversing the plug. If the plug should still fail to fit, contact your electrician to replace your obsolete outlet. To prevent electric shock do not use this polarized plug with an extension cord, receptacle or other outlet unless the blades can be fully inserted without blade exposure.
Getting Started -7- connected to this unit should bear the UL listing mark or CSA certification mark on the accessory itself and should not have been modified so as to defeat the safety features. This will help avoid any potential hazard from electric shock or fire. If in doubt, contact qualified service personnel.
Getting Started -8- product. 16 Lightning -- For added protection for this video product during a lightning storm, or when it its left unattended and unused for long periods of time, unplug it from the wall outlet and disconnect the antenna or cable-system. This will prevent damage to the video product due to lightning and power-line surges. SERVICE 17 Servicing -- Do not attempt to service this video product yourself as opening or removing covers may expose you to dangerous voltage or other hazards.
Getting Started -9- 1 Decide Where to Put Your VCR Be sure your chosen location allows for proper ventilation, stability, and protection from heat and moisture (see Important Safeguards). Place the VCR near your TV but not on top of it. For convenience in using the remote control, locate them no more than three feet apart. If you have an external cable or antenna, place the TV and VCR where you have ample cable to hook them up. If necessary, you can purchase a cable extension and connector.
Getting Started - 10 - 3 Hook up the Audio/Video Signal If your TV is a fairly recent model, you probably have both audio and video jacks. Look on the back of your TV for two jacks - possibly color-coded yellow and white. They will be labelled AUDIO IN, or VIDEO IN. (If you are not sure, look at the back of your VCR you will see two sets of these jacks.) If you have no jacks like these on your TV, skip this step and proceed to Step 4.
Getting Started - 11 - Simple Antenna/Cable 75 Ohm Hookup This is an easy hookup that you can use if your cable or antenna has a 75 ohm round wire connector. You will need the 75 ohm cable supplied with your VCR. It looks like this: (Refer to page 11 for 300 ohm UHF connection to the TV and antenna.) If you have been watching the TV in your home before getting the VCR, you will already have a round wire attached to your TV. Otherwise, look for a cable connection coming in through the wall from outside.
Getting Started - 12 - take it from where it comes in on the wall. 2. Considering the three pictures below, determine which adapter you will need to hook it into your VCR. If you have Use this adapter Single 300 ohm flat wire Separate UHF and VHF antenna antenna wires, both 300 ohm flat wire 300 ohm flat UHF and 75 ohm round VHF If you have "rabbit ears" (an antenna on top of your TV), you will need an additional adapter and 75 ohm extension to make your leads reach from the antenna to the VCR.
Getting Started - 13 - 2. Using the 75 ohm cable supplied with your VCR, connect either end to the OUT TO TV upper jack on the back of the VCR. 3. Use a second adapter to attach the other end of the 75 ohm connector back into the TV (where you first disconnected the antenna). Capabilities: With this hookup, you should now be able to perform all basic functions provided by this equipment.
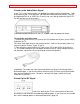
Getting Started (Controls) - 14 - Getting Started (Controls) Quick Tour of the Controls Study these pictures carefully to learn about the buttons and controls that you'll need for everyday operation. Various controls are explained throughout this manual as they are needed, but now is a good time to get familiar with their locations. Most of the time, you'll be directing the VCR from the remote control, but there are some controls on the VCR that will come in handy too.
Getting Started (Controls) - 15 - Picture of Remote Control Remote Control Buttons POWER Turns the VCR on and off. VCR1, TV, CATV, VCR2 Device buttons let you set the remote to control one of four devices. MUTE (TO CONTROL TV) Turns off the audio until you press Mute again. VOLUME/SLOW Increase or decrease the audio volume and plays back in adjustable slow motion. REW Rewinds the videotape. PLAY Starts playing a loaded cassette.
Getting Started (Controls) - 16 - REC Starts recording on the station the VCR is set to. (Press REC and PLAY at the same time.) F.FWD Fast forwards the videotape. PAUSE Temporarily stops the cassette from recording or playing. Press PAUSE again (or PLAY) to resume. F.ADV Lets you advance the tape frame by frame. CLEAR Used in on-screen programming and indexing. DISPLAY Used in on-screen programming and indexing. TRACKING Lets you fine tune the picture. 0 to 9 Number buttons used in on-screen programming.
Getting Started (Controls) - 17 - POWER Turns VCR power on and off. STOP/EJECT Cancels any videotape action, and when pressed a second time, ejects tape. PLAY Plays the loaded videotape. DISPLAY Shows time, channel, and status indicators. CHANNEL Up and down arrows for selecting channels. REC/IRT To begin recording. F.FWD Controls the videotape's forward motion. REW Controls the videotape's rewind motion. VIDEO IN Receives video signal from a video camera or another VCR.
Getting Started (Initial Setup) - 18 - You may view all the on-screen instructions in English, French or Spanish. When you first set up your VCR, it will be set to English. Press number 6 or 7 for the other language options. Now, you will do most of your programming and setup by pressing numbers on the remote control which correspond to options presented in this and other on-screen menus. Instructions are easy to follow, and blinking spaces on the screen will show you where your input is needed.
Getting Started (Initial Setup) - 19 - At the screen are the default settings on your VCR. The default settings are the ones that are preset at the factory. They come up on the VCR every time the power goes out for more than 1 minute - for example, during a storm or when you unplug the VCR. Look at each item to see if it matches your own setup: To change a setting, press the button that has the same number as that item. This will cycle you through several options.
Getting Started (Initial Setup) - 20 - When you first plug in the VCR or after a power interruption, the clock display will read "--:--". To set the clock, press GUIDE, then press 1 to bring up the Clock Set screen: Press the number buttons on the remote control to set the current time - two digits for the hour and two for the minutes. Then press 1 or 2 for AM or PM, respectively. For example, if it is now 2:15 PM, press 0, 2, 1, and 5 for hours and minutes, and press 2 for PM.
Getting Started (Videotapes) - 21 - between channels that are far apart. Removing Channels You may not want to keep all the stations the auto-programmer selects, since you may prefer to have only a few favorite channels in the tuner's memory. Or, you may want to delete from memory a weak or unused channel that the tuner picked up. Erased channels cannot be selected by the up and down CHANNEL SELECT buttons but can still be selected by using the numbered buttons 0 to 9 and 100/ENT.
Getting Started (Videotapes) - 22 - T-120 120 min. 360 min. T-160 160 min. 480 min. You may have noticed that there is also an LP speed. You Hitachi VCR does not record at this speed, but it can play cassettes that were recorded in LP mode. No special setting is required for playback. Safety Tabs Prevent Erasure A safety tab is located on the front left edge of every videotape next to the label. Break this tab off if you want to keep a special tape from being erased accidentally.
Basic Operations - 23 - indicator shows on the LCD display. It may also start playing immediately if the safety tab has been removed. To remove the cassette, simply press the STOP/EJECT button on the VCR. (If the tape is playing, press STOP/EJECT on the VCR once to stop the tape and a second time to eject it.) Now you can take the cassette out and put it away. Tape Storage Store your videocassettes in their jackets and in an upright position (like books in a bookshelf) away from any magnetic sources.
Basic Operations - 24 - To Fine Tune the Picture Auto Tracking Pressing PLAY starts the auto tracking feature, which adjusts the tuning to eliminate static lines that may appear on the screen. Manual Tracking Scratched tapes or poorly recorded tapes may require additional picture adjustment. You can do this with the remote control. Press VCR1 or VCR2 on respective mode, then press either of the TRACKING buttons (down or up arrows) until picture clears up.
Basic Operations - 25 - Still Playback (Pause) Press PAUSE to still the tape during play. The picture will "freeze". After 5 minutes in PAUSE mode, the VCR automatically switches to STOP mode to protect the tape. If the screen jitters during PAUSE, use the remote's TRACKING buttons to minimize it. (See manual Tracking) To resume play, press PAUSE or PLAY again. Frame Advance While in PAUSE mode during playback, press F.ADV to view the video one frame at a time. Press PAUSE to resume play.
Basic Operations - 26 - When you want to check the counter during playback, there are several ways to do it. Pressing DISPLAY will cycle you through the three options. Press DISPLAY just once to see the counter, mode, time, and date on the screen for 5 seconds. Before the 5 seconds are up, press DISPLAY a second time to see just the counter. It will stay on the screen. Press DISPLAY a third time to see the counter on the VCR display as well. ("M" will display below the counter on the TV screen.
Basic Operations (Recording) - 27 - Select minutes by pressing buttons 0 to 9 - one digit for hours, then two digits for minutes. Then press F.FWD if you want to move that many minutes ahead, or REW if you want to move that many minutes backward. For example, say you want to review a scene that began about 2 minutes earlier in a video, press 0, 0, and 2 to display 0:02 on the screen. Then press REW.
Basic Operations (Recording) - 28 - Recording a Program Before you Record The VCR must be hooked up properly for recording. See the Simple Hookups at the beginning of this manual. Make sure you are familiar with the Easy Graphic Menu for on-screen programming (page 18) and the basics about videocassettes and VCR safety. Copyright Infringement Warning Most television programs and films are copyrighted. This means that someone has legal rights governing the reproduction and distribution of this material.
Basic Operations (Recording) - 29 - Once you have set the VCR for recording, press VCR/TV on the remote control. Now, you will be viewing through your TV only. Switch channels using your TV controls or the VCR remote, if it's programmed to control your television (see Advanced Operations). The recording will continue as set on the VCR. If a preset timed recording starts up while you are watching the TV, you'll hear the cassette as it clicks on and see the recording indicator light up on the VCR display.
Basic Operations (Recording) - 30 - 1:30, 2:00, 3:00, 4:00) by continually pressing the REC/IRT button. While you are recording, the time remaining is shown in the display. At the end of your recording the display will read "0:00"; recording will then automatically stop and the VCR will turn itself off. To stop recording while in the IRT mode, press the POWER button and then press the STOP (STOP/EJECT) button (this can be done either on the VCR or with the remote control) within 10 seconds.
Basic Operations (Recording) - 31 - correct line depending on your input selection. (L2: Front A/V IN; L1: Rear A/V IN.) Remember to press 0 before single-digit channel numbers, times, and dates - for example, 0 and 6 for channel 6. After you enter the channel and time, the VCR automatically shows the current date or the next date, whichever is most logical. Leave the date as it comes up, or enter new digits for the month and day.
Basic Operations (Recording) - 32 - Enter the end time, half past six, as 06:30. The VCR automatically selects PM for you. The screen shows today's date, so no changes are needed on that line. Press TAPE SPEED to switch to SP because you want the best quality picture for this recording. Everything is as you want it, so press GUIDE to set the program in memory. Insert a videocassette, and power off the VCR. Check for the delayed recording indicator on the VCR's display.
Advanced Operations (Remote Control of TV) - 33 - To avoid recording only bits and pieces of different overlapping shows, review your programming and delete those shows that are not essential. Advanced Operations (Remote Control of TV) This section explains how to use the VCR's remote control to operate your TV. It also shows you how to hook up a cable box and how to connect a second VCR for a complete home entertainment system.
Advanced Operations (Remote Control of TV) - 34 - For example, if you have an RCA television, press TV and 0 at the same time. If this button combination sends a signal that matches with your TV, the channel will change on the TV, and you'll know the remote is set to control the television. If that button combination does not change the TV channel, go through the whole list of button combinations one by one until you find one that does change your TV channel.
Advanced Operations (Cable Box Hookups) - 35 - Be aware that not all of your TV's functions may work even though the remote control is correctly programmed. Advanced Operations (Cable Box Hookups) Hooking Up to a Cable Box The cable box brings all the advantages of pay cable, but finding a satisfactory hookup can be challenging. To sort out what to do, we suggest a step-by-step approach to installation.
Advanced Operations (Cable Box Hookups) - 36 - 1. Remove the cable company's cable line from the back of your TV. Connect it to the IN FRONT ANT lower jack on the back of the VCR. 2. Using the 75 ohm coaxial cable supplied with your VCR, connect either end to the VCR's OUT TO TV upper jack 3. Connect the other end of the 75 ohm cable to the TV, in the same place where you removed the cable line. Check all the TV and VCR functions. If you don't get all the functions you want, proceed with Option 2.
Advanced Operations (Cable Box Hookups) - 37 - splitter. 2. Using a coaxial jumper, reconnect one of the splitter outputs to the cable box's input that you just freed up. 3. Using a second coaxial jumper, connect the other splitter output to the A of the A-or-B switch. 4. Using the cable box output line, connect the cable box receptacle to the B of the A-orB switch. 5. Using a third coaxial jumper, connect the output of the A-or-B switch to the IN FROM ANT lowerjack on the back of the VCR. 6.
Advanced Operations (Second VCR) - 38 - Hamlin 4 Zenith 5 Scientific Atlanta 6 Pioneer Philips 7 8 To operate the cable box once the remote is programmed for it: Press CATV and then the button of the function you want. Press VCR to operate your VCR with the remote again. Advanced Operations (Second VCR) Integrating a Second VCR With another VCR hooked up, you can copy videotapes as needed, and you can get fancy with multimedia programming.
VCR Care and Servicing - 39 - Press the VCR2 button on the remote before pressing GUIDE twice to exit the onscreen program. With this setting, the remote control can now operate both VCRs. To switch control from one to the other, simply press VCR1 or VCR2 on the remote. (Remember to aim the remote at the selected VCR.) Copying from One VCR to Another (Dubbing) Consider VCR1 the recording VCR, and VCR2 (VT-M181A) the playback VCR. You will play a tape on VCR2 and record it on VCR1.
Care and Servicing (Problems) - 40 - sound during auto head cleaning. Even with the auto head cleaning system, dirt can build up on the heads. If the picture is blurry during playback, or is occasionally interrupted or blanks out, try playing different cassettes to see whether you get the same picture problems. If the picture problems persist, the heads may need to be cleaned professionally. Consult your VCR dealer for the name of trained service technician near you.
Care and Servicing (Problems) - 41 - set correctly? VCR power turned off? Turn power off to activate the timer. Safety tab removed from Put cellophane tape over the the videocassette? tab area, or use a videocassette with the safety tab intact. Does not record Safety tab removed from Put cellophane tape over the when you press the videocassette? tab area, or use a REC. videocassette with the safety tab intact. TV program Loose or inappropriate viewed connections between recorded.
Specification - 42 - cassette if you are done viewing. Otherwise, no is necessary. action Hitachi Service Hotline Authorized Hitachi service facilities are available throughout the US and Canada. For the location nearest you, call the Hitachi Service Hotline at one of these numbers: In the continental U.S.A.
Specification - 43 - Video Input: Video Output: Audio Input Audio Output Video Recording S/N: Horizontal Resolution: lines (EP) Audio Response: Audio S/N: Power Input: Power Consumption: Cabinet Size: Weight: Accessories: 1-2 Vp-p 75ohm unbalanced 1 Vp-p 75ohm unbalanced 316mV rms (-7.8dB) 50 kohm 316mV rms (-7.8dB) 1.