
User Guide

3
ENGLISH
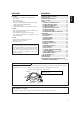
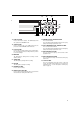
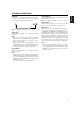
[FRONT]
1
32
4
5
6
7
8
9
10
11
12
13 14
15
16
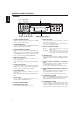
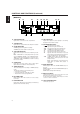
DISPLAY (See page 5)
S
CONTROLS AND FUNCTIONS
1. SLOW TRACKING CONTROL
Adjust to optimize the picture quality in the SLOW
PLAY mode, e.g. 24 hours speed.
2. TRACKING CONTROL
Adjust to optimize the picture quality during playback
at the 03, A12 and A24 hour speeds.
3. PROG./SHARPNESS CONTROL
Press to select one of the seven programmable func-
tions.
Press to select the picture quality with the UP/HARD
or DOWN/SOFT button to hard or soft during play-
back. See page 20 for SHARPNESS CONTROL.
4. DOWN/SOFT BUTTON
Press to decrement, change or reverse to the
previous/lower value.
Press to adjust the picture quality to soft during play-
back.
5. START/STOP BUTTON
Press to start or stop the programming of a program-
mable function. (Press once to start the programming
sequence and a second time to stop (end) it.)
6. UP/HARD BUTTON
Press to increase, change or advance to the next
higher value.
Press to adjust the picture quality to hard during play-
back.
7. SET BUTTON
Press to select the specific value which is to be
changed with the UP/DOWN buttons.
8. CASSETTE COMPARTMENT
9. COUNTER RESET BUTTON
Press to clear the digital counter to “0000”.
10. RESET BUTTONS
Press these buttons at the same time to clear all
(microprocessor) functions.
Press the “S” button to reset the system. (This does
not erase the stored information.)
11. REC/PLAY HOURS BUTTONS
▲ (UP): Press to increase hours to the next
higher value.
▼ (DOWN): Press to decrease hours to the next
lower value. The tape speed will be
indicated as part of the monitor display.
12. TIMER BUTTON
Press after programming the TIMER for automatic
TIMER recording. See page 13 for TIMER program-
ming.
13. V-POS (VERTICAL POSITION) / V-LOCK BUT-
TON
Press repeatedly to control the vertical position of the
programmable display on the monitor.
Press to reduce vertical jitter in the still play mode.
14. H-POS (HORIZONTAL POSITION) / V-LOCK BUT-
TON
Press repeatedly to control the horizontal position of
the programmable display on the monitor.
Press to reduce vertical jitter in the still play mode.
15. ALARM RESET BUTTON
Press to clear POWER LOSS information. When this
button is pressed when the Alarm Memory screen is
being displayed, the alarm memory is cleared.
16. ALARM INDEX BUTTON
Press this button to cause the INDEX indicator to light,
and set the VCR to the visual search mode (press
F.FWD or REWIND during playback mode) in this
state; the start of the alarm recorded can be located.