USER MANUAL FULLY AUTOMATIC WASHING MACHINE Model SF-S55GR Thank you for your purchase of Fully Automatic Washing Machine. Please read this manual carefully for proper operation. Please keep this manual for future reference.
CONTENTS Preface ........................................................................................................................... 3 Safety Precautions ................................................................................ 4 Installation Guide .................................................................................................... 7 Installation ....................................................................................................................
Preface The number next to the sign is the page number for detailed description. Infiltration washing Infiltrate the detergent inside the cloth to detach the dirt off the cloth fiber. The detergent dissolves sufficiently to become the high-concentration detergent that washes the laundry in infiltration mode for easier detachment of dirt off the cloth fiber. 11) Put detergent in 2) Supply a little water The detergent put in at the injection opening will fall below the pulsator.
Safety Precautions Please read this part of substance carefully for proper operation before using your machine. The precautions stated here are classified as "Warning" and "Attention" according to the damage and the emergency caused by misoperation, and are described respectively in line with the marks below. Warning With no respect to this mark, the misoperation may cause death or GBH. Attention With no respect to this mark, the misoperation may cause body harm or object damage.
Warning Do not put your hand into the basket until it has stopped completely. Prohibited Do not put your hands into the washing • spinning basket during the washing and rinsing process. Prohibited Even when the spinning of the basket is slow, there is still a danger of being caught in the motion, resulting injuries. Particular attention should be paid when children are around. Even when the spinning is slow, hands may be trapped by clothes.
Safety Precautions (continued) ( ) Warning Do not insert a screwdriver into the Lid Lock hold. Prohibited Do not open the lid in locked status by force. Prohibited Otherwise, the lid or locking device may be damaged, resulting in unstoppable spinning of washing • spinning basket and thus causing injuries. To avoid injuries caused by the lock damage. Attention Do not stand on or put weight on the top of the unit. Do not pull the wire from the socket when unplugging the unit.
Safety Precautions (continued) ( ) Attention Please turn off the water tap when not using the unit. Prohibited water leakage Do not wash, rinse and spin the water proof fabric or cloth. ( To prevent damages caused by water leakage. sleeping bag, raincoat, cover of skiing, utilities, bicycles, cars and motors ) Otherwise may lead to injury by abnormal vibration during spinning or damage the washing machine, wall, floor and clothes. Do not incline installing the washing cap.
Installation Guide (continued) ( ) Installation of Washing Machine 1 Adjust the instability of the washing machine with adjustable leg. 2 Please make sure of the horizontality of the washing machine. As shown in the figure, the horizontality can be easily observed by the string used to hang an object. It is level if the A clearance between A and machine body is the same with that string between a and the machine body.
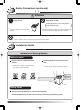
How to Change the Water Drainage Hose and How to Install the Base Plate Water drainage hose is attached on the left side of unit at shipment, nonetheless, it can be reattached on the right side to suit drainage needs. 1 Black mark Lay the unit down slowly. Back Lay the unit down on some corrugate pqper to prevent damage. The water drainage hose pulled out (left) The water drainage hose pulled out (right) The water drainage hose Corrugate paper etc.
Installation Guide (continued) ( ) How to install the base plate (Mount the base plate on the pad on top of unit) ( ) Fit the barb on the plate into the square hole of the bottom, and tighten the screws. Water Drainage Hose Related Parts Ensure that the drainage hose will not separate from its outlet even if there is vibration or the outlet is too big or too shallow. Extended hose Attention Please use optional extension drainage tube for lengthening the water drainage hose.
How to Install the One Touch Joint 1 Confirm the diameter of the water tap. If the diameter exceeds 2cm, remove the joint ring. 2cm 2 Check the distance between joints A and B. A B Screw joint B in the arrow direction to adjust the gap. B Joint Screw Approximately 6 6 Joint ring One touch joint 3 Joint Label Press the sealed pad evenly against the tap and tighten the four screws in a uniform fashion.
Installation Attention Please turn on the water tap to check to connecting condition of the water supply hose before washing. To prevent damages caused by water leakage due to loosen screw. How to install and remove the water supply hose Main unit Water tap Do not allow water tap, one touch joint and rubber ring to touch the unit when installing them. Turn the union nut in the direction as shown by the arrow and firmly. Connect it to the water supply opening.
Safety Check If any of the following conditions or other abnormalities occur, immediately pull out the power plug to prevent an accident and request help from an authorized dealer or agent. , , ( ) Never conduct repairs by yourself as it may be dangerous. , If you have used the washing machine for 4 - 5 years,even if the following conditions and other abnormalities do not occur, request for safety inspection of the machine is stilled required.
Control Panel Washing indicator The indicators of washing, rinsing and spinning display the ongoing process. ¡During the washing machine operation, the display (lighting, flashing, darkening) of indicator of each process describes the operation status and the working process to the user. Detergent indicator The detergent amount and the water level are described by the lighting or flashing of indicator. The amount of detergent refers to the (concentrated) powder detergent.
Programme indicator The indicator of selected process will light or flash. With each pressing on the "PROGRAM" button, the indicator will light in the following sequence. NORMAL HEAVY SPEEDY SOAK Light Light Light Light BASKET CLEAN PRESET 9HR BLANKET SILK Flash Flash Flash Flash 9 Lid Lock indicator Lid Lock indicator will light when the lid is in locked status. ¡Before the water supply, the lid is in the status of locking.
Technical Description The number next to the sign is the page number for detailed description.
Before Using Your Machine Preparation for washing machine When the first using One touch joint The washing machine can be used only after the proper installation in compliance Turn on with the "Installation Guide". Water supply hose AC 220V 220V Drainage outlet Daily using 1 The front of the water drainage hose must insert in the drainage outlet. 2 Connect the water supply hose and turn on the water tap. 3 Insert the power plug into the socket.
Before Using Your Machine (continued) ( ) How to put laundry in Put in the laundry as evenly distributed as possible. Put bulky or floating laundry in basket first. Sheet Jean The bluejeans and other thick cloth shall be evenly distributed in the washing basket before washing. (Prevent the laundry from overflowing during washing) • Press the laundry with hand during water supply, and make the water infiltrate the cloth sufficiently. • It smoothes rotation of the laundry.
How to Use Liquid Detergent, Bleach and Fabric Softener Start the washing machine with water in the washing basket, and the infiltration washing can't perform then. Please put the detergent in the washing • spinning basket. Powder synthetic detergent Put the detergent in the detergent dispenser Notes • When water is adhering to the detergent dispenser, please wipe it first. • When the detergent adheres to the dispenser, it remains even the dispenser is closed.
How to Use Liquid Detergent, Bleach and Fabric Softener (continued) ( ) Liquid detergent/Bleach / Liquid detergent Fabric softener 1 Open the cap of the fabric softener injection opening. Dilute the liquid detergent with water and gently pour it into the injection opening. 120 • When using preset operation, dilute the detergent with twice the amount of water. Bleach Dilute the bleach with water before the washing and gently pour it into the injection opening.
Amount of Laundry and Detergent Synthetic detergent Concentrated detergent Regular detergent Amount of Laundry Water Level 5.5kg 50L 33g 42mL 67g (67mL) 3.5kg 40L 27g 33mL 53g (53mL) 1.5kg 30L 20g 25mL 40g (40mL) 0.
Selection of Laundry Process The washing machine have eight laundry courses. Please select the appropriate detergent and course for laundry according to the table below. 8 Type of laundry Regular laundry Recommended Automatic Process Recommended Detergent Wash the clothes which are not too dirty with normal washing mode. Powder synthetic detergent When you wish to do the washing while you are out or when you wish to do the washing at night and hang out in the morning.
NORMAL Process Put the laundry in and press the "POWER SWITCH" button . The unit is set automatically to the "NORMAL" process. • In the case of any process other than "NORMAL", press the "PROGRAM" button to switch over. Press "START" button . Sufficient wash with economic consumption of water, electricity and time • The pulsator to detect the amount of laundry and display on the control panel.
NORMAL Process (continued) ( ) Sufficient wash with economic consumption of water, electricity and time Washing of the "NORMAL" process Dissolve detergent Washing First Rinsing Second Rinsing (Sprinking rinsing) ( ) (Water-storage rinsing+ Water-inset rinsing) Spinning after draining Agitating Approximately 2 minutes 2 When the spinning of the basket is slow, the water supply is beginning Spinning after draining Spinning Spinning after draining Supply water to the required level and performing
HEAVY Process Put the laundry in and press the "POWER SWITCH" button . Press the "PROGRAM" button "HEAVY" process. and select the • With each pressing on the "PROGRAM" button, the indicator will light or flash in sequence. Press "START" button . Through Wash • The pulsator to detect the amount of laundry and display on the control panel. 18 18 • After the detergent amount and the water level are displayed, the washing machine will pause about 1 minute for putting in the detergent.
HEAVY Process (continued) ( ) Through Wash Washing of the "HEAVY" process Dissolve detergent Washing First Rinsing Second Rinsing (Water-storage rinsing) (Water-storage rinsing) Spinning after draining Spinning after draining Preceding to water level required and performing agitating Preceding to water level, required and performing and agitating Balanced agitating Balanced agitating Agitating Approximately 2 minutes 2 Spinning Spinning after draining When using Liquid detergent, Fabric sof
SPEEDY Process Cleans Laundry Fast Put laundry in and press the "POWER SWITCH" button Press the "START" button . . (The sound of buzzer indicates washing completion) Press the "PROGRAM" button "SPEEDY" process. • After the detergent amount and the water level are displayed, the washing machine will pause about 1 minute for putting in the detergent.
SOAK Process Put the laundry in and press the "POWER SWITCH" button . Press the "PROGRAM" button the "SOAK" process. and select • With each pressing on the "PROGRAM" button, the • The pulsator to detect the amount of laundry and display on the 18 control panel. 18 • After the detergent amount and the water level are displayed, the washing machine will pause about 1 minute for putting in the detergent.
Wash with special moving steeped water flow Washing of the "SOAK" process Resolve the detergent Washing Agitating First Rinsing Second rinsing (Water-storage rinsing) (Water-storage rinsing) Spinning after draining Soaking Approximately 2 minutes 2 Agitating Spinning Spinning after draining Supply water to the required level and performing agitating Supply water to the required level and performing agitating Balanced agitating Balanced agitating Spinning after draining Soaking When using L
SILK Process Before using your machine Please note that the washing cap should be used in SILK process. • Washing without the cap may cause the laundry damage and the washing machine failure. The "SILK"process applies the mode of basket rotation, which uses the rotating water in the basket to wash the fine cloth with label and the laundry with " " label gently. • Some laundries can't be washed due to the cloth materials.
Washing clothes with "Dry clean" label Preparation for the washing Preparation for the laundry • Remove the color spot or the dark dirt before washing. • Please fasten the fasteners or the zip of laundry completely. • As to the laundries with fastener or broider, turn its inner side to external before washing. Make sure the decoloring possibility • Please make sure the decoloring possibility of the laundry.
SILK Process (continued) ( ) How to wash Please do not use detergent dispenser The water level is automatically set to "30L". The water level can switch between "25L" to "35L" according to the washing capacity. 30L 20L 30L Make preparation 30 • The laundry amount is below 1.2kg. 1.2kg Put in the liquid detergent and close the lid. Put the laundry in and install the washing cap, .
Washing of the "SILK" process Rotating water + Soaking Draining Spinning Washing Rotating water + Soaking Draining Spinning Rinsing (twice) 2 Spinning After washing Drying methods Treatment (recovery of the shrinkage and distortion) ( ) • Sweaters of wool, Angora and cashmere shall be laid in shady and cool place after dressing to be dried in shade. • Hover the steam flatiron over the clothes, release steam and dress the clothes.
BLANKET Process Before using your machine The basket rotates and creates "Blanket washing current" and "Soak" process to gently wash comforters, blanket and bed spread. Please note that washing cap should be used in "BLANKET" process. • Washing without the cap may do harm to the clothes and the washing machine. For installation and dismantlement of the washing cap. 37 56 The washing cap is the optional part. 56 37 Washable Comforter • Comforters filled with synthetic (polyester) fibre.
Washing the comforter and blanket How to wash Please do not use detergent dispenser The washing machine is automatically set to "50L". It can also set water level by manual according to the washing amount. 50L Make preparation 34 Put the laundry in and install the washing cap, then press the "POWER SWITCH" button . • Unfold the laundry evenly and fold it properly, then put it into the washing basket, with the washing cap on.
BLANKET Process (continued) ( ) Washing of the "BLANKET" process Rotating water + Soaking Draining Spinning Washing Rotating water + Soaking Rinsing (twice) 2 Draining Spinning Spinning • The washing basket rotates slowly, generate rotating water and softly wash the quilt and blanket. After the end of washing Method to take out • Opposite to the put-in sequence, pull out the comforter slowly. Washing basket Comforter or blanket • Preset operation is not available in the "BLANKET" process.
Using the Washing Cap Make sure the washing cap is used in "SILK" or "BLANKET" process. The washing cap is the optional part. Installation of the washing cap 1 Bend the cap as is shown in the figure and then put it in the basket with the side with letter faced up. 2 1Press the washing cap on your side, squeeze the whole cap into the basket. 2Press hard the whole washing cap down and flatten it up. Push down the whole cover Push down the cover 2 close to your body.
Using the Washing Cap (continued) ( ) In "BLANKET" process 1 Dismantlement of the detergent dispenser 2 1Bend the dispenser Put the washing cap into the basket, hold the central circle, and pull it right beneath the balance ring. 2Dismantle the pin from the pinhole. Do not clip the clothes when installing the washing cap. balance ring Pin 2 3 Pin hole washing cap central circle • Do not add any clothes on the washing cap after the installation of the cap.
Content of the Washing Process This part describes the process of each process. ( ) indicates it may be manually switched within the range contained in the bracket by pressing the buttons. No ( ) means no switch.
PRESET 9 HR Process 9 • The pulsator to detect the amount of laundry and display Put the laundry in and press the "POWER SWITCH" button . on the control panel. 18 • If powder synthetic detergent is used, be sure to put 18 detergent into detergent dispenser. Press the "PROGRAM" button "PRESET 9 HR" process. and select the • Do not use liquid detergent during preset washing. 9 Press "START" button . Put in the detergent according to the amount (approximate) Pour in detergent and close the lid.
Decreasing Drying Time ("Powerful Dehydration") • When washing has finished, "30 minutes" or "60 minutes" powerful dehydration can start automatically, drying the clothes with air currents, sucking water out of the clothes, and leaving them in an easy to dry state. It can be set when using "NORMAL", "HEAVY", "SPEEDY", "SOAK", "BLANKET", and "PRESET 9HR" processes.
Wash in Your Favorite Way Any of the processes of "Washing", "Rinsing" and "Spinning" can be set up alone, and the processes can also operate in combination. (The content of the washing will not be stored) ( ) • Except the "washing rinsing spinning" and "washing spinning", when other washing modes are set, no stirring of the washings will be made for loosening clothes after the completion of drainage.
Using the "MANUAL" Button With each pressing on the "MANUAL" button, the indicator light moves forward.
Use the Detergent Again Use the detergent again 1 "Washing" only for the 1st collective of laundries. Laundry with slight dirt 2 Washing only Put in the 2nd collective of laundries, and select the favorite washing mode. • Set the proper water level for the laundries. • When you select a mode different from the washing mode for the first batch washing, the adjustment of clutch may cause briefly water draining by setting to SILK and BLANKET process.
Use Guidelines Do not remove the plug of power supply during the operation. • Lest the washing machine will be in trouble. Make sure the operation is suspended or the power supply is cut off before removing the plug. Attention on dewfall . • Since the humidity is high in summer, there will be dewfall outside the washing machine when washing with cool water, which may damp the floor. Please pay attention to it. Do not add excessive amount of detergent. Do not put in excessive clothes.
Maintenance and Repair Maintenance to the washing basket (to keep it clean) ... BASKET CLEAN Process ... It's hard for the soap alkali residue and the mildew to adhere to the stainless steel basket, but the soap alkali residue may come into being after long usage. Please perform the regular maintenance, and clean the washing basket bimonthly. 2 Regular maintenance Press the "POWER SWITCH" button Press the "PROGRAM" button CLEAN" process. .
Pay attention to the rust on the washing basket The stainless basket is rustproof, but it may rust in the following cases. 1 The rust-inclined ironwork such as the barrette or the needle remains in the basket and touches the stainless steel inner wall. 2 The water containing the impurities such as rust or iron power flows into the washing basket, and the impurities adhere to the stainless steel inner wall. When rusting of the basket occurs, use a sponge socked with liquid cleanser to remove the rust.
Maintenance and Repair (continued) ( ) 4 Fit the angle hole of the filter net over the convexity of the encasing, then match the hasps on left and right sides. (push the protrusion of the angle hole into the encasing) 5 Install the lint filter. Kacha Notes • The lint filter is consumable items. When damage is found in the fiter net,please buy a new one at a dealer. 3 ( Hasp ) • When the lint filter is fetched out, please do not let the coin or barrette fall in the bottom of the washing basket.
How to maintain the water supply opening The contamination accumulated at the water supply opening will worsen the supply effect. 1 Turn off the tap, and disassemble the water supply hose. (Refer to page 12 for proper disassembly) 12 2 Clean up the contamination accumulated at the filtering net of water supply opening. water supply opening • If it's hard to clean up the contamination, disassemble the filtering net for east cleanout.
When Failure Happens About the abnormality alarm In the following cases, the flash of indicator and the sound of buzzer will announce the abnormality. If the washing machine generates unexpected error alarm, the washing machine shall be temporarily suspended for a while, and then restarted. If the same error alarm occurs again, please follow the following steps.
Flash of indicator Alarm content Part to check The lid is not locked completely (The lid is not completely closed) Solution Troubleshooting • Is there foreign substance under the lid? ? Restart operation Washing basket can not rotate (washing, rinsing, spinning) • Are the washings oblique? ? • Or is the washing machine placed straight? See page 7 ? 7 Please press the "START/PAUSE" button to pause the operation, rearrange the laundry evenly, and restart with the lid closed.
When Failure Happens (continued) ( ) Case Cause Fail to supply water No spinning, washing basket can't rotate Please refer to "Part to check" in "About abnormality alarm". 50 50 No stirring Can not open the lid Abnormal sound occurs No buzz at the end of washing Water leakage Water can not be reserved (when pouring the water with water basket) • If there is outage and shutdown during the operation, the washing machine will generate alarms and cut off the power supply. The lid is still locked.
Automatic power OFF The power will be cut automatically at the end of operation. The power will be automatically cut if the washing machine keeps one of the following status for above 1 hour. 1 1) Pause 2) Lid open 3) Abnormality alarm describer in page 50 50 With no pressing on "START/PAUSE" button in 5 minutes after the power on, the power will be cut automatically. 5 The following cases are not the failures Case About the water charging Cause Supply water during the course of washing.
When Failure Happens (continued) ( ) Case About the sound About the rinse About the spinning About the water level Cause It buzzes or sounds "Hoola, hoola" during the high-speed washing or dehydration. • That is the electromagnetic sound of the motor switched on and off to control the rotating speed. Sprinking rinsing turns into water storing rinse or water charging rinse. • It is because the clothes oblique cause the action of the security switch.
Case About the power switch About the washing machine cover lock The power supply switch won't work right away when transferred from switched-off to switched on. • The power supply switch doesn't work from the cutoff of the switch to the extinguishment of the mode LED. If the power supply is to be switched on again, please press the switch after the LED extinguish. The indicating LED won't light right away when the power supply switch is switched on.
Optional Parts Extended water drainage hose (about 80 cm) 80cm • For drainage hose extension. Washing cap (Specialized) Lint filter Intended water drainage hose (1m/ 2m/3m) 1m/2m/3m • For drainage hose intension. Product Specifications Model Type Power Normal washing capacity Normal spinning capacity Normal water level Rating power Washing mode Pressure of tap water Profile dimension Weight SF-S55GR Fully automatic washing machine 220V~50Hz 5.