
Operation Manual


7
English
䡬 By pulling the switch trigger, the rotation speed will
steplessly vary from 0 to 2000 revolutions per minute.
NOTE: When the switch trigger is pulled only
slightly, a beep sound will be heard. This
is the sound of the motor, and it does not
indicate any abnormality.
CAUTION
While the screwdriver is running, the push button
cannot be switched.
To switch it, turn off the screwdriver first.
OPERATIONAL CAUTIONS
1. After continuous work, allow the screwdriver to rest
When you replace the battery after continuously
using the screwdriver to tighten screws, let the
screwdriver rest for about 15 minutes.
If you continue using the screwdriver immediately
after replacing the battery, the motor and switch etc.
may become very hot, and may burn out.
2. To screw in screws, hold the driver straight against
the workpiece.
If the driver is slanted relative to the screw, the
screw head can be damaged and the bit worn.
Moreover, the prescribed torque is not transmitted
to the screw, resulting in screws left sticking out.
3. When screwing in, press the main body firmly until
the screw is completely screwed in.
Relaxing your pressure on the driver while screwing
in can leave the screw sticking out.
4. Do not you screw in a screw on top of another screw.
If you do, the screw falls over and the next screw
can not be fed.
5. Precautions for empty strikers:
When you are screwing in colleted screw strips, you
might continue to use the driver without noticing
that you have run out of screws. If you try to screw
in when you are out of screws, the bit can damage
the gypsum board, so while working, keep an eye
on how many screws you have left.
6. Cautions on use of the speed control switch
This switch has a built-in, electronic circuit which
steplessly varies the rotation speed. Consequently,
when the switch trigger is pulled only slightly (low
speed rotation) and the motor is stopped while
continuously driving in screws, the components of
the electronic circuit parts may overheat and be
damaged.
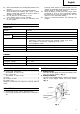
Push
Push button
(Main body figures viewd from handle side)
Forward rotation
Reverse rotation
Fig. 19
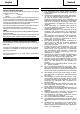
7. When the slider does not move smoothly
Clean the slider, sliding surface of the slider case
and roller of the upper part of the slider. (Fig. 20)
NOTE:
The operator may become covered with plaster dust
quite easily when operation is performed in an
upward direction. Clean the slide surface and roller
periodically during operation.
SCREW HANDLING
NOTE:
Handle both the packed box of screws and the collated
screw strips with care. If you drop them, screws can come
out of the collated tape and cause screw feed malfunctions.
Do not expose the screws to prolonged periods of direct
sunlight or outside air. They can cause rust and collated
tape problems, so when you will not be using the screws
for awhile, put them in the screw packing box or the like.
MAINTENANCE AND INSPECTION
1. Inspecting the driver bit
Using a broken bit or one with a worn out tip is
dangerous because the bit can slip. Replace it by
a new one.
2. Inspecting the mounting screws
Regularly inspect all mounting screws and ensure
that they are properly tightened. Should any of the
screws be loose, retighten them immediately. Fail-
ure to do so may result in serious hazard.
3. Cleaning of the outside
When the automatic screwdriver is stained, wipe
with a soft dry cloth or a cloth moistened with soapy
water. Do not use chloric solvents, gasoline or paint
thinner, as they melt plastics.
4. Storage
Store the automatic screwdriver in a place in which
the temperature is less than 40°C, and out of reach
of children.
NOTE
Due to HITACHI’s continuing program of research and
development, the specifications herein are subject to
change without prior notice.
Slider Roller
Slider case
Fig. 20