StarBoard FX-77/FX-63/FX-82W User’s Guide How to Request a User’s Guide When requesting a separate copy of this user’s guide, specify FXEU-051101. Read this user’s guide and carefully retain it for future reference. Before using this product, carefully read and fully understand the safety instructions. Store this user’s guide nearby for ease of reference.
StarBoard FX-77/FX-63/FX-82W Notices Reproduction or reprinting, without permission, of this manual or any part thereof is prohibited. The contents of this manual are subject to change without prior notice. Every effort has been made to ensure that this manual is complete and correct. However, should any questionable points, mistakes, etc., come to your attention, please inform the vendor. Please be advised in advance that this company will assume no responsibility for losses, etc.
StarBoard FX-77/FX-63/FX-82W Product Assurance Provisions This product is limited to use in the European Union markets. For warranty details, refer to Appendix B at the end of this user's guide.
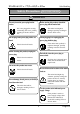
StarBoard FX-77/FX-63/FX-82W Safe Handling Safe Handling Markings and Symbols Various markings and symbols are used in this user’s guide and on this product, to ensure the safe and correct use of this product and to prevent personal injury and property damage. These symbols and their meanings are as explained below. Understand the information well before reading the body of the user’s guide.
StarBoard FX-77/FX-63/FX-82W Safety Precautions Safe Handling Always comply with them. WARNINGS Securely insert the power plug into the mains. Before moving this product, detach the power plug and the mains lead. If it is not plugged in securely, overheating will occur, possibly resulting in electric shock or fire. The mains lead might be damaged, possibly resulting in electric shock or fire. Do not plug in the power plug with a wet hand.
StarBoard FX-77/FX-63/FX-82W Safety Precautions Safe Handling Always comply with them. WARNINGS Do not use a mains lead other than the accessory mains lead. Do not open or alter the cabinet of this product. If a mains lead other than the accessory mains lead is used, fire or electric shock might result. The cabinet contains high-voltage areas, so electric shock or other injury will result. Only place specified objects on this product. Do not leave this product or any of its accessories on the floor.
StarBoard FX-77/FX-63/FX-82W Safety Precautions Safe Handling Always comply with them. WARNINGS In the following cases, unplug the product from the mains and ask the dealer. a. After the mains lead or power supply plug is damaged. b. After a liquid is spilled onto the main unit. c. After the main unit is exposed to rain or water. d. After this product malfunctions, even when operated according to the instruction manual. Adjust this product within the ranges specified in the instruction manual.
StarBoard FX-77/FX-63/FX-82W Safe Handling Careful thought was given to the cautions on this device and in this user’s guide. However, unanticipated circumstances might occur. When operating this product, users themselves must exercise caution as well as follow instructions. CAUTIONS Caution Details Page(s) Fasten the screws tightly. Otherwise, the stand might fall and cause injury or the impact of the falling board might cause damage. This work should be performed by at least two people.
StarBoard FX-77/FX-63/FX-82W Contents Contents Notices ..................................................................................................................1 Disclaimers...........................................................................................................1 Product Assurance Provisions............................................................................2 1. Introduction.................................................................................................
StarBoard FX-77/FX-63/FX-82W 1. Introduction Introduction 1.1 Parts Check After unpacking, make sure that all of the following parts are present. 1.1.1 StarBoard (1) Parts No. Name Qty. (1) Board 1 (2) Electronic pen 1 (3) AC Adaptor (*1) 1 (4) AC Adaptor Plug (*1) 4 (5) Power Supply to USB Adaptor (*1) 1 (6) Bluetooth Adaptor (*2) 1 (7) Wall mounting bracket 2 (8) AA alkaline Battery 2 (9) StarBoard Software x.
StarBoard FX-77/FX-63/FX-82W Introduction 1.1.2 Stand (1) Parts No. Name Qty.
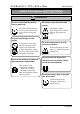
StarBoard FX-77/FX-63/FX-82W Introduction 1.2 Role of Each Part 1.2.1 StarBoard (1) (3) (2) (6) (4) (5) (1) Digitiser (4) USB Cable Receives information regarding annotations and Connect to the PC (for Wired Models) or graphics drawn with the electronic pen, and connect to AC adaptor (for Wireless transmits this data to the PC. Green light Models). indicates a wired connection, and blue light (5) Casters indicates a wireless connection.
StarBoard FX-77/FX-63/FX-82W Introduction 1.2.2 Function Area There are the shortcut buttons frequently used in applications (the default settings are shown below), and you can customise the buttons as desired. Please refer to the online help for details. Symbol Description Show/Hide the StarBoard Software toolbar. Symbol Description Insert and show a blank page. Show previous page. Show next page. Show/Hide Topic List. Switch to PC Operation. Select Pen. Select Highlighter. 1.2.
StarBoard FX-77/FX-63/FX-82W Introduction 1.3 Assembly and Setup When setting up the StarBoard, keep the following in mind: • Select a level and stable position. • Do not set it up near equipment that might generate electromagnetic waves and radio frequencies (e.g. radio transmitter, television, copying machine, air conditioner). • Avoid locations that are dusty, that are subject to extremely high or low temperature or humidity or that are exposed to direct sunlight. 1.3.
StarBoard FX-77/FX-63/FX-82W Introduction (2) Board Installation Install the board on the stand assembled in step (1). Install the board according to the following procedure. Furthermore, this step should be performed by at least two people. Numbers in the diagram correspond to numbers in the parts list on page 1-2. Board (a) Decide the level (out of six) at which the board will be installed, (4)(5) and use the square holes on the back of the board to hang it on the board receiving brackets.
StarBoard FX-77/FX-63/FX-82W Introduction (3) Height Adjustment The StarBoard can be positioned at six height levels. Adjust the height according to the following procedure. Furthermore, this work should be done by at least two people. (a) Remove the triangular knob screw at the bottom of each side. (b) Raise the board and re-hang it by attaching the square holes for the desired height to (b) © the receiving brackets. (a)(c) (c) Fasten the triangular knob screw at the bottom of each side.
StarBoard FX-77/FX-63/FX-82W Introduction 1.3.2 Wall-Mounting Setup Method (1) Install the mounting brackets. Determine the height at which the board will be installed, and install the brackets at the positions shown in the following diagram. 1108±2mm/ 43.6±0.1inch 107mm/4.2inch Height Floor CAUTION Before installation, take the wall material into consideration. If it is installed by using a method inappropriate for the wall material, the board might fall.
StarBoard FX-77/FX-63/FX-82W Introduction (2) Board Installation Connect each mounting bracket to the top square hole in the board receiving bracket located at the back of the board on both sides. CAUTION This work should be performed by at least two people. The board might fall and cause injury or its impact might cause damage. NOTE ・The equipment might malfunction if set up in an excessively bright location.
StarBoard FX-77/FX-63/FX-82W Introduction 1.3.3 How to Connect When Using Projection Mode (1) How to connect when using USB cable (i.e., Wired Mode) Connect the PC, projector, and StarBoard according to the following procedure. RGB Cable (1) (2) (3) StarBoard RGB RGB USB (4) Projector (4) Power Supply (1) Connect the RGB cable to the projector’s RGB terminal, and fasten with the integral screws.
StarBoard FX-77/FX-63/FX-82W Introduction (2) How to connect when using the USB wireless receiver (i.e., Wireless Mode) Connect the PC, projector, and StarBoard according to the following procedure (only if the wireless unit is purchased with the StarBoard).
StarBoard FX-77/FX-63/FX-82W 2. Usage Usage 2.1 Basic Usage In this chapter, the basic usage of the StarBoard will be explained. Read this section carefully to learn about the StarBoard functions. 2.1.1 Preparation Prepare to use the StarBoard. (1) Insert the battery into the electronic pen. (1) Open the battery cover on the electronic pen by moving in the direction of the arrow. (2) As shown in the figure, insert the battery after verifying that the “+” side faces to the pen tip.
StarBoard FX-77/FX-63/FX-82W Usage 2.1.2 How to Use Electronic Pen (1) When drawing with the electronic pen, apply force sufficient enough to cause the pen tip to sink completely into the electronic pen. When information from the pen is being transmitted normally, a slight buzzing sound is audible from the pen. (2) A miniature transmitter is embedded in the tip of the electronic pen.
StarBoard FX-77/FX-63/FX-82W Usage 2.1.3 Basic operation of Electronic Pen In the default setting of the electronic pen, the pen tip is set to emulate the left click button of a mouse. While Windows is in operation, the following mouse operations can be performed using the pen tip button. • Click Push the pen tip onto the StarBoard with sufficient force and then release the pen away from the board. • DoubleClick Perform the “Click” operation explained above twice in the same spot.
StarBoard FX-77/FX-63/FX-82W Usage 2.2 How to Use StarBoard in Projection Mode 2.2.1 Wired Connection (1) Connect devices following the page 1-10. (2) Power up the projector. (3) Power up PC to start up Windows. (4) Adjust the position of the projector so that the Windows screen projected by the projector is within the pen input active area (see page 1-3). (5) Install and launch the StarBoard Software.
StarBoard FX-77/FX-63/FX-82W Usage 2.2.2 Wireless Connection (1) Connect devices following the page 1-11. (2) Power up the projector. (3) Power up PC to start up Windows. (4) Adjust the position of the projector so that the Windows screen projected by the projector is within the pen input active area (see page 1-3). For the driver installation, please refer to “USB Bluetooth Dongle Installation Manual” provided with the Bluetooth Dongle.
StarBoard FX-77/FX-63/FX-82W Appendix 3. Appendix A. System Specifications Item Specification Product name FX-77 (Wired) FX-77(Wireless) FX-63 (Wired) FX-63(Wireless) Model No AH00086 AH00087 Input methods AH00088 AH00089 Infrared and Ultrasonic methods Interface to computer Wired USB 2.0 Wireless Bluetooth 1.1 Effective screen size (mm) 77 inches, 1,573 (W) × 1,180 (H) 63 inches, 1,280 (W) × 960 (H) StarBoard dimensions (mm) 1,793 (W) × 1,220 (H) × 77.5 (D) 1,500 (W) × 1,000 (H) × 77.
StarBoard FX-77/FX-63/FX-82W Item Appendix Specification Product name Model No FX-82W (Wired) FX-82W (Wireless) AH00090 AH00091 Interface to computer Wired USB 2.0 Wireless Bluetooth 1.1 Effective screen size (mm) 82 inches Wide, 1,831 (W) × 1,030 (H) StarBoard dimensions (mm) 2,051 (W) × 1,070 (H) × 77.
StarBoard FX-77/FX-63/FX-82W Appendix B. Provisions of Product Warranty 1. During the free warranty service period, if a malfunction occurs during normal use, the malfunction will be corrected without charge, according to the provisions of the warranty. Furthermore, if the customer registration card accompanying the warranty is not returned to our company, the customer information will not be registered; so free repairs might be unavailable.
StarBoard FX-77/FX-63/FX-82W Appendix (8) In the event of a malfunction in this product caused by the connection to this product of equipment other than the equipment specified by our company. (9) In the event that there is no abnormality in this product, but a defect in a part other than this product was detected or remedied. (10) In the event of ordinary wear and tear, wear, deterioration, etc., of consumables, even during normal use. 5.