Designed for operating in USA & Canada only. When this product is used in areas other than the USA & Canada, we cannot guarantee the product quality and performance.
CONTENTS English Page IMPORTANT SAFETY INSTRUCTIONS ............. 3 MEANINGS OF SIGNAL WORDS ...................... 3 SAFETY .................................................................... 3 GENERAL POWER TOOL SAFETY WARNINGS .................................................. 3 SPECIFIC SAFETY RULES AND SYMBOLS ....... 5 IMPORTANT SAFETY INSTRUCTIONS FOR USE OF THE CORDLESS IMPACT DRIVER/WRENCH ........ 6 IMPORTANT SAFETY INSTRUCTIONS FOR BATTERY CHARGER ...........................
English IMPORTANT SAFETY INSTRUCTIONS Read and understand all of the safety precautions, warnings and operating instructions in the Instruction Manual before operating or maintaining this power tool. Most accidents that result from power tool operation and maintenance are caused by the failure to observe basic safety rules or precautions. An accident can often be avoided by recognizing a potentially hazardous situation before it occurs, and by observing appropriate safety procedures.
English 4) A moment of inattention while operating power tools may result in serious personal injury. b) Use personal protective equipment. Always wear eye protection. Protective equipment such as dust mask, nonskid safety shoes, hard hat, or hearing protection used for appropriate conditions will reduce personal injuries. c) Prevent unintentional starting. Ensure the switch is in the off-position before connecting to power source and/or battery pack, picking up or carrying the tool.
English 8. WARNING: Some dust created by power sanding, sawing, grinding, drilling, and other construction activities contains chemicals known to the State of California to cause cancer, birth defects or other reproductive harm. Some examples of these chemicals are: ● Lead from lead-based paints, ● Crystalline silica from bricks and cement and other masonry products, and ● Arsenic and chromium from chemically-treated lumber.
English IMPORTANT SAFETY INSTRUCTIONS FOR USE OF THE CORDLESS IMPACT DRIVER/WRENCH IMPORTANT SAFETY INSTRUCTIONS FOR BATTERY CHARGER WARNING: WARNING: Death or serious bodily injury could result from improper or unsafe use of the cordless impact driver/wrench. To avoid these risks, follow these basic safety instructions: Death or serious bodily injury could result from improper or unsafe use of battery chargers. To avoid these risks, follow these basic safety instructions: 1.
English * If the input rating of a battery charger is given in watts rather than in amperes, the corresponding ampere rating is to be determined by dividing the wattage rating by the voltage rating–for example: 1,250 watts = 10 amperes 125 volts 9. Do not operate battery charger with damaged cord or plug-replace them immediately. 10. Do not operate battery charger if it has received a sharp blow, been dropped, or otherwise damaged in any way; take it to a qualified serviceman. 11.
English 2. Do not pierce battery with a sharp object such as a nail, strike with a hammer, step on, throw or subject the battery to severe physical shock. 3. Do not use an apparently damaged or deformed battery. 4. Do not use the battery in reverse polarity. 5. Do not connect directly to an electrical outlets or car cigarette lighter sockets. 6. Do not use the battery for a purpose other than those specified. 7.
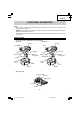
English FUNCTIONAL DESCRIPTION NOTE: The information contained in this Instruction Manual is designed to assist you in the safe operation and maintenance of the power tool. NEVER operate, or attempt any maintenance on the tool unless you have first read and understood all safety instructions contained in this manual. Some illustrations in this Instruction Manual may show details or attachments that differ from those on your own power tool. NAME OF PARTS 1.
English 2. Battery Charger (UC18YRSL) Cord Pilot lamp Guide rail Nameplate Fig. 2 SPECIFICATIONS 1. Cordless Impact Driver/Wrench Model No-load speed Capacity WH18DSDL Power mode Save mode Small screw Ordinary bolt High tension bolt Tightening torque (Maximum) Bit shank size Rechargeable battery Weight WR18DSDL 0 – 2,600/min 0 – 2,000/min 5/32" – 3/8" (M4 – M10) 1/4" – 9/16" (M6 – M14) 1/4" – 15/32" (M6 – M12) Power mode 1,510 in-lbs. {170 N·m} Save mode 840 in-lbs.
English ASSEMBLY AND OPERATION APPLICATIONS Driving and removing of machine screws, wood screws, tapping screws, etc. Tightening and loosening of all types of bolts and nuts, used for securing structural items REMOVAL AND INSTALLATION METHOD OF BATTERY 1. Connect the charger’s power cord to a receptacle. When the power cord is connected, the charger’s pilot lamp will blink in red. (At 1-second intervals) WARNING: Do not use the electrical cord if damaged.
English (1) Pilot lamp indication The indications of the pilot lamp will be as shown in Table 2, according to the condition of the charger or the rechargeable battery. Table 2 Indications of the pilot lamp The pilot lamp lights or blinks in red. The pilot lamp lights in green. Lights for 0.5 seconds. Does not light for 0.5 seconds. (off for 0.5 seconds) Before charging Blinks While charging Lights Charging complete Blinks Lights for 0.5 seconds. Does not light for 0.5 seconds. (off for 0.
English 䢇 When the pilot lamp flickers rapidly in red (at 0.2– second intervals), check for and take out any foreign objects in the charger’s battery installation hole. If there are no foreign objects, it is probable that the battery or charger is malfunctioning. Take it to your authorized Service Center. BEFORE USE Check the work area to make sure that it is clear of debris and clutter. Clear the area of unnecessary personnel. Ensure that lighting and ventilation is adequate.
English is low when the trigger switch is pulled slightly and increases as the trigger switch is pulled more. 䡬 When releasing the trigger of the switch, the brake will be applied for immediate stopping. NOTE: A buzzing noise is produced when the motor is about to rotate; this is only a noise, not a machine failure. 8. Change rotation speed As shown in Fig. 9, when the rotation change lever is slid to the lower side, the power mode (P) is set. And when slid to upper side, the save mode (S) is set.
English 12. About Remaining Battery Indicator When pressing the remaining battery indicator switch, the remaining battery indicator lamp lights and the battery remaining power can be checked. (Fig.12) When releasing your finger from the remaining battery indicator switch, the remaining battery indicator lamp goes off. The table 5 shows the state of remaining battery indicator lamp and the battery remaining power. Switch panel Light switch Fig.
English 4. Work at a tightening torque suitable for the bolt under impact The optimum tightening torque for nuts or bolts differs with material and size of the nuts or bolts. An excessively large tightening torque for a small bolt may stretch or break the bolt. The tightening torque increases in proportion to the operation time. Use the correct operating time for the bolt. 5. Confirm the tightening torque The following factors contribute to a reduction of the tightening torque.
English MAINTENANCE AND INSPECTION CAUTION: Pull out battery before doing any inspection or maintenance. Wear limit 1. Checking the condition of the bit. (WH18DSDL) The bits should be checked regularly. If worn or broken bits can slip or decrease the efficiency of the motor and burn it out. Replace worn bits with new ones. 0.12" (3mm) 0.45" (11.5mm) Fig. 14 CAUTION: If you use a driver bit of which point is worn or broken, it will be dangerous since it slips. So replace it with a new one. 2.
English Contact portion outside brush tube Fig. 17 7. Check for Dust Dust may be removed with a soft cloth or a cloth dampened with soapy water. Do not use bleach, chlorine, gasoline or thinner, for they may damage the plastics. 8. Disposal of the exhausted battery WARNING: Do not dispose of the exhausted battery. The battery must explode if it is incinerated. The product that you have purchased contains a rechargeable battery. The battery is recyclable.
English ACCESSORIES WARNING ALWAYS use Only authorized HITACHI replacement parts and accessories. NEVER use replacement parts or accessories which are not intended for use with this tool. Contact HITACHI if you are not sure whether it is safe to use a particular replacement part or accessory with your tool. The use of any other attachment or accessory can be dangerous and could cause injury or mechanical damage. NOTE: Accessories are subject to change without any obligation on the part of the HITACHI.
English 3. Hexagonal socket Part Name 4 mm Hexagonal socket 5 mm Hexagonal socket 6 mm Hexagonal socket 5/16" Hexagonal socket 8 mm Hexagonal socket 10 mm Hexagonal socket (small type) 10 mm Hexagonal socket 10 mm Hexagonal socket 1/2" Hexagonal long socket L B Code No. 65 65 65 65 65 7 8 10 12 13 992689 996177 985329 996178 996179 14 16 17 21 65 65 65 166 14 16 17 21 996180 996181 996182 996197 4. Drill chuck adapter set: Code No. 321823 Use the drill available on the market.
English Square head drive dimensions S Part Name 1/2" Hexagonal (12.7 mm) Socket Code No.
English 4. Extension bar: The extension bar is convenient for working in very restricted spaces or when the socket provided cannot reach the bolt to be tightened. CAUTION 7 Bit adaptor: This is used for tightening small screws (M6). NOTE: This adaptor is set only on the anvil (drive angle) of the main unit. When the extension bar is used, the tightening torque is reduced slightly compared with the ordinary socket. S B s Code No. 873633 Code No. 991476 Dimention B, S 1/2" (12.7 mm) 5.
Français CONSIGNES DE SÉCURITÉ IMPORTANTES Lire et comprendre toutes les précautions de sécurité, les avertissements et les instructions de fonctionnement dans ce mode d’emploi avant d’utiliser ou d’entretenir cet outil motorisé. La plupart des accidents causés lors de l’utilisation ou de l’entretien de l’outil motorisé proviennent d’un non respect des règles ou précautions de base de sécurité.
Français e) 3) En cas d'utilisation d'un outil électrique à l'extérieur, utiliser un cordon de rallonge adapté à un usage extérieur. L'utilisation d'un cordon adapté à l'usage extérieur réduit les risques de choc électrique. f) Si vous devez utiliser un outil électrique dans un endroit humide, utilisez une alimentation protégée contre les courants résiduels. L'utilisation d'un dispositif de protection contre les courants résiduels réduit le risque de choc électrique.
Français 6) des clous, des vis ou autres petits objets métalliques pouvant raccorder les bornes. La connexion des bornes peut entraîner des blessures ou un incendie. d) En cas d’utilisation dans des conditions extrêmes, du liquide peut être émis de la batterie. Éviter tout contact. en cas de contact accidentel, rincer à l’eau. Si le liquide entre en contact avec les yeux, consulter un médecin. Le liquide émis par la batterie peut entraîner des irritations et des brûlures.
Français 13. Les lames et les accessoires doivent être fermement montés sur l’outil. Eviter les blessures potentielles personnelles et aux autres. Les lames, les instruments de coupe et les accessoires qui ont été montés sur l’outil doivent être fixés et serrés fermement. 14. NE JAMAIS utiliser un outil défectueux ou qui fonctionne anormalement.
Français 4. 5. 6. 7. Ne pas exposer le chargeur à la pluie ni à la neige. L’utilisation d’un accessoire non recommandé ou non vendu par le fabricant du chargeur de batterie risque de provoquer un feu, une décharge électrique ou des blessures. Pour réduire tout risque de dommage de la fiche et du cordon électrique, débrancher le cordon du chargeur en tirant sur la fiche.
Français 7. 8. 9. 10. 11. 12. 13. 14. NE JAMAIS raccorder deux chargeurs de batterie ensemble. NE JAMAIS insérer de corps étrangers dans l’orifice de la batterie ou du chargeur de batterie. NE JAMAIS utiliser de transformateur-élévateur pour la recharge. NE JAMAIS utiliser de générateur de moteur ni d’alimentation CC pour la recharge. NE JAMAIS ranger la batterie ni le chargeur de batterie dans un lieu où la température peut atteindre ou dépasser 104°F (40°C).
Français AVERTISSEMENT Un court-circuit risque de se produire et causer un incendie, si un corps étranger conducteur d’électricité passe dans les bornes de la pile au lithium-ion. Veuillez respecter les consignes suivantes pour le rangement de la pile. 䡬 Ne pas mettre d’objet conducteur d’électricité, tels que clous, fil d’acier, de cuivre ou autre fil dans la mallette de rangement.
Français DESCRIPTION FONCTIONNELLE REMARQUE: Les informations contenues dans ce mode d’emploi sont conçues pour assister l’utilisateur dans une utilisation sans danger et un entretien de l’outil motorisé. NE JAMAIS utiliser ni entreprendre une révision de l’outil sans avoir d’abord lu et compris toutes les instructions de sécurité contenues dans ce manuel. Certaines illustrations dans ce mode d’emploi peuvent montrer des détails ou des accessoires différents de ceux de l’outil motorisé utilisé.
Français 2. Chargeur de batterie (UC18YRSL) Cordon Lampe témoin Rail guide Plaque signalétique Fig. 2 SPECIFICATIONS 1. Marteau/clé à chocs sans fil Modèle Vitesse sans charge Capacité WH18DSDL Mode alimentation Mode économie d’énergie Petite vis Boulon ordinaire Boulon hautement extensible WR18DSDL 0 – 2,600/min 0 – 2,000/min 5/32" – 3/8" (M4 – M10) 1/4" – 9/16" (M6 – M14) 3/8" – 23/32" (M10 – M18) 1/4" – 15/32" (M6 – M12) 5/16" – 9/16" (M8 – M14) Mode électrique 1,510 in-lbs.
Français ASSEMBLAGE ET FONCTIONNEMENT UTILISATIONS Enfoncement et extraction de vis mécaniques, vis de bois, vis de taraudage, etc. Pour le serrage et le desserrage de tous types de boulaons et d’écrous utilisés pour la consolidation de stuctures. Si la recharge est effectuée à une tension supérieure à la tension indiquée sur la plaque signalétique, le chargeur sera brûlé. 1. Brancher le cordon d’alimentation du chargeur sur une prise secteur.
Français REMARQUE: Si la lampe témoin clignote en rouge, débrancher la fiche de la prise et vérifier si la batterie est insérée correctement. (1) Indication de la lampe témoin Les indications de la lampe témoin sont expliquées dans le Tableau 2, selon la condition du chargeur ou de la batterie rechargeable. Quand la batterie est rechargée à fond, la lampe témoin clignote lentement en rouge.
Français immédiatement après utilisation, les substances chimiques internes risquent de se détériorer et la durée de vie de la batterie se raccourcira. Laisser la batterie refroidir un moment avant de l’utiliser. PRECAUTION ● Si le chargeur a fonctionné pendant longtemps de suite, il sera chaud, ce qui risque de provoquer des pannes. Lorsque la recharge est terminée, laisser le chargeur refroidir pendant environ 15 minutes avant de passer à la recharge suivante.
Français ATTENTION : R L Pousser R Pousser L Bouton-poussoir Déclencheur Fig. 8 PRECAUTION Il n’est pas possible de commuter le boutonpoussoir pendant que le tournevis à percussion fonctionne. Pour commuter le bouton-poussoir, arrêter le tournevis à percussion, puis régler le bouton-poussoir. 7. Fonctionnement de l’interrupteur 䡬 Quand on tire sur la gâchette de l’interrupteur, l’outil tourne. Quand on relâche la gâchette, l’outil s’arrête.
Français Tableau 5 Etat de la lampe La puissance résiduelle de la batterie La puissance résiduelle de la batterie est suffisante La puissance résiduelle de la batterie est à la moitié Crochet Fig. 10 Vis (2) Remplacer le crochet et serrer les vis. Installez le crochet à fond dans la gorge de l’outil électrique et serrez les vis pour le maintenir fermement. (Fig. 11) Gorge Crochet Fig. 11 Vis 12.
Français REMARQUE: Pour éviter de consommer de la puissance batterie lorsque vous oubliez de couper la DEL, la lampe s’éteint automatiquement après environ 15 minutes. PRECAUTIONS D'UTILISATION 1. Repos de l’appareil après un travail continu Après un travail de serrage de boulons effectué de façon continue, laisser l’outil reposer pendant environ 15 minutes lors du remplacement de la batterie. La température du moteur, de la gâchette, etc.
Français ENTRETIEN ET INSPECTION PRECAUTION Sortir la batterie avant toute opération d’inspection ou d’entretien. Limite d'usure 1. Vérifier l’état de la mèche. (WH18DSDL) Les mèches doivent être vérifiées régulièrement. Si elles sont usées ou cassées, elles risquent de glisser ou de réduire le rendement du moteur et de le brûler. Remplacer les mèches usées par des neuves. 0.12" (3mm) 0.45" (11.5mm) Fig.
Français Section de contact à l’extérieur du tube de balai Fig. 17 7. Vérifier s’il y a de la poussière Enlever la poussière avec un chiffon doux ou un chiffon humecté d’eau savonneuse. Ne pas utiliser de décolorant, chlorure, essence ou diluant, car ces produits pourraient endommager le plastique. 8. Mise au rebut d’une batterie usée AVERTISSEMENT: Ne pas jeter la batterie usée aux ordures ménagères. La batterie risque d’exploser si elle est incinérée.
Français ACCESSOIRES AVERTISSEMENT: TOUJOURS utiliser uniquement des pièces de rechange et des accessoires HITACHI. NE JAMAIS utiliser de pièce de rechange ou d’accessoires qui ne sont pas prévus pour être utilisé avec cet outil. En cas de doute, contacter HITACHI pour savoir si une pièce de rechange ou un accessoire particulier peuvent être utilisés en toute sécurité avec votre outil.
Français 3. Douille hexagonale Caractères gravés 7 8 10 12 13 14 16 17 21 Désignation 4 mm Douille hexagonale 5 mm Douille hexagonale 6 mm Douille hexagonale 5/16" Douille hexagonale 8 mm Douille hexagonale 10 mm Douille hexagonale (Petits format) 10 mm Douille hexagonale 10 mm Douille hexagonale 1/2" Douille hexagonale longue L B N° de code 65 65 65 65 65 65 65 65 166 7 8 10 12 13 14 16 17 21 992689 996177 985329 996178 996179 996180 996181 996182 996197 4.
Français Dimensions de l’entraînement carré S Nom du produit N°de Code 10 mm 944291 12 mm 873632 13 mm 873539 14 mm 873540 1/2" Douille 17 mm (12.
Français 4. Barre de rallonge: La barre de rallonge est pratique pour le travail dans des espaces très resserrés ou lorsque la douille utilisée ne permet pas d’atteindre le boulon à serrer. PRECAUTION Quand la rallonge est utilisée, le couple de serrage est légèrement réduit comparé à celui de la douille ordinaire. 7. Adaptateur de mèche: Cet adaptateur est utilisé pour serrer des petites vis (M6). REMARQUE: Utiliser cet adaptateur uniquement dans le prolongement de l’angle de la visseuse.
Español INSTRUCCIONES IMPORTANTES SOBRE SEGURIDAD Antes de utilizar o de realizar cualquier trabajo de mantenimiento de esta herramienta eléctrica, lea y comprenda todas las precauciones de seguridad, advertencias e instrucciones de funcionamiento de este Manual de instrucciones. La mayoría de los accidentes producidos en la operación y el mantenimiento de una herramienta eléctrica se deben a la falta de observación de las normas o precauciones de seguridad.
Español 3) Mantenga el cable alejado del calor, del aceite, de bordes afilados o piezas móviles. Los cables dañados o enredados aumentan el riesgo de descarga eléctrica. e) Cuando utilice una herramienta eléctrica al aire libre, utilice un cable prolongador adecuado para utilizarse al aire libre. La utilización de un cable adecuado para usarse al aire libre reduce el riesgo de descarga eléctrica.
Español b) 6) Utilice herramientas eléctricas sólo con paquetes de pilas específicamente diseñados. La utilización de otros paquetes de pilas podría crear riesgo de daños e incendio. c) Cuando no se utilice el paquete de pilas, manténgalo alejado de otros objetos metálicos como clips, monedas, llaves, clavos, tornillos u otros objetos metálicos pequeños que puedan hacer una conexión de un terminal a otro. Si se acortan los terminales de las pilas podrían producirse quemaduras o incendios.
Español 11. Mantenga todos los tornillos, pernos, y cubiertas firmemente fijados en su lugar. Mantenga todos los tornillos, pernos, y cubiertas firmemente montados. Compruebe periódicamente su condición. 12. No utilice herramientas eléctricas si la carcasa o la empuñadura de plástico está rajada. Las rajas en la carcasa o en la empuñadura de plástico pueden conducir a descargas eléctricas. Tales herramientas no deberán utilizarse mientras no se hayan reparado. 13.
Español INSTRUCCIONES IMPORTANTES DE SEGURIDAD PARA EL CARGADOR DE BATERÍAS ADVERTENCIA: La utilización inadecuada del cargador de baterías puede resultar en lesiones serias o en la muerte. Para evitar estos riesgos, siga las instrucciones de seguridad ofrecidas a continuación. 2. 3. No exponga el cargador de baterías a la lluvia ni a la nieve.
Español PRECAUCIÓN ¡UTILICE SOLAMENTE BATERÍA HITACHI DEL TIPO DE LA SERIE BSL18. LOS DEMÁS TIPOS DE BATERÍAS PODRÍAN EXPLOTAR Y CAUSAR LESIONES! Para evitar el riesgo de lesiones, siga las instrucciones ofrecidas a continuación: ADVERTENCIA: La utilización inadecuada de la batería o del cargador de baterías puede conducir a lesiones serias. Para evitar estas lesiones: 1. 2. 3. 4. 5. 6. 7. 8. 9. 10. 11. 12. 13. 14. NUNCA desarme la batería.
Español 9. Aléjela del fuego inmediatamente cuando se detecte una fuga o un olor raro. 10. No la utilice en un lugar donde se genere gran electricidad estática. 11. Si hay una fuga de la batería, mal olor, se genera color, está descolorida o deformada, o de algún modo funciona de forma anormal durante su utilización, recarga o almacenamiento, retírela inmediatamente del equipo o del cargador de la batería y detenga su utilización. PRECAUCIÓN 1.
Español DESCRIPCIÓN FUNCIONAL NOTA: La información contenida en este Manual de instrucciones ha sido diseñada para ayudarle a utilizar con seguridad y mantener esta herramienta eléctrica. NUNCA haga funcionar ni efectúe el mantenimiento de la herramienta antes de leer y comprender todas las instrucciones de seguridad contenidas en este manual. Algunas ilustraciones de este Manual de Instrucciones pueden mostrar detalles o accesorios diferentes a los de la propia herramienta eléctrica. NOMENCLATURA 1.
Español 2. Cargador de baterías (UC18YRSL) Cable Lámpara piloto Riel de guía Placa de características Fig. 2 ESPECIFICACIONES 1.
Español MONTAJE Y OPERACIÓN APLICACIONES Atornillamiento y desatornillamiento de tornillos para metales, tornillos para madera, tornillos que no necesitan abrir antes su agujero, etc. Apretado y aflojado de cualquier tipo de pernos y tuercas pasa aseguerar estructuras. MÉTODO DE EXTRACCIÓN E INSTALACIÓN DE LA BATERÍA 1. Desmontaje de la batería Sujetar firmemente el asidero y presionar el cierre de la bataría para desmontarla (Ver la Fig. 3). 1.
Español Cuando la batería se haya cargado completamente, la lámpara parpadeará lentamente en rojo. (A intervalos de 1 segundo) (Consulte la Tabla 2) (1) Indicaciones de la lámpara piloto Las indicaciones de la lámpara piloto mostradas en la Tabla 2, se producirán de acuerdo con la condición del cargador o de la batería. Tabla 2 Indicaciones de la lámpara piloto El indicador luminoso piloto se ilumina o parpadea en rojo.
Español ● ● ● PRECAUCIÓN Si utiliza continuamente el cargador de baterías, éste se calentará, lo que puede causar averías. Después de haber finalizado la carga, espere 15 minutos antes de realizar la carga siguiente. Si recarga una batería caliente o expuesta al sol, la lámpara piloto puede encenderse en verde. La batería no se cargará. En tal caso, deje que la batería se enfríe antes de cargarla. Cuando la lámpara piloto parpadee rápidamente en rojo (a intervalos de 0.
Español PRECAUCIÓN: R Cuando trabaje en el modo de ahorro (S), no ajuste continuamente los tornillos, ya que la temperatura de los componentes electrónicos del conmutador del convertidor aumenta. L Presionar R Presionar L Conmutador de gatillo Botón pulsador Fig. 8 PRECAUCIÓN El botón pulsador no podrá utilizare mientras el motor de la herramienta esté girando. Para accionarlo, pare en primer lugar el motor de la herramienta. 7.
Español (1) Retirada del gancho. Extraiga los tornillos que sujetan el gancho con un destornillador Philips. (Fig. 10) Tabla 5 Estado del Potencia de batería restante indicador La potencia restante de la batería es suficiente. La potencia restante de la batería se encuentra a la mitad. La potencia restante de la batería está prácticamente agotada. Recargue la batería cuanto antes. Gancho Fig. 10 Tornillo (2) Colocación del gancho y ajuste de los tornillos.
Español PRECAUCIONES OPERACIONALES 1. Reposo de la herramienta después de un funcionamiento prolongado Tras una tarea de apriete de pernos de larga duración, deje la unidad en reposo durante unos 15 minutos al reemplazar la batería. Si reinicia la tarea inmediatamente después de reemplazar la batería, aumentaría la temperatura del motor, del interruptor, etc., con los consiguientes riesgos de quemadura.
Español MANTENIMIENTO E INSPECCIÓN PRECAUCIÓN Extraiga la batería antes de realizar cualquier trabajo de inspección o de mantenimiento. Límite de uso 1. Comprobación de las condiciones de la broca. (WH18DSDL) Las brocas deberán comprobarse regularmente. Si una broca está desgastada o rota, puede patinar o reducir la eficacia del motor, o hacer que se queme. Reemplace las brocas gastadas por otras nuevas. 0.12" (3mm) 0.45" (11.5mm) Fig.
Español PRECAUCIÓN Tubo exterior de la parte de contacto de la escobilla de carbón Fig. 17 7. 8. 9. Comprobación del polvo El polvo podrá eliminarse con un paño suave y seco o ligeramente humedecido en agua jabonosa. No utilice lejía, cloro, gasolina, ni diluidor de pintura, porque podrían dañar el plástico. Eliminación de las baterías agotadas ADVERTENCIA: No tire las baterías agotadas. Las baterías pueden explotar si se incineran. El producto que ha adquirido contiene una batería.
Español ACCESORIOS ADVERTENCIA: SIEMPRE utilice únicamente repuestos y accesorios autorizados por HITACHI. NO utilice nunca repuestos o accesorios no previstos para usar con esta herramienta. Si tiene dudas en cuanto a la seguridad de usar determinado repuesto o accesorio junto con su herramienta, póngase en contacto con HITACHI. La utilización de otros accesorios puede resultar peligrosa y causar lesiones o daños mecánicos.
Español 3. Receptáculo hexagonal para tuercas y pernos Nombre de la pieza 4 mm Receptáculo hexagonal 5 mm Receptáculo hexagonal 6 mm Receptáculo hexagonal 5/16" Receptáculo hexagonal 8 mm Receptáculo hexagonal 10 mm Receptáculo hexagonal (Tamaño pequeño) 10 mm Receptáculo hexagonal 10 mm Receptáculo hexagonal 1/2" Receptáculo hexagonal largo Caracteres grabados 7 8 10 12 13 L B No.
Español Dimensión S de la boca impulsora cuadrada Nombre del producto Nº de código 10 mm 944291 12 mm 873632 13 mm 873539 Diámero idóneo del perno Dimensión H entre caras opuestas Forma Gran ISO ISO Pernos en de la boca tensión (ordinario) (pequeño) pulgadas hexagonal M6 M8 W5/16" M8 14 mm 873540 1/2" Cubo 17 mm (12.
Español 4. Barra de extensión: La barra de extensión es muy apropiada para trabajar en espacios muy reducidos o cuando el receptáculo provisto no pueda llegar al perno a ser apretado. PRECAUCIÓN Cuando se utilice la barra de extensión, la tensión de apriete se reduce ligeramente en comparción, la tensión lograda con el receptáculo ordinario. 7. Adaptador de brocas: Este adaptador se utiliza para apretar tornillos pequeños (M6).
03Spa_WH18DSDL_US.p65 65 10/2/12, 3:14 PM 20 503 502 501 21 11 22 12 23 36 35 24 13 1 37 25 14 2 15 34 3 26 4 16 27 5 41 29 40 39 18 42 28 38 17 6 19 30 7 31 45 8 42 9 41 46 10 32 33 1 2 3 4 5 6 7 8 9 10 11 12 13 14 15 16 17 18 19 20 21 22 23 24 25 26 27 28 29 30 31 32 33 34 35 36 37 38 39 40 41 A WH18DSDL B C D 330619 1 330856 1 331284 1 322717 1 332198 1 333745 1 319535 2 D3.5 333744 1 959154 2 D5.556 324218 1 959148 28 D3.
03Spa_WH18DSDL_US.p65 66 10/2/12, 3:14 PM 18 9 503 502 501 19 20 10 21 11 34 33 22 10 35 23 12 13 32 24 1 14 25 39 27 38 37 16 40 26 36 15 2 17 28 4 29 5 3 6 43 40 7 39 8 44 30 31 1 2 3 4 5 6 7 8 9 10 11 12 13 14 15 16 17 18 19 20 21 22 23 24 25 26 27 28 29 30 31 32 33 34 35 36 37 38 39 40 A WR18DSDL B C D 332198 1 332200 1 332196 1 "4-6" 324257 1 332197 1 324256 1 959154 2 D5.556 333749 1 959148 28 D3.
03Spa_WH18DSDL_US.
Please contact HITACHI KOKI U.S.A. LTD. at 1-800-59-TOOLS (toll free), or HITACHI AUTHORIZED POWER TOOL SERVICE CENTER regarding COLLECTION. Pour le RAMASSAGE, contacter HITACHI KOKI U.S.A. LTD. au 1-800-59-TOOLS (appel gratuit), ou UN SERVICE APRÈS-VENTE D’OUTILS ÉLECTRIQUE AGRÉÉ PAR HITACHI. Con respecto a la RECOLECCIÓN de baterías, póngase en contacto con HITACHI KOKI U.S.A. LTD. número 1-800-59-TOOLS (llamada gratis), o con HITACHI AUTHORIZED POWER TOOL SERVICE CENTER. Issued by Hitachi Koki Co.