
User's Instructions


– –
12
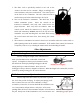
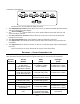
Charging the Eclipse 7 Ni-Cd Batteries
1. Connect the transmitter charging cord into the charging socket (on the rear of the case, left
side) and airborne Ni-Cd batteries to the receiver connector on the charger.
2. Connect the receiver battery to the charging cord.
3. Plug the charger into a wall socket.
4. The charger’s LEDs should light, indicating charging current is flowing. The batteries should
be left on charge for about 15 hours.
• Try to charge the batteries with the charger supplied with your system exclusively. The use of a
fast-charger may damage the batteries by overheating and dramatically reduce their lifetime.
NOTE: If you need to remove or replace the transmitter battery, do not pull on its wires to
remove it. Instead, gently pull on the connector’s plastic housing where it plugs in to the
transmitter. The battery must be removed to charge it properly with a "peak" charger.
Operating With A Trainer Cord
An optional training cord is available from your dealer. The cord may be used to help a
beginning pilot learn to fly easily by allowing a second transmitter, operated by an experienced
instructor, to be connected to this system. The instructor may override the beginning pilot at any
time to bring the model back under safe control. For training, the transmitter may be connected
to another Hitec FM system, as well as to any Futaba
®
FM transmitter (if Hitec cord #58310 is
used).
To use the trainer cord:
1. Set up both the student’s and instructor’s transmitters to have identical trim and control
motions. If the instructor’s transmitter is on a different frequency than the student’s, use the
student’s as the master transmitter and the other as the student’s.
2. Collapse the student's antenna, and fully extend the instructor's antenna. If the student's
transmitter has a removable RF module, remove it from the transmitter.