
User's Instructions


Aircraft
(ACRO)
Section
– –
34
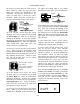
19. Next we’ll set the direction of the elevator
servo, channel 2. When you move the right-
hand stick towards the BOTTOM of the
transmitter, the elevator should move up.
Check to make sure it moves the proper
direction! (More planes are crashed due to
reversed controls than for any other reason.)
UP
DOWN
UP
DOWN
20. If the elevator control moves the wrong
direction, move over to Channel 2 by pressing
the
Cursor
Right
key. Now the ‘
2
’ should be
flashing in the display. Activate the opposite
direction for the elevator servo by pressing the
Active/Inhibit
(
Clear
) key. Move the right-hand
stick up-and-down again and verify the
elevator moves the right direction.
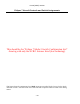
21. Now we’ll set the direction of the throttle
servo. When you move the left-hand stick
towards the BOTTOM of the transmitter, the
throttle should close, meaning that the hole in
the carburetor should close. Check to make
sure that the throttle lever on the engine
moves the proper direction!
LOW Throttle: carburetor
at idle position (not fully
closed)
HIGH
LOW
HIGH Throttle: carburetor
fully opened
22. If the throttle servo moves the wrong
direction, move over to Channel 3 by pressing
the
Cursor
Right
key. Now the
3
should be
flashing in the display. Activate the opposite
direction for the throttle servo by pressing the
Active/Inhibit
(
Clear
) key. Verify the throttle
stick makes the servo move the carburetor
opening in the correct direction.
23. Now we’ll set the direction of the rudder
servo. When you move the left-hand stick
towards the CENTER of the transmitter (to
the right), the trailing edge or rear rudder
should move to the right. Check to make sure!
RIGHT
LEFT
LEFT
RIGHT
Front View
If the rudder moves the wrong direction, move
over to Channel 4 by pressing the
Cursor
Right
key. Now the ‘
4
’ should be flashing in the
display. Activate the opposite direction for
the rudder servo by pressing the
Active/Inhibit
(
Clear
) key. Move the left-hand stick left-and-
right again and verify the rudder moves the
right direction.
If your model has retracts, set the correct
response direction when commanded by the
Gear switch, using the same procedure.
If you’re using a second aileron servo, you’ll
now set the left aileron servo direction
(otherwise skip this and the next step). This is
channel 6, and the ‘
6
’ should be flashing for
this command. When you move the right-
hand stick to the right, the aileron on the left
wing should move downwards. Check that the
left aileron moves the correct way! If it does
not, activate the opposite direction for the left
aileron servo using the above procedures.
Move the right-hand stick again and verify the
left aileron moves the proper directions.
Press the
Up
or
Down
arrow keys to the Flap
Trim function (
FLPT
), and input a percentage
of zero (0) using the
Data
–Decrease
key. This
temporarily disables the flap knob (VR1) so
that you can set aileron neutrals without
regard to the flap knob position. Later we’ll
turn it back on.
FLPT 0
CH
6