
User's Instructions


Aircraft
(ACRO)
Section
– 49 –
PMX1
to
PMX5
— Programmable Mixes 1, 2, 3, 4, & 5
Your
Eclipse 7
system contains FIVE separate programmable mixers (
PMX1
—
PMX5
)
with unique capabilities. You may use mixing to correct unwanted tendencies of the aircraft
during aerobatics. Each one of these mixers may be programmed to do things that are not built-
in programs. This makes them useful for all sorts of different things. Note that the mixers must
be turned on by flipping a switch — if you need them to be on all the time, you must not touch
that switch.
The elevator dual-rate switch in its down position turns on mixers (if they’ve been
activated). The method to be used to program mixers is given for Mixer #1, but the other mixers
may be programmed in an identical fashion.
You can use both PMXs to create a custom dual elevator function, where you use two
servos for your elevator control, one for each side, the second plugged into an unused receiver
channel and mixed from elevator (if you do this, you must be careful to keep the mixer on at all
times). Or you may also use the mixers for correcting unwanted flying tendencies, like
automatically applying a bit of rudder with throttle to account for torque/P-factor effects, to a
corrective elevator motion during knife-edge flight to correct for an undesired tucking tendency
(the latter is described in the ACRO model setup section and below).
Using the Programmable mixers
1. Call up the mixer screen by repeatedly pressing one of the
Edit Up Down
keys until a
PMX
window appears. The default is for the function to be inhibited. To activate, press the
Active/Inhibit (Clear)
key. This will cause the
INH
display to change to a display showing
100%, Master and Slave indicators, and a flashing
ON
or
OFF
depending on the position of
the mixer's on-off switch (see table below).
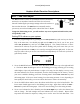
PMIX1 + 8
CH
%
ON
R/D
4213567
SLV
MAS
2. Now you’ll select the
Master
channel for the mixing, the channel that causes the mixing to
occur. Press the
Cursor Right
key to get the master channel indicator
MAS
flashing on and
off, then press the
Data +Increase or –Decrease
keys to move the top arrow over the number
of the desired master channel, 1 – 7.
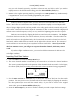
421356
CH
Master
Slave
3. Next you’ll put in the
Slave
channel, the one that is affected by motion of the master
channel. Press the
Cursor Right
key to get slave channel indicator
SLV
flashing on and off,
then press the
Data +Increase or –Decrease
keys to move the bottom arrow underneath the
number of the desired slave channel.