
User's Instructions


Glider
(GLID)
Section
– –
68
23. Set up the crow (also referred to as
“butterfly”) function for precise spot
landings. The ailerons reflex (go up), and
the flaps drop with movement of the throttle
stick. Turn on by locating the CROW menu
with the
Up Down Edit
keys, then pressing
the
Active/Inhibit (Clear)
key. The
On
or Off
display will be flashing, depending on the
Gear switch.
24. First set the CROW function activation
point. Hit the
Cursor Left
key one time to
get to the offset setting menu. Now move
the throttle stick all the way up. Enter that
position by pressing the
Clear Active/Inhibit
key.
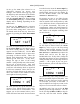
SET +127
CH
16
SLV
MAS
ON
2
%
25. Next, set up the throws for the ailerons.
Hit the
Cursor Right
key two times to get to
the aileron setting menu (a small triangle
appears over the number 1). Use the
Data
+Increase
or
–Decrease
keys to input some
percentage of aileron motion. Move the
throttle stick downwards and be sure the
ailerons go UP with crow. If they don’t,
change the sign in front of the setting
number. You'll probably want a fair amount,
but not all, of aileron travel. Start with
about 50%. Be sure not to use full travel, so
you'll have roll authority while on approach
in full crow command. Notice that you set
the throw for both ailerons at the same time:
this is the reason to have identical control
arm lengths and neutral positions.
CROW + 35
CH
16
SLV
MAS
ON
2
%
26. Now you may set up the throw for the
elevator, but it usually doesn't take much,
and too much will be uncontrollable. We
suggest you set this amount backer you've
flown and know how much elevator motion
is needed to trim. Press the
Cursor Right
key
once to get to the elevator setting menu (a
small triangle appears over the number 2).
Set the desired number with the
Data
+Increase
or
–Decrease
keys.
For starters, use zero or very little elevator
compensation until you fly and determine
what is needed: if the model pitches up with
crow, add down elevator compensation and
if it pitches downwards, add some up
compensation. Make only small changes in
compensation because it has a big effect on
trim. Refer to the sailplane trimming chart
for more details.
CROW 0
CH
16
SLV
MAS
ON
2
%
27. (4WNG only) Now set up the throws
for the flaps as desired. Press the
Cursor
Right
key once to get to the flap setting
menu (a small triangle appears over the
number 6). Set the desired number with the
Data
+Increase
or
–Decrease
keys. Move the
throttle stick and be sure the flaps go
DOWN with crow. If they don’t, change the
sign (this may depend on servo orientation).
You'll probably want as much flap motion as
possible — 90° is great if you can get it.
Like the ailerons, you set both flap offsets at
the same time.
CROW +100
CH
16
SLV
MAS
ON
2
%
28. (4WNG only) Then, using Subtrims, fine
tune to get neutral flaps on both sides. Use
EPAs to get 90° flap travel (or the amount
of travel that you’d like) at full crow. It
may be helpful to use long servo arms on the
flap servos to increase their effective throw.
29. (4WNG only) You can use the S.TM1
(launch) preset for high launches. You can
set the two flaps (CH6 and CH7) to drop for
more lift, and trim with elevator (CH2).