
User's Instructions


Helicopter
(HELI)
Section
– 85 –
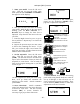
5. Name your model. Press the UP arrow
once. This gets you into the model name
mode (note the words MODEL and NAME in
the upper left of the display).
****- 0
421 3 567
MODEL
6. Now you can select four letters to identify
your model. With the first of the four letters
flashing, press the Data +Increase or –
Decrease keys to change the letter that is
displayed. Stop when the first letter is the one
you want.
7. Press the Right Cursor key once to get to
the second letter. Repeat Step 5 to choose the
second letter.
8. Repeat the previous steps two more times
to fill out the remaining two letters. If you
like, you can hit the right cursor button one
more time and select a number between 0 and
199 for further identification.
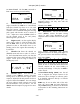
9. Set the stopwatch. Press the UP arrow
once. This gets you into the Timer menu
(TIME). Use the Data Increase and Decrease
keys to select the amount of time you want the
stopwatch to count down. This is handy to
keep track of engine running time so you don't
run out of gas.
TIME 10
421 3 567
MODEL
10. This completes the initial part of the setup.
Now, we’ll go ahead and customize the
settings for your model. Switch transmitter
power OFF.
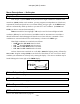
11. Servo Directions. Switch transmitter
power back on and check the proper direction
of throw for each servo. Use the reversing
function [
REV
] to reverse channels as
necessary to get proper throw directions.
REV
CH
4213567
N
R
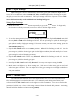
12. If you’re using 120’ or 180’ swash types,
please use the swashplate (SWAH) menu,
page 94, to adjust these responses.
SWAH + 70
CH
162
%
LEFT RIGHT
Right Aileron: swashplate
tilted towards the chopper's
right side.
Left Aileron: swashplate
tilted towards the left side.
DOWN
UP
Down Elevator: swashplate
tilted towards the chopper's
front.
Up Elevator: swashplate
tilted towards the rear.
HIGH
LOW
HIGH Position: high rotor
pitch AND carburetor fully
opened
LOW Position: low rotor
pitch, carburetor at idle (use
trim tab to fully close)
LEFT
RIGHT
LEFT
RIGHT
13. Servo Neutrals. First, be sure the hovering
pitch and hovering throttle knobs are centered.
Set up all linkages so that all servos are as
close to mechanical neutral as possible. Then,
use the Subtrim (
STRM
) window to make fine
adjustments on the servo neutrals.
STRM 5
CH
421 3 567