
Manual
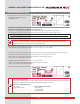

9 CHANNEL 2.4GHz AIRCRAFT COMPUTER RADIO SYSTEM
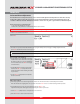
Gyro (HELI)
Gyro set-up for helis
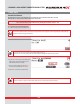
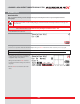
a. Select Gyro from the model menu.
b. Press ACT to activate the gyro menu.
Single rate gyro set-up
c. The default sensitivity value is 50%. Follow
the gyro manufacturer's guidelines and apply an
appropriate % value with the + RST – icons for
each dierent idle-up and hold condition
you have set.
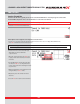
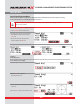
Dual rate gyro set-up
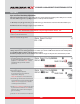
d. Many modern gyros are
dual rate heading hold products.
To use a dual rate gyro select the Mode:
Single arrow to change it to,
Mode : Dual and press Yes when asked “Sure”?
e. Consult the gyro manufacturers documentation
to determine what rate value should be applied.
Use the +RST- icon to apply a rate % value for
each idle-up and hold condition.
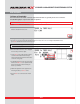
f. On the, Rate1: 0%/NOR arrow line, press the arrow
to cycle between a normal and T.lock or throttle
lock feature. This is used for bench testing the
gyro rate sensitivity.
g. Select the Exit icon to return to the model menu.
Gyro on/o and Sensitivity Adjustment.
Almost all modern helicopters use a gyro on the tail rotor control. The Aurora 9X oers you the ability to use a switch to
have three dierent gyro “rates” per ight condition or “idle-up” and hold condition.
To eectively set-up the gyro function, you should have the gyro manufacturer’s instruction manual available to you.
We will discuss the two main types of gyros, single and dual rate.
Without selecting a gyro switch option, you will have one rate option in each ight condition or idle-up and hold
settings. If you choose to set the gyro function on a switch, you can have a dierent rate value for each switch position,
in each dierent ight condition or idle-up and hold condition.
We will keep it simple, and not select a multiple value switch for the gyro at this point. You can do it later if you wish.
### This function can be inuenced by the ight condition feature ###
140