
User guide
17
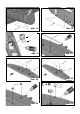
the motor is installed with no sidethrust and 1.5° downthrust
(with reference to the fuselage centreline). This is our
recommended basic setting.
The machine screws 38 should project from the rear of the
firewall by the amounts stated below:
Upper left: 2 mm
Upper right: 2 mm
Lower left: 2 mm
Lower right: 2 mm
The firewall, complete with motor, can now be attached to
the motor mounts 37, which are already installed in the
fuselage.
Fig. 31
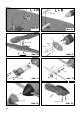
22. Fitting the propeller and spinner
Slip the propeller driver 63 onto the motor shaft, followed
by the split taper collet.
Balance the propeller 64 as accurately as possible, then fit
this on the driver, followed by the spinner holder 48, which
is fixed in place using the screw and washer included in
the power set. Finally push the spinner 10 onto the spinner
holder.
Figs. 32, 33
23. Completing the canopy
Trial-fit the two latch tongues 23 in the slots in the canopy
8, and check that they can be positioned accurately. Apply
thick cyano to the serrated areas of the latch tongues,
then push them into the slots in the canopy. Slide the front
end of the canopy into the fuselage, and allow the latch
tongues to engage in the latch catches 22 at the rear. While
the glue is still wet, position the canopy immediately and
accurately on the fuselage. Wait for about one minute before
carefully opening the canopy again, then apply more glue
to the latch tongues if necessary.
Figs. 34, 35
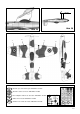
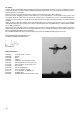
24. Setting the Centre of Gravity
Like any other aircraft, the DogFighter must be balanced
at a particular point in order to achieve stable flying
characteristics. Assemble your model ready to fly, and
install the flight battery.
The Centre of Gravity (CG) should be at a position 68 mm
aft of the wing root leading edge, i.e. at the fuselage sides.
Mark this point on both sides of the fuselage. You will find
it easier to balance this model inverted: support it at this
position on two fingertips, and it should balance level. If
not, you can move the flight battery forward or aft to correct
the balance point. Once the exact position is found, mark
the location of the flight pack inside the model to ensure
that it is always replaced in the same position.
Fig. 36
25. Recommended control surface travels
Control surface travels (measured at the widest point of
the control surface):
Ailerons: 14 / 8 mm +/-
Elevator: 7 / 7 mm
Rudder: 20 / 20 mm +/-
26. Gilding the lily - applying the decals
The kit is supplied with a multi-colour decal sheet 3.
Cut out the individual name placards and emblems and
apply them to the model in the position shown in the kit
box illustration, or in an arrangement which you find pleasing.
The decals cannot be re-positioned once applied, so take
care to place them carefully!
27. Preparations for the first flight
For the model’s initial test-flight please wait for a day with
as little breeze as possible. The evening hours often present
ideally calm conditions.
Be sure to carry out a range-check before the first flight.
The range-check should be completed using the procedure
described in your RC system instructions.
The transmitter and flight battery must first be fully charged,
using the procedure recommended by the manufacturer. If
you are not using a 2.4 GHz system, ensure that your
channel is not already in use before switching the
transmitter on.
Before carrying out the range-check ensure that there is
nothing and nobody in the way of the propeller. It is always
possible that the motor could burst into life unexpectedly!
If you encounter a problem, please don’t risk a flight. If you
cannot sort out the problem yourself, send the whole
system (including battery, switch harness and servos) to
the Service Department of your RC system manufacturer
and ask them to check it.
The first flight ...
The DogFighter should always be launched exactly into
any wind.
If you are a beginner to model flying, or are not confident
with this type of aeroplane, we strongly recommend that
you ask an experienced model pilot to help you for the first
few flights.
28. Hand-launching
Note for beginners: do not attempt to test-glide this
model!
Test-gliding an aeroplane of this type always results in
damage! The model should be hand-launched directly into
wind, with the motor running at ¾-throttle.
If you have an experienced model launcher available, ask
him or her to help you.
There are two possible methods:
Grasp the model from the underside, just aft of the wing;
alternatively by the turtle deck, i.e. from above. The model’s
nose should be directed upwards by at least 45° for a
successful launch, and a slight bank to the right is also
helpful.
Caution: the high motor torque will cause the model to
attempt to roll to the left immediately after launch. However,
an immediate and brief aileron command will straighten
the model up without problem.