
HFP-30 Hand Held Programmer Manual


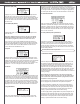

4. Deadband (DB_Width):
Highlight DB_Width on the main screen and press the Adjust Dial to
enter the menu.
Note: Hitec Digital Servos from the factory are set to the tightest
Deadband possible by default. Even if the Deadband can be set
lower with the programmer, it will have no effect on the servo.
Once in the menu, the current Deadband is displayed under Now
Values. Use the Adjust Dial to change the value under the ‘Set
Values’. When the desired Deadband is reached, press the Adjust
Dial to save the value to ‘Now Values’. Use the BACK button to exit
to the main menu. Values for the Deadband are 1-10.
5. Speed:
At times, it is required to slow a servo down for a desired application.
Highlight Speed in the main menu and press the Adjust Dial. Once
in the menu, the current speed is displayed under ‘Now Values’. Use
the Adjust Dial to change the value under the ‘Set Values’. Once the
desired speed is reached, press the Adjust Dial to save the value to
Now Values. Use the BACK button to exit to the main menu. Values
for speed are 10 – 100%.
6. ID (ID_Read):
With D Series servos, you have the ability to assign an individual ID
number. On the main menu, the current ID is displayed. To change it,
highlight ID_Read and press the Adjust Dial to enter the menu. In the
menu, adjust the ID number and press the Adjust Dial to assign it.
Use the BACK button to exit to the main menu.
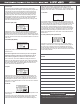
7. Failsafe:
Sometimes it is desired to have the servo go to a preset position
with loss of signal. To program and turn on the feature enter the
menu. To enter the menu, use the Adjust Dial to scroll to page 2
of the main menu and press the dial once highlighted. Follow the
on-screen instructions and center the Pulse Dial. Current Failsafe
settings are listed under ‘Now Values’. Use the Pulse Dial to set the
Failsafe position. Once set, use the Adjust Dial to turn Failsafe on or
o. Press the Adjust Dial to the save setting to the servo. The new
setting will be displayed in the ‘Now Values’. Use the Back button to
exit the menu.
8. Soft Start:
1. EPA Neutral Settings
Press the Adjust Dial to enter the menu. If the Pulse Dial is o center,
the program will ask that the dial be moved so the indicator is at 12
o’clock. Once adjusted, the Neutral Settings screen will appear. Use
the Adjust Dial to elect either to change the Neutral position orto skip
and move on to the endpoints.
To change the Neutral position, highlight NEUTRAL, press the Adjust
Dial to enter edit mode. To make an adjustment, use the Pulse Dial. To
save the setting to the servo, press the Adjust Dial, otherwise, press
the BACK button to exit without making a change.
Note: Please note that changing the Neutral position to an extreme
will affect the throw of the servo’s endpoints. Try to never vary
the position to far from nominal. Also, if the Neutral position is
programed, then the endpoints must be programmed.
The endpoints can be changed without setting the Neutral position. To
do this, highlight ‘Skip to Neutral Set’ and press the Adjust Dial. To set
the Left or Right position of the throw, highlight the direction and press
the Adjust Dial to edit. Once in editing, use the Pulse Dial to make
changes. Press the Adjust Dial to conrm or the BACK button to exit
without saving.
2. Servo Sync
To match two servos together, use the Servo Sync option when
programming Neutral and Endpoints. The rst step is to program and
save the rst servo at the desired positions. Exit the programming
mode and then place the programmed servo into the SYNC slot of
the HFP-30. Place the next servo into the Servo slot and enter the
programming mode. Enter the EPA and Neutral Setting menu and
begin programming the servo. As the servos neutral and endpoints
are adjusted, you will see the servo in the SYNC slot move to its
preprogrammed center and endpoints allowing easy matching of the
new servo and those positions.
5xxx/7xxx Series Program Mode
The Soft Start feature, depending on the setting, allows the servo
to either quickly or slowly move to the received signal when rst
turned on. Once it reaches the correct position, normal operation of
the servo resumes. By default, this feature is enabled on D Series
servos. To enter the menu, use the Adjust Dial to scroll to page 2
of the main menu and press the dial once highlighted. Current Soft
Start settings are list under ‘Now Values’. To change the values, turn
the Adjust Dial to the desired percentage and press the dial to set it.
The new setting will be displayed in the ‘Now Values’. Use the Back
button to exit the menu.
9. Factory Default (Factory Default Set):
Sometimes it is best to restore the servo back to Factory Default
settings. To enter the menu, use the Adjust Dial to scroll to page 2 of
the main menu and press the dial once highlighted. Follow the on-
screen prompts to reset the servo. Once each prompt is completed,
the corresponding box will say ok. After the last one, the servo will
be reset to factory defaults.