
Instruction Manual


Copyright HK Instruments 2022 www.hkinstruments. Installaonversion7.02022
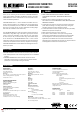
SCHEMATICS
DIMENSIONAL DRAWINGS
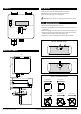
INSTALLATION
STEP 1: MOUNTING THE DEVICE
1)Mountthedeviceinthedesiredlocaon(seestep1).
2)Routethecablesandconnectthewires(seestep2).
3)Thedeviceisnowreadyforconguraon.
WARNING!Applypoweronlyaerthedeviceisproperlywired.
1)Selectthemounnglocaon(onaduct).
2)Usethemounngangeofthedeviceasatemplateandmarkthe
screwholes.
3)Mounttheangeontheductwithscrews(notincluded).(Figure1a)
4)Adjusttheprobetothedesireddepth.Ensurethattheendofthe
probereachesthemiddleoftheduct.(Figure1b)
5)Tightenthescrewontheangetoholdtheprobeinposion.
Figure 1a - Mounng a ange
Tighten the
screw
Figure 1b - Mounng the probe in a ange
Airowdirecon
Airowdirecon
Airowdirecon Airowdirecon
Airowdirecon
Strainrelieffacingdown
Figure 1c - Mounng orientaon
Display connecon
Terminal block
A
B
24 V
GND
Joysck1
Joysck2
Joysck3
Select
Up
Down
Menu buons
119.0
95.5
119.0
45.0
88.5
186.0