MODELS GF35A & GF65A FREE-STANDING GAS FRYERS SERIES 35 Lb. Oif Capacity GFE35A ML-43264 120-Volt Line Control GFO35A ML-43263 Self-Powered Control GFM35A ML-43266 120-Vito Line Control & Melt Cycle 65 Lb. Uil Capacity SAFENESS ML-43268 120-Volt Line Control GFOBSA ML-43267 Self-Powered Control GFME5A ML-43270 120-Colt Line Control & Melt Cycle WORLD HEADQUARTERS TROY. THO 25374 FORM 15552 (Rev.
IMPORTANT FOR YOUR SAFETY THIS MANUAL HAS BEEN PREPARED FOR PERSONNEL AUTHORIZED, QUALIFIED, CERTIFIED OR LICENSED TO INSTALL GAS EQUIPMENT, WHO SHOULD PERFORM THE INITIAL FIELD STARTUP AND ADJUSTMENTS OF THE EQUIPMENT COVERED BY THIS MANUAL. POST IN A PROMINENT LOCATION THE INSTRUCTIONS TO BE FOLLOWED IN THE EVENT THE SMELL OF GAS IS DETECTED. THIS INFORMATION CAN BE OBTAINED FROM THE LOCAL GAS SUPPLIER.
Installation, Operation and Care of Model GF Series Gas Fryers SAVE THESE INSTRUCTIONS GENERAL The GF series gas fever features an accurate thermostat that helps give frying consistency and lengthens shortening Site. The efficient gas burner gives prompt, quiet ignition. It has an easy-to-clean unobstructed interior. Models GFE35A, GFM35A, GABFEST and GFM65A have a 120-volt electric line voltage control. Models GFO35A and HOGBACK have a self-powered control. Models GFM35A and GFMS65A feature a melt cycle.
INSTALLATION CODES AND STANDARDS Hobart fryers should be installed in accordance with: IN THE UNITED STATES 1. State and local codes. 2. National Fuel Gas Code, available from American Gas Association, inc. 1515 Wilson Bird, Arlington, VA 22209, 3. PAN Standard #96. 4. National Electrical Code EXPANSION 70-1987. IN CANADA 1. Logan codes. 2. CSA Standard C22.1 Canadian Electrical Code, Part 1. 3. CAN I-B149.1 Installation for Natural Gas Burning Appliances and Equipment. 4. CAN I-B149.
ELECTRICAL CONNECTIONS WARNING: ELECTRICAL AND GROUNDING CONNECTIONS MUST COMPLY WITH THE APPLICABLE PORTIONS OF THE NATIONAL ELECTRICAL CODE AND/OR OTHER LOCAL ELECTRICAL CODES. WARNING: THE ELECTRICALLY CONTROLLED MODELS (GFE35A, GFM35A, GFE6SA & GFME5A) ARE PROVIDED WITH A THREE-PRONG GROUNDING PLUG. IT 1S IMPERATIVE THAT THE OUTLET TO WHICH THIS PLUG 1S CONNECTED BE PROPERLY GROUNDED. IF THE RECEPTACLE IS NOT THE PROPER GROUNDING TYPE, CONTACT AN ELECTRICIAN.
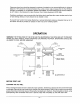
Clearance above fryer should be adequate for products of combustion to be removed efficiently. A minimum distance of 18” should be maintained between fie outlet and lower edge of grease filter for the GFO35A, GFE35A, and GFM35A, For the GFOB5A, SAFENESS and GFMB5A, it is recommended that this minimum distance be 24”. Refer tw the Standard for Vapor Removal From Cooking Equipment (PAN #96).
FILLING THE OIL WELL WITH LIQUID SHORTENING Before pilot light is lit, fill ol well with shortening. The required shortening level is marked with a line on rear of well about 17 below ledge whets foaming area begins. The fryer can then be lit as noted in USING THE FRYER section. FILLING THE OIL WELL WITH SOLID SHORTENING It is highly recommended that a fryer with an automatic melt cycle be used when using solid shortening.
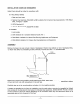
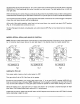
Set thermostat dial to desired temperature. Turn control valve knob counterclockwise so that ON position is opposite INDEX (Fig. 4). Gas flows through the control, manifold, and into burners. The pilot ignites burner on both left and right sides. When set temperature is reached, the gas control shuts off gas flow into manifold/burners and flame is extinguished. It takes about 85 minutes for fryer to reach 350°F From then on, fryer will cycle on and off to maintain set temperature.
Turning the Fryer On CAUTION: Before turning the burners on, the oii well must be filed with shortening. if this is not done, the tank walls can be damaged. War page can cause leaks. Set thermostat dial to desired temperature. Turn control valve knob counterclockwise so that ON position is opposite INDEX (Fig. 7). Turn power switch on front control panel to ON. Gas flows through the control, manifold, and into burners. The pilot ignites burner on both left and right sides.
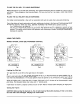
White still holding knob in, light pilot with a lit taper. Hold knob in for 2 minutes to heat thermonuclear to retain pilot flame. Pilot is located below drain valve and ¥2" behind panel. if pilot does not remain lit, make sure MELT-FRY switch is OFF. Depress control knob and turn it to OFF. Wait 5 minutes before attempting to refit pilot. Mating Sofia Shortening Set a block of shortening in the oil well. Set MELT FRY switch in MELT position.
Prepare raw, wet foods by draining and wiping dry to minimize splatter. Keep uniform size of ali food for the same basket, When using baskets, keep food at maximum basket capacity. Lower basket carefully into oil to prevent splattering. For suggested cooking temperatures and times, refer to the cooking guide (Fig. 12). SPECIAL PROCESSING Doughnuts and fritters: Turn only once during frying, Potatoes and onion rings: Shake basket several times in a manner that prevents grease splattering.
COOKING GUIDE Many actors, such as type of food, initial temperature and size, affect cooking time. The following tables are presented as a guide {when using baskets). FRYING GUIDE (ALL MODELS) SUGGESTED COOKING TEMPERATURES AND TIMES TEMP. TIME CAPACITY/LOAD CAPACITY/LOAD SETTING | (IN MIN.) | GFE35A, GFM35A | ZIEGFELD, GFM65A FOOD °F & GFO3BA, & GFOG5A. French-fried potatoes %" strips (raw o done} 350 57 75 Potato chips, thin slices 350 34 25 3 Fish fillets, 5" x 2" 365 34 10.75 13 Shrimp 375 23 6.
MAINTENANCE WARNING: THE FRYING ZONE OF THE FRYER AND THE SHORTENING IN THE FRYER ARE HOT. TO PREVENT BURNS, BE VERY CAREFUL WHEN OPERATING OR DRAINING THE FRYER. SHORTENING SHOULD BE ALLOWED TO COOL BEFORE HANDLING. SHORTENING MAINTENANCE The life of shortening in a fryer depends to a great extent on operator control. The best fryer in the word can ruin shortening without proper maintenance, The important things to remember in controlling shortening life are: Use good quality shortening.
CLEANING WEEKLY OR AS NEEDED After shortening has been removed, flush out scrapings and sediment with a small quantity of warm shortening, and allow well to drain thoroughly. Close drain valve and fill well with a non-corrosive, grease-dissolving commercial cleaner, following the manufacturer's instructions. Set thermostat at 300°F and boil solution for 15 to 20 minutes. Drain solution from well.