O P E R A T I O N HBA RACK OVEN WITH ELECTRONIC OVEN CONTROL MODELS HBA1G HBA2G GAS GAS HBA1E HBA2E ELECTRIC ELECTRIC 701 S. RIDGE AVENUE TROY, OHIO 45374-0001 937 332-3000 www.hobartcorp.com FORM 34757 Rev. A (Nov.
IMPORTANT FOR YOUR SAFETY — GAS OVENS — POST IN A PROMINENT LOCATION THE INSTRUCTIONS TO BE FOLLOWED IN THE EVENT THE SMELL OF GAS IS DETECTED. THIS INFORMATION CAN BE OBTAINED FROM THE LOCAL GAS SUPPLIER. IMPORTANT IN THE EVENT A GAS ODOR IS DETECTED, SHUT DOWN UNITS AT MAIN SHUTOFF VALVE AND CONTACT THE LOCAL GAS COMPANY OR GAS SUPPLIER FOR SERVICE. — ALL OVENS — FOR YOUR SAFETY DO NOT STORE OR USE GASOLINE OR OTHER FLAMMABLE VAPORS OR LIQUIDS IN THE VICINITY OF THIS OR ANY OTHER APPLIANCE.
MODEL HBA RACK OVEN –3–
TABLE OF CONTENTS GENERAL .............................................................................................................................................5 INSTALLATION .................................................................................................................................... 5 OPERATION ......................................................................................................................................... 6 HBA Standard Controls .......................
OPERATION AND CARE OF MODEL HBA GAS RACK OVEN SAVE THESE INSTRUCTIONS GENERAL The Hobart HBA Rack Oven accommodates a roll-in rack. It is equipped with an electronic oven control for baking and/or steaming applications. A mechanism in the oven ceiling rotates the rack during baking. Model HBA1G is rated at 180,000 Btu/hr, natural or propane gas. Model HBA2G is rated at 300,000 Btu/hr or 350,000 Btu/hr, natural or propane gas. Model HBA1E is rated at 34.2 kW. Model HBA2E is rated at 51.3 kW.
OPERATION HBA STANDARD CONTROLS HBA CONTROLS - STANDARD –6–
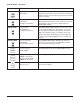
Control Guide - Standard Button POWER Action Display Press to turn the oven ON or OFF. Control panel displays are lit when the oven is on. Oven defaults to Program 0. If oven is turned off and back on within 2 minutes, the oven will come up in the last mode and oven setting. SET TEMP Press to set the desired temperature (5-degree increments). The SET TEMP window displays the set temperature. The ON light is lit while the oven is heating.
Oven Preheat For best results, the oven must be preheated to bake temperature before baking begins. 1. The door must be closed for oven to heat. The rack carrier will lift and rotate only during timed bake. NOTE: The rack carrier will be in the unload position from the last bake. 2. Press the POWER ON OFF button to turn the oven on. 3. Press the UP or DOWN arrows next to the SET TEMP window to enter the desired baking temperature. Actual temperature of the oven will appear in the OVEN TEMP window. 4.
Loading Procedure 1. The rack carrier is equipped with a stop on both ends. For B lifts, ensure stop flap is in the up position to load the rack on the rack carrier. For C lifts, push rack stop to the left after rack is loaded. 2. Roll the rack into the oven so the end brackets channel onto the rack carrier. 3. Close the loading door. The rack carrier will lift and rotate only during timed bake. Unloading Procedure WARNING: THE OVEN AND ITS PARTS ARE HOT.
HBA ADVANCED CONTROLS HBA CONTROLS - ADVANCED – 10 –
Control Guide - Advanced Button POWER Action Display Press to turn the oven ON or OFF. Control panel displays are lit when the oven is on. Oven defaults to Program 0. If oven is turned off and back on within 2 minutes, the oven will come up in the last mode and oven setting. AUTO ON/OFF TIMER Press to enter current time or time for oven to Automatically turn on or off, when corresponding AUTO ON TIME or AUTO OFF TIME button is pressed.
Control Guide - Advanced (cont) Button PROGRAM STEP Action Display Press to stop the BAKE TIMER or silence the beeper after the BAKE TIMER has timed out. The ON light is off when the BAKE TIMER is inactive. Press to select bake program. The PROGRAM window displays the number of the current program. Press to select one of four baking steps. The corresponding indicator light will be lit (1 to 4), depending on which step is selected. Press to open or close the vent.
Oven Preheat For best results, the oven must be preheated to bake temperature before baking begins. 1. The door must be closed for oven to heat. The rack carrier will lift and rotate only during timed bake. NOTE: The rack carrier will be in the unload position from the last bake. 2. Press the POWER ON OFF button to turn the oven on. 3. Press the UP or DOWN arrows next to the SET TEMP window to enter the desired baking temperature. Actual temperature of the oven will appear in the OVEN TEMP window. 4.
Loading Procedure 1. The rack carrier is equipped with a stop on both ends. For B lifts, ensure stop flap is in the up position to load the rack on the rack carrier. For C lifts, push rack stop to the left after rack is loaded. 2. Roll the rack into the oven so the end brackets channel onto the rack carrier. 3. Close the loading door. The rack carrier will lift and rotate only during timed bake. Unloading Procedure WARNING: THE OVEN AND ITS PARTS ARE HOT.
• The oven monitors the heating system by comparing the current oven temperature to the set temperature. If a problem arises in the heating system or there is a heating system failure, both temperature displays will flash. If the problem continues, contact your authorized Hobart Bakery Systems service agency. • To cool the oven more than 20 degrees below its current temperature; change SET TEMP to the desired new temperature, open the oven door, and press VENT.
PROGRAMMING THE OVEN Single Step Programming The program menu stores up to 99 programs that can be recalled by number when needed. A program is a set of baking instructions (temperature, bake, steam and airflow delay settings) that the operator defines for any baking operation. 1. With the oven in the OFF mode, press and hold the UP arrow in the STEPS section. While pressing and holding the UP arrow, press the POWER ON OFF button for 3 seconds. When the beep sounds, the oven is in program mode. 2.
Multi-Step Programming Additional programs or steps can be entered within the original program number. Up to four individual steps can be added by the operator, each with different bake settings. For example, Program 1 has temperature, bake, steam and delay time settings set by the operator. This is known as Step 1. After the timer times out in Step 1, the oven automatically starts the programmed bake settings in Step 2. The system continues with each step until all steps have been timed out. 1.
Changing the Programs 1. With the oven in the OFF mode, press and hold the UP arrow in the STEPS section. While pressing and holding the UP arrow, press the POWER ON button for 3 seconds. When the beep sounds, the oven is in program mode. 2. Press the PROGRAM UP or DOWN arrows until the program number that is desired is displayed. 3. Enter the new Bake, Steam and Delay Airflow settings: • Press the UP or DOWN arrows next to BAKE TIMER to enter the desired time.
Using the Programs 1. Press the PROGRAM UP or DOWN arrows to select the desired program number (1-99). The TEMP, BAKE, STEAM and AIRFLOW DELAY settings are displayed. 2. Confirm that the oven is at the set baking temperature. 3. Slowly open the doors. Wait for the rack lifting device to come to a stop. 4. Roll the rack into the oven so the end brackets channel onto the rack lifting carrier. (See Loading Procedure.) 5. Close and latch the door. 6. Press START.
CUSTOMIZED OPERATION The HBA oven standard and advanced controls have the capability of being customized to fit your own personal needs using the setup mode. Before entering the setup mode, read all the instructions to make sure you are completely clear on what to do. If you need assistance, please call your authorized Hobart Bakery Systems service office. Entering Setup Mode With the oven in the OFF mode, press and hold the START button.
Setup Guide Setup Number Setup Item Display P1 Maximum Temperature Setpoint This is the maximum temperature at which the oven can be set. Range is 50°F to 525°F (10°C to 274°C). P2 Preheat Temperature This is the default temperature setpoint when the oven is first turned on (Program 0). The preheat temperature cannot be set higher than the value in P1. Range is 50°F to 525°F (10°C to 274°C). P3 Minimum Temperature Setpoint This is the minimum temperature at which the oven can be set.
Setup Guide (cont) Setup Number Setup Item Display P14* Steam Timer Mode The STEAM TIMER can be set up to display in seconds or operate in food service mode. Select 0 for seconds or 1 for food service mode. P15* Interior Light Brightness This value is the brightness of the interior lights. The higher the number, the brighter the lights. Range is 50 to 100. P16* Clock Operation This selects either 12 hours (AM/PM) or 24 hours real time display.
CLEANING WARNING: DISCONNECT THE ELECTRICAL POWER TO THE MACHINE AND FOLLOW LOCKOUT / TAGOUT PROCEDURES. WARNING: THE RACK OVEN AND ITS PARTS ARE HOT. USE CARE WHEN OPERATING, SERVICING OR CLEANING THE RACK OVEN. WARNING: HOT AIR AND STEAM ARE RELEASED FROM THE OVEN INTERIOR WHEN THE LOADING DOOR IS OPENED. TO AVOID BURNS, OPEN THE DOOR SLOWLY AND KEEP CLEAR OF THE OPENING. • Allow the oven to cool. • Clean the outside of the oven daily with a clean, damp cloth.
MAINTENANCE WARNING: THE RACK OVEN AND ITS PARTS ARE HOT. USE CARE WHEN OPERATING, SERVICING OR CLEANING THE OVEN. WARNING: HOT AIR AND STEAM ARE RELEASED FROM THE OVEN INTERIOR WHEN THE LOADING DOOR IS OPENED. TO AVOID BURNS, OPEN THE DOOR SLOWLY AND KEEP CLEAR OF THE OPENING. WARNING: DISCONNECT THE ELECTRICAL POWER TO THE MACHINE AND FOLLOW LOCKOUT / TAGOUT PROCEDURES. On gas ovens, annually check the flue to be sure it is free of obstructions. GENERAL As Needed • Inspect the area around the oven.
TROUBLESHOOTING BURNERS WILL NOT LIGHT ON GAS OVEN 1. Check that door is shut. 2. Press the OFF button to turn the oven off and wait 5 minutes. 3. Make sure the gas shutoff valve is in the ON position. 4. Press the ON button to turn the oven back on. If the above suggestions do not remedy the problem, contact a Hobart Bakery Systems service office.
Clean and Vacuum Components and Control/Burner Compartment Area (Gas Only) 1. Clean the control/burner compartment (Fig. 2) area of dust and/or lint accumulation. 2. Vacuum the control/burner compartment floor of dust and/or lint accumulation. 3. Gain access to the top of oven and clean dust that may have accumulated on top of circulation blower motor (Fig. 3) and motor cooling fan. Fig. 3 Fig. 2 Rack Lift and Rotation Assemblies 1. Check rack lift assembly for proper operation. A. Open door.
Inspect Door Components 1. Check loading door latch. A. Check door gasket for good condition. If door gasket needs replacement, contact your local Hobart office for service. B. Check loading door latch. Latch must fully extend (Fig. 5) when door is closed and contacting door gasket. Leave about 1/8" gap for heat expansion. C. Adjust strike in or out as required by loosening one screw (Fig. 6) on each side of strike. D. Tighten screws. Fig. 6 Fig. 5 2. Check door sweep. A.
Inspect Air Louvers 1. Check air louvers (shutters) (Fig. 9) inside oven and tighten any loose screws. 2. Check oven interior, tighten or replace loose or missing panel screws. Also check floor anchors. Inspect Cavity Vent 1. Check cavity vent for proper operation. A. Push vent (Fig. 10) button on control panel to open vent and then push again to close vent. B. Visually check that vent opens (Fig. 11) and closes (Fig. 12) when button is pressed. Fig. 10 Fig. 9 Fig. 11 Fig.
Verify Ignition Module Safety Lockout Functions (Gas Only) 1. Verify ignition module safety lockout functions. A. Turn main gas supply off to the oven. B. Open control panel door to gain access to burner compartment area. C. Turn the oven on. D. Set the oven to call for heat, make sure convection fan is running. E. Observe LED light through hole in control box cover (Fig.13), after trying to light the burner three times the module should lockout. (See chart below.) F.
3. Verify draft inducer pressure switch (Fig. 15) operation. A. Set oven control to call for heat make sure convection fan is running. B. Disconnect tubing from draft inducer pressure switch (Fig. 15), burner flame should go out. C. Reconnect tubing and burner should establish a flame. If not, contact your local Hobart Bakery Systems service office. Fig. 15 Verify Operation of Steam 1. Check steam system for proper operation. A. Turn the water supply on. B. Turn oven on and set to normal bake temperature.
MODEL/SERIAL NUMBERS COPY AS NEEDED RECOMMENDED OWNER PREVENTIVE MAINTENANCE CHECKLIST BAKERY RACK OVENS - GAS CHECK FOR PROPER OPERATION OR CLEAN.
NOTES FORM 34757 Rev. A (Nov. 2003) – 32 – PRINTED IN U.S.A.